
HP ProLiant BL e-Class System Setup and Installation Guide


Installing and Cabling the System
IMPORTANT: Step 5 applies only when you wish to upgrade DIMMs.
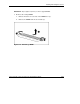
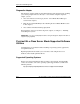
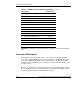
5. Remove the existing DIMM:
a. Release the latches on each side of the DIMM slot 1 (1).
b. Remove the DIMM from the server blade (2).
Figure 3-26: Removing a DIMM
HP ProLiant BL e-Class System Setup and Installation Guide 3-33
HP CONFIDENTIAL
Writer: Karen Hale File Name: d-ch3 Installing and Cabling the System.doc
Codename: MacDuff Part Number: 249068-003 Last Saved On: 5/21/03 3:04 PM