
ProLiant BL e-Class C-GbE Interconnect Switch Web-based Interface Reference Guide

Configuring the Switch Modules using the Web-based Interface
Configuring SNMP Manager
Simple Network Management Protocol (SNMP) is an Open Systems Interconnection (OSI)
Layer 7 (the application layer) protocol for remotely monitoring and configuring network
devices. SNMP enables network management stations to read and modify the settings of
gateways, routers, switches, and other network devices. SNMP can be used to perform many
of the same functions as a directly connected console, or can be used within an integrated
network management software package such as Insight Manager 7.
SNMP performs the following functions:
•
•
•
Sends and receives SNMP packets through the IP protocol
Collects information about the status and current configuration of network devices
Modifies the configuration of network devices
The switch module has software, called an agent, that processes SNMP requests. The user
program that makes the requests and collects the responses runs on the management station (a
designated computer on the network). The SNMP agent and the user program both use the
UDP/IP protocol to exchange packets.
The authentication protocol ensures that both the switch SNMP agent and the remote user
SNMP application program discard packets from unauthorized users. SNMP (version 1)
implements a form of security by requiring that each request include a “community string.” A
community string is an arbitrary string of characters used as a “password” to control access to
the switch module.
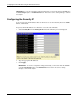
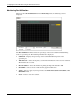
To configure SNMP Manager parameters:
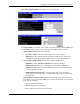
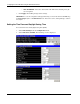
1. Select SNMP Manager from the Management menu. The following screen is displayed.
2. In the Community String field, type a user-defined SNMP community string.
3. In the Access Right field, select the access right of Read-Only or Read-Write.
4. In the Status field, set the status of the current community string to Valid or Invalid.
5. Click Apply after making changes to the settings.
IMPORTANT: To save the configuration settings permanently, you must enter them into NVRAM
using the Save Changes option on the Maintenance menu. Refer to the section, “Saving
Changes,” earlier in this chapter.
HP ProLiant BL e-Class C-GbE Interconnect Switch Web-based Interface Reference Guide 2-43