
HP Switch Services Modules - HP SECBLADEII-CMW520-F3171P05 Release Notes


HP SECBLADEII-CMW520-F3171P05
Release Notes
Hewlett-Packard Development Company, L.P.
24
NOTE:
A boot file is an application file used to boot the SecBladeII card.
When there are multiple
application files on the CF card, you can use the boot-loader command to specify an
application file for the next boot. The main application file is used to boot the SecBladeII
card. The backup application file is used to boot the SecBladeII card when the main
application file is unavailable.
Specifying a configuration file
Use the startup saved-configuration cfgfile command in user view to specify a
configuration file for the next boot and then restart the device. In the command, cfgfile is
the name of the configuration file.
Application upgrade on the web interface
SecBladeII cards support Web-based network management. The network administrator
can conveniently, visually manage, maintain, and upgrade the cards on the Web
interface. Default Web login information is set for SecBladeII cards before delivery and you
can use the default information to log in to the Web interface.
Preparations for software upgrade
Before software upgrade on the Web interface, connect a terminal (usually a PC) to an
interface (for example, GigabitEthernet 0/1) on the SecBladeII card and configure a route
between them as follows:
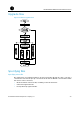
Step1 Install the SecBlade card in the A5800/A7500/A9500/A12500/A6600/A8800 series in the way
you install an LPU and ensure that the switch or route works normally.
Step2 Connect a PC to interface GigabitEthernet 0/1 of the SecBladeII card with a crossover
Ethernet cable.
Step3 Configure an IP address for the PC and ensure that the PC and the interface are on the
same network segment.
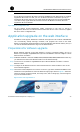
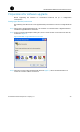
Step4 Launch the Internet Explorer 6.0 or above on the PC, type the IP address 192.168.0.1 in the
address bar and press Enter to enter the Web user login page shown in Figure 2 . Enter the
username admin, password admin, and verify code, select a language, and click login to
log in to the Web interface.
Figure 2 Web user login interface