
Installation and Getting Started Guide for 720wl/740wl/760wl 2004-03


Hardware Installation
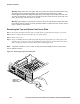
Inserting an Option Card into a 700wl Series Unit
Step 1. Remove the option card from its protective packaging, taking care not to damage it.
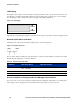
Step 2. Insert the card into the chassis as shown (Figure 2-14).
Figure 2-14. Inserting an option card into the 700wl Series chassis
3
4
1
2
O
N
H
D
D
SC
RO
LL
S
E
L
E
CT
N
E
T
W
O
R
K
U
P
L
IN
K
RE
S
E
RV
ED
J8153A
hp
proc
urv
e
a
ccess cont
roller 720wl
Option card
Retaining
Screw Cover
Riser Board
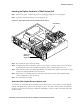
Step 3.
Be sure that the option card seats firmly.
Step 4. Using the screw removed with the option card cover plate, secure the option card to the chassis
by inserting the screw and screwdriver through the option card retaining screw cover.
Step 5. Make sure the riser board is still perpendicular to the motherboard, and the option card is seated
properly in and perpendicular to the riser board.
Step 6. Replace the cover, making sure the cover clips secure the riser board, and reinstall the eight
screws holding the cover to the chassis.
Step 7. Reconnect the power cable.
Short Haul Fiber Gigabit Ethernet Option Card
To connect an SC cable to the Short Haul Fiber option card, use the LC-to-SC media converter shipped
with the card. Make sure you remove the protective covers on the cable connectors before attempting to
insert the connector into the card port, and before attempting to connect a cable to the female side of the
media converter.
HP ProCurve Secure Access 700wl Series Installation and Getting Started Guide 2-13