HP Photosmart D110 series Windows Help
HP Photosmart D110 series
1 HP Photosmart D110 series Help............................................................................................3 2 Get to know the HP Photosmart Printer parts................................................................................................................................5 Control panel features................................................................................................................6 TouchSmart Web .........................................................
Contents 2
HP Photosmart D110 series Help For information about the HP Photosmart, see: • • • • • • • “How do I?” on page 7 “Get to know the HP Photosmart” on page 5 “Print” on page 9 “Copy and scan” on page 13 “Work with cartridges” on page 19 “Connectivity” on page 25 “Technical information” on page 37 HP Photosmart D110 series Help 1 HP Photosmart D110 series Help 3
Chapter 1 HP Photosmart D110 series Help 4 HP Photosmart D110 series Help
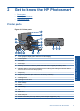
2 Get to know the HP Photosmart • • • Printer parts Control panel features TouchSmart Web Printer parts 1 Color graphics display (also referred to as the display) 2 Control panel 3 On button 4 Photo light 5 Memory card slots for Memory Stick DUO and Secure Digital (SD-MMC) cards 6 Wireless button: Launches the wireless menu. Pushing and holding the wireless button launches Wi-Fi Protected Setup (WPS).
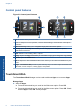
Chapter 2 Control panel features Figure 2-2 Control panel features 2. 2. Get to know the HP Photosmart 1 Back: Returns to the previous screen. 2 Cancel: Stops the current operation, restores default settings, and clears the current photo selection. 3 Directional keys: Allow you to navigate through photos and menu options. 4 Setup: Opens the Setup menu where you can change product settings and perform maintenance functions. 5 OK: Selects a menu setting, value, or photo.
How do I? This section contains links to commonly performed tasks, such as printing photos, scanning, and making copies.
Chapter 3 How do I? 8 How do I?
4 Print “Print documents” on page 9 Print “Print photos” on page 10 “Print envelopes” on page 11 Related topics • “Load media” on page 31 • “Tips for print success” on page 12 Print documents Most print settings are automatically handled by the software application. You need to change the settings manually only when you change print quality, print on specific types of paper or transparency film, or use special features. To print from a software application 1.
Chapter 4 6. Click OK to close the Properties dialog box. 7. Click Print or OK to begin printing. Related topics • “Load media” on page 31 • “Tips for print success” on page 12 Print photos Print “Print photos saved on your computer” on page 10 Print photos saved on your computer To print a photo on photo paper 1. Remove all paper from the paper tray. 2. Place the photo paper print side down on the right side of the paper tray. 3. 4. 5. 6.
11. In the Basic Options area, select a high print quality, such as Best, from the Print Quality drop-down list. 12. In the HP Real Life Technologies area, click the Photo fix drop-down list and select from the following options: • Off: applies no HP Real Life Technologies to the image. • Basic: enhances low-resolution images; moderately adjusts image sharpness. 13. Click OK to return to the Properties dialog box. 14. Click OK, and then click Print or OK in the Print dialog box.
Chapter 4 Tips for print success Use the following tips to print successfully. Print Print tips • Use genuine HP cartridges. Genuine HP cartridges are designed for and tested with HP printers to help you produce great results, time after time. • Make sure the cartridges have sufficient ink. To check the estimated ink levels, follow the instruction in the Tools menu on the display. Alternatively, you can check the ink levels in Printer Toolbox from the software. • Load a stack of paper, not just one page.
5 Copy and scan • • • Copy text or mixed documents Scan to a computer Tips for copy and scan success Copy text or mixed documents Copy text or mixed documents 1. Do one of the following: Copy and scan Make a black and white copy a. Load paper. Load full-size paper in paper tray. b. Load original. Lift lid on product. TIP: To make copies of thick originals, such as books, you can remove the lid. Load original print side down on right front corner of glass.
Chapter 5 Copy and scan Close lid. c. Select Copy. On the Home screen, highlight Copy, and then press OK. Highlight Black Copy, and then press OK. Press the Settings button to change the copy size. Press Directional keys to change the number of copies. d. Start copy. Press OK. Make a color copy a. Load paper. Load full-size paper in paper tray. b. Load original. Lift lid on product.
TIP: To make copies of thick originals, such as books, you can remove the lid. Load original print side down on right front corner of glass. Copy and scan Close lid. c. Select Copy. On the Home screen, highlight Copy, and then press OK. Highlight Color Copy, and then press OK. Press the Settings button to change the copy size. Press Directional keys to change the number of copies. d. Start copy. Press OK. 2. View the animation for this topic.
Chapter 5 b. Load original print side down on right front corner of glass. Copy and scan c. Close lid. 2. Start scan. a. On the Home screen, highlight Scan, and then press OK. b. Highlight Scan to PC, and then press OK. If product is network-connected, a list of available computers appears. Select computer to which you want to transfer to start the scan. 3. View the animation for this topic.
• • To avoid incorrect or missing scanned text, make sure the brightness is set appropriately in the software. If the document to be scanned has a complex layout, select framed text as the scan document setting in the software. With this setting, the text layout and formatting are retained. If the scanned image is incorrectly cropped, turn off the autocropping feature in the software and crop the scanned image manually.
Chapter 5 Copy and scan 18 Copy and scan
6 Work with cartridges • • • • • • Replace the cartridges Cartridge warranty information Order ink supplies Ink-backup mode Check the estimated ink levels Tips for working with print cartridges Replace the cartridges To replace the cartridges 1. Check that power is on. 2. Remove cartridge. a. Open cartridge access door. Work with cartridges Wait for print carriage to move to center of the product. b. Lightly press down on the cartridge to release it, then remove it from slot.
Chapter 6 1 Cartridge slot for tri-color cartridge 2 Cartridge slot for black cartridge 3. Insert new cartridge. a. Remove cartridge from packaging. b. Remove plastic tape by using the pink pull tab. Work with cartridges c. Line up colored shaped icons, then slide cartridge into slot until it clicks into place.
d. Close cartridge door. 4. Align cartridges. a. When prompted, press OK to print a cartridge alignment page. b. Load page print side down on right front corner of glass, and then press OK to scan page. c. Remove alignment page and recycle or discard it. 5. View the animation for this topic. Related topics • “Order ink supplies” on page 21 • “Ink-backup mode” on page 22 Cartridge warranty information The HP cartridge warranty is applicable when the product is used in its designated HP printing device.
Chapter 6 Cartridge information and links to online shopping also appear on ink alert messages. In addition, you can find cartridge information and order online by visiting www.hp.com/buy/ supplies. NOTE: Ordering cartridges online is not supported in all countries/regions. If it is not supported in your country/region, contact a local HP reseller for information about purchasing cartridges. Ink-backup mode Use the ink-backup mode to operate the HP Photosmart with only one print cartridge.
NOTE: If you have installed a refilled or remanufactured cartridge, or a cartridge that has been used in another printer, the ink level indicator might be inaccurate or unavailable. NOTE: Ink level warnings and indicators provide estimates for planning purposes only. When you receive a low-ink warning message, consider having a replacement cartridge available to avoid possible printing delays. You do not have to replace the cartridges until the print quality is unacceptable.
Chapter 6 • • • Consider getting replacement print cartridges when you receive a low-ink warning message. This avoids possible printing delays. You do not need to replace the print cartridges until print quality becomes unacceptable. Make sure the printhead is clean. Follow the instructions from Tools menu on the printer display. Alternatively, look in Printer Toolbox in the software. After you insert new print cartridges, align the printer for best print quality.
7 Connectivity Add the HP Photosmart to a network • • • • WiFi Protected Setup (WPS) Wireless with a router (infrastructure network) Wireless without a router (ad hoc connection) Install the software for a network connection WiFi Protected Setup (WPS) To connect the HP Photosmart to a wireless network using WiFi Protected Setup (WPS), you will need the following: A wireless 802.11 network that includes a WPS-enabled wireless router or access point.
Chapter 7 NOTE: The product begins a timer for approximately two minutes in which the PIN needs to be entered on the networking device. 2. View the animation for this topic. Related topics • “Install the software for a network connection” on page 29 • “Tips for setting up and using a networked printer” on page 30 Wireless with a router (infrastructure network) To connect the HP Photosmart to an integrated wireless WLAN 802.11 network, you will need the following: A wireless 802.
There are two methods you can use to connect the HP Photosmart to your computer using an ad hoc wireless network connection. Once connected, you can install the HP Photosmart software. Turn on the wireless radio for the HP Photosmart and the wireless radio on your computer. On your computer, connect to the network name (SSID) hp (product model).(6-digit unique identifier), which is the default ad hoc network created by the HP Photosmart. The 6-digit identifier is unique to each printer.
Chapter 7 1. In the Control Panel, double-click Network and Internet, then Network and Sharing Center.. 2. In the Network and Sharing Center (under Tasks on the left), select Set up a connection or network. 3. Choose the connection option Set up a wireless ad hoc (computer-to-computer) network, then click Next. Read the description and warnings about ad hoc networks, then click Next>. 4. Enter details, including Network name (the SSID for your ad hoc connection), Security type, and SecurityPassphrase.
f. In the Confirm network key box, type the same WEP key you typed in the previous step. NOTE: You must remember the exact uppercase (capital) and lowercase (small) letters. If you enter your WEP key incorrectly on the product, the wireless connection will fail. g. Write down the WEP key exactly as you typed it, including uppercase and lowercase letters. h. Select the check box for This is a computer-to-computer (ad hoc) network; wireless access points are not used. i.
Chapter 7 6. Follow the prompts to install the software. When you have finished installing the software, the product is ready for use. 7. To test your network connection, go to your computer and print a self-test report to the product. Tips for setting up and using a networked printer Use the following tips to set up and use a networked printer: • • • • • • • • When setting up the wireless networked printer, make sure your wireless router or access point is powered on.
8 Paper basics Load media Paper basics 1. Do one of the following: Load small-size paper a. Lower paper tray. Slide paper-width guide outwards. b. Load paper. Insert stack of photo paper into paper tray with short edge forward and print side down. Slide stack of paper forward until it stops. NOTE: If the photo paper you are using has perforated tabs, load photo paper so that tabs are closest to you. Slide paper-width guide inward until it stops at edge of paper.
Chapter 8 Paper basics Load full-size paper a. Lower paper tray. Slide paper-width guide outwards. b. Load paper. Insert stack of paper into paper tray with short edge forward and print side down. Slide stack of paper forward until it stops. Slide paper-width guide inward until it stops at edge of paper.
Paper basics 2. View the animation for this topic.
Chapter 8 Paper basics 34 Paper basics
9 HP support • • • • Phone support period Placing a call Additional warranty options Clear the paper jam from the rear access door Phone support period One year of phone support is available in North America, Asia Pacific, and Latin America (including Mexico). To determine the duration of phone support in Europe, the Middle East, and Africa, go to HP.com/support. Standard phone company charges apply.
Chapter 9 3. Remove jammed paper. 4. Replace rear door. 5. Turn on product. 6. Try printing again.
10 Technical information The technical specifications and international regulatory information for the HP Photosmart are provided in this section. For additional specifications, see the printed documentation that came with the HP Photosmart.
Chapter 10 (continued) Type Paper weight Paper tray* Legal paper 20 to 24 lb. (75 to 90 gsm) Up to 80 (20 lb. paper) Index cards 110 lb. index max (200 gsm) Up to 30 Hagaki cards 110 lb. index max (200 gsm) Up to 40 Envelopes 20 to 24 lb. (75 to 90 gsm) Up to 10 5 x 7 inch (13 x 18 cm) Photo paper 145 lb. Up to 30 (236 gsm) 4 x 6 inch (10 x 15 cm) Photo paper 145 lb. Up to 30 (236 gsm) 8.5 x 11 inch (216 x 279 mm) Photo paper * 145 lb. Up to 30 (236 gsm) Maximum capacity.
For more information, visit HP’s Commitment to the Environment Web site at: www.hp.com/hpinfo/globalcitizenship/environment/index.
Chapter 10 Additional ENERGY STAR qualified imaging product model information is listed at: www.hp.com/ go/energystar HP inkjet supplies recycling program HP is committed to protecting the environment. The HP Inkjet Supplies Recycling Program is available in many countries/regions, and lets you recycle used print cartridges and ink cartridges free of charge. For more information, go to the following Web site: www.hp.
Česky Likvidace vysloužilého zařízení uživateli v domácnosti v zemích EU Tato značka na produktu nebo na jeho obalu označuje, že tento produkt nesmí být likvidován prostým vyhozením do běžného domovního odpadu. Odpovídáte za to, že vysloužilé zařízení bude předáno k likvidaci do stanovených sběrných míst určených k recyklaci vysloužilých elektrických a elektronických zařízení.
Chapter 10 Regulatory notices The HP Photosmart meets product requirements from regulatory agencies in your country/region.
VCCI (Class B) compliance statement for users in Japan 䈖䈱ⵝ⟎䈲䇮䉪䊤䉴Bᖱႎᛛⴚⵝ⟎䈪䈜䇯䈖䈱ⵝ⟎䈲䇮ኅᐸⅣႺ䈪↪䈜䉎䈖䈫䉕⋡⊛䈫䈚䈩 䈇䉁䈜䈏䇮䈖䈱ⵝ⟎䈏䊤䉳䉥䉇䊁䊧䊎䉳䊢䊮ฃାᯏ䈮ㄭធ䈚䈩↪䈘䉏䉎䈫䇮ฃା㓚ኂ䉕ᒁ䈐 䈖䈜䈖䈫䈏䈅䉍䉁䈜䇯ขᛒ⺑ᦠ䈮ᓥ䈦䈩ᱜ䈚䈇ข䉍ᛒ䈇䉕䈚䈩ਅ䈘䈇䇯 VCCI-B Notice to users in Japan about the power cord Notice to users in Korea 넩 韥韥鱉 閵뇊끞 B鞾 냱ꈑ 놹녅볁놶뼞麦ꈒ냹 뼑 韥韥ꈑ 늱 ꈑ 閵뇊꾅 ꩡ끞뼍鱉 阸냹 ꑞ놶냱ꈑ 뼍ꐥ ꑝ麕 덵꾢꾅 ꩡ 끞뼕 ꯍ 넽걪鱽鲙 Technical information B 鞾 韥韥 閵뇊끞 ꗞꭖ뭪겕韥韥 Regulatory notices 43
Chapter 10 HP Photosmart D110 series declaration of conformity DECLARATION OF CONFORMITY according to ISO/IEC 17050-1 and EN 17050-1 Supplier's Name: Supplier's Address: declares, that the product Product Name and Model: Regulatory Model Number: 1) Radio Module: Power Adapter: Product Options: DoC #: SNPRH-0901 Rev A Hewlett-Packard Company 20, Jia Feng Road Waigaoqiao Free Trade Zone Pudong, Shanghai ˈ PRC 200131 HP Photosmart D110 series SNPRH-0901 SDGOB-0892 0957-2269 All conforms to the following P
Regulatory wireless statements This section contains the following regulatory information pertaining to wireless products: • Exposure to radio frequency radiation • Notice to users in Brazil • Notice to users in Canada • Notice to users in Taiwan • European Union regulatory notice Exposure to radio frequency radiation Exposure to radio frequency radiation Caution The radiated output power of this device is far below the FCC radio frequency exposure limits.
Chapter 10 Notice to users in Taiwan Technical information 46 Technical information
European Union regulatory notice European Union Regulatory Notice Products bearing the CE marking comply with the following EU Directives: • • Low Voltage Directive 2006/95/EC EMC Directive 2004/108/EC CE compliance of this product is valid only if powered with the correct CE-marked AC adapter provided by HP.
Chapter 10 Technical information 48 Technical information
Index Symbols/Numerics P 10 x 15 cm photo paper specifications 37 paper specifications 37 phone support period period for support 35 photo paper specifications 37 print specifications 38 printer found screen, Windows 29 printing with one ink cartridge 22 buttons, control panel 6 C control panel buttons 6 features 6 copy specifications 38 customer support warranty 35 E encryption WEP key 28 envelopes specifications 37 environment Environmental product stewardship program 38 environmental specifications