HP Pay per use Utility Meter II Software Software Version: 9.
Installation and Configuration Guide Legal Notices Warranty The only warranties for HP products and services are set forth in the express warranty statements accompanying such products and services. Nothing herein should be construed as constituting an additional warranty. HP shall not be liable for technical or editorial errors or omissions contained herein. The information contained herein is subject to change without notice. Restricted Rights Legend Confidential computer software.
Contents Installation and Configuration Guide 1 Contents 3 About This Document 6 Intended Audience 6 Document Revision History 6 Document Organization 6 Related Documents 6 Introduction 7 Overview 7 What is New for Version 9.6 9 What Has Been Fixed in Version 9.
Installation and Configuration Guide Contents Installing Using a CD 16 Installing Using Integrated Lights-Out 17 Configure the Utility Meter Parameters 18 Configuring the Utility Meter Parameters from the Command Line 19 Configuring the Utility Meter Parameters from the GUI 20 URS EVA Only – Install the CV EVA SSSU Software 23 URS XP Only – Install the CVAE CLI Software 23 Avoiding CVAE Device Manager Refresh Conflicts Configuring Devices 25 Add Devices 25 Adding a PPU WBEM Partition/Ser
Installation and Configuration Guide Contents Modifying a 3PAR Storage Array 37 Modify a 3PAR Storage Array from the GUI 37 Modify a 3PAR Storage Array from the Command Line 38 Verify Connectivity 38 Testing Connectivity from a Device to the Utility Meter 38 Running the End-to-End Test 39 Generating a Usage Report 39 Checking the Web Portal for Data Arrival 40 Delete Devices 42 Deleting Devices from the GUI 42 Deleting Devices from the Command Line 43 Enable PPU WBEM Authentication to
Installation and Configuration Guide About This Document About This Document Intended Audience This document provides instructions for installing, configuring, and verifying the operation of version 9.6 of the HP Pay per use Utility Meter II software (HP product T2258AA) on supported HP servers.
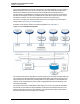
Chapter 1 Introduction Overview Pay per use (PPU) and Utility Ready Storage (URS) are part of HP's Utility Pricing Solutions (UPS) program. In this program, customers are charged according to usage of the PPU resources (servers) and URS resources (disk arrays) under a UPS contract. For more information on this program, see the HP Utility Pricing Solutions web page: http://www.hp.com/go/utility. The usage data for PPU and URS is collected by the Utility Meter software, which runs on the Utility Meter server.
Installation and Configuration Guide Chapter 1: Introduction The HP Utility Billing Engine processes usage data from the Utility Database once per month and billing information is sent to the customer. For PPU resources, the monthly bill contains a fixed amount for the hardware, software and services and a variable amount that represents the processor usage. The variable amount is based on the usage of the UPS resources (core usage). For URS the monthly bill contains only a variable amount.
Installation and Configuration Guide Chapter 1: Introduction What is New for Version 9.6 Version 9.6 of the Utility Meter software includes the following: l Updates to the Utility Meter GUI. What Has Been Fixed in Version 9.6 Version 9.6 of the Utility Meter software includes the following fixes: l QC 3138- Test vpar6.1 migration between multiple VSP and missing data, test adding new vpar6.
Installation and Configuration Guide Chapter 1: Introduction l HP Integrity Servers l HP-UX Virtual Partitions ( vPars v6.1. and earlier versions) Supported URS Disk Arrays The following disk arrays are supported by URS: EVA: l EVA4400 l EVA6400 l EVA8400 XP: l P9500 l XP20000 l XP24000 Note: The Utility Meter version 9.6 does not support the monitoring of XP arrays that contain THP Pools with external volumes.
Installation and Configuration Guide Chapter 1: Introduction l For Utility Ready Storage EVA installations: n HP StorageWorks Storage System Scripting Utility (SSSU) version 9.3 communicating with CV EVA version 9.3.0. n SSSU version 9.4 communicating with CV EVA version 9.4.0. The latest version of SSSU that the Utility Meter software was tested against is installed with the Utility Meter software in the /home/umeter/SSSU directory.
Installation and Configuration Guide Chapter 1: Introduction l l Configuration files n /etc/opt/hp/RemoteSupport/umeter/config — xml configuration files for ucd n /etc/init.
Installation and Configuration Guide Chapter 1: Introduction Utility Pricing Solutions Web Portal HP maintains a Web portal that displays the usage data for Utility Pricing Solutions (UPS) resources under a PPU or URS contract. The UPS Web portal is located at: http://www.hp.com/go/payperuse. The Web portal uses the standard HP Passport single sign-in process. If you do not have a Passport ID, please click the Register link. If you have an existing Passport ID, please click the Sign-in link.
Installation and Configuration Guide Chapter 1: Introduction l For PPU: 48 times per day per partition l For URS: 12 times per day per disk array Missing Usage Reports Important: HP requires that an email address of a customer contact is configured and monitored as the Utility Meter's system contact. This ensures that HP can send a notification email to the customer in case HP does not receive PPU or URS usage reports from the Utility Meter.
Installation and Configuration Guide Chapter 1: Introduction Partition/Server was added. l A network configuration, for the network that the Utility Meter is installed on, has been changed. l For URS EVA or XP installations, Command View has been updated making it incompatible with the SSSU or CLI installed on the meter. l The email or HTTPS configuration on the customer's network was modified and the change has broken the transport of the usage data to HP.
Chapter 2 Installing and Configuring the Utility Meter Software This chapter provides information about installing and configuring the Utility Meter software. Obtain the Utility Meter Software Download the latest version of the HP Pay per use Utility Meter II software from the HP Software Depot web site http://software.hp.com. Search for product number T2258AA. The Software Depot download is an ISO image that includes a hardened version of Red Hat Enterprise Linux Server and the Utility Meter software.
Installation and Configuration Guide Chapter 2: Installing and Configuring the Utility Meter Software Important: The CD should automatically eject after the install is complete. If the CD does not eject, make sure to eject the CD before the system reboots, otherwise the installation begins again. Installing Using Integrated Lights-Out To install the Utility Meter software using Integrated Lights-Out (iLO), complete the following steps: 1.
Installation and Configuration Guide Chapter 2: Installing and Configuring the Utility Meter Software 10. Enter 1 to configure the hostname. Enter the fully qualified domain name and then enter y to confirm. 11. Enter 2 to configure the network parameters. You can perform either a static or DHCP configuration.
Installation and Configuration Guide Chapter 2: Installing and Configuring the Utility Meter Software l Hostname l Network parameters Configuring the Utility Meter Parameters from the Command Line To configure the Utility Meter using the command line, complete the following steps: 1. Log on to the Utility Meter as user umeter (default password: h.lnxmtr) and enter the umadmin configure command. 2. Enter 1 to configure the hostname. Enter the fully qualified domain name and then enter y to confirm. 3.
Installation and Configuration Guide Chapter 2: Installing and Configuring the Utility Meter Software SMTP: n HTTPS Protocol: Enter 1 to use HTTPS protocol and enter the following parameters if a proxy is being used: o HTTP Proxy o HTTP Proxy Port o HTTP Proxy Login o HTTP Proxy Password If no proxy is used press the Enter key. Enter y to confirm your settings. The Utility Meter daemon will be restarted to update to the new settings.
Installation and Configuration Guide Chapter 2: Installing and Configuring the Utility Meter Software a. Select either the HTTPS or SMTP option. b. If using the HTTPS protocol, enter the following parameters if a proxy is being used: o HTTP Proxy o HTTP Proxy Port o HTTP Proxy Login o HTTP Proxy Password If no proxy is used, leave the fields blank. c. If using the SMTP protocol, enter the following parameters: o Mail Relay Host o Domain Masquerade d. Click Submit.
Installation and Configuration Guide Chapter 2: Installing and Configuring the Utility Meter Software a. From the drop-down list, select the country code and click Submit. b. Select the timezone for your country and click Submit. c. If the date and/or time is different from what is displayed in the fields, enter the current date and/or time. If the Setup tab has been opened for awhile, click Refresh to update the date and time. Click Submit. 6. Set the hostname: a. Enter the fully qualified domain name.
Installation and Configuration Guide Chapter 2: Installing and Configuring the Utility Meter Software o DNS #1 Address o DNS #2 Address (optional) c. Click Submit. URS EVA Only – Install the CV EVA SSSU Software If any of the metered devices are URS EVA devices, then HP StorageWorks Storage System Scripting Utility (SSSU) software must be installed on the Utility Meter.
Installation and Configuration Guide Chapter 2: Installing and Configuring the Utility Meter Software This script sets the proper permissions for the files and completes the setup of the CVAE CLI software. Avoiding CVAE Device Manager Refresh Conflicts The CVAE CLI executes a refresh of the CVAE Device Manager database prior to collecting URS XP usage information. The refresh ensures that up-to-date XP array usage information is obtained.
Chapter 3 Configuring Devices Add Devices Adding a PPU WBEM Partition/Server Important: For a Superdome 2 server, both the Onboard Administrator (OA) and the partitions it manages need to each be added as separate devices. Add a PPU WBEM Partition/Server from the GUI To add a PPU WBEM Partition/Server using the GUI, complete the following steps: 1. Open a browser and enter the Utility Meter's fully qualified domain name into the address bar. 2.
Installation and Configuration Guide Chapter 3: Configuring Devices n Device Name – If the hostname is used in the Device IP/Hostname field, it is best to use the first part of the hostname as the Device Name. For example, if the hostname is host.hp.com, you should use host as the Device Name. n Device Type – Select PPUOA for a PPU Onboard Administrator, PPUPARTITION for Superdome 2, PPUSD1 for Superdome 1 or Integrity Server, PPUVSP for VSP and PPUVPAR6.1 for vPars v6.1.
Installation and Configuration Guide Chapter 3: Configuring Devices Adding an EVA Storage Array Add an EVA Storage Array from the GUI To add an EVA array using the GUI, complete the following steps: 1. Open a browser and enter the Utility Meter's fully qualified domain name into the address bar. 2. Log on to the Utility Meter as user umeter (default password: h.lnxmtr). 3. Select the Device Management tab and click Add Device. 4. Select Storage Device - EVA Array from the Device Type drop-down list. 5.
Installation and Configuration Guide Chapter 3: Configuring Devices n Password for CV EVA – Enter the password that can be used to log on to the CV EVA. Contact the System Administrator or HP engineer who installed CV EVA for the password. 6. Click Add. 7. Verify the EVA array was added by checking for it in the left menu tree. Add an EVA Storage Array from the Command Line To add an EVA array using the command line, complete the following steps: 1.
Installation and Configuration Guide Chapter 3: Configuring Devices 5. Enter the information about the XP array in the Add Device form: n CVAE Instance IP/Hostname – Enter either the IP address or hostname of the CVAE server. If CV EVA and CVAE are installed on the same system, do not use the same hostname for both in this field. In case DNS is enabled on the network segment for the URS environment, use the short hostname for the CV EVA instance and the long hostname for the CVAE instance or vice versa.
Installation and Configuration Guide Chapter 3: Configuring Devices 1. Log on to the Utility Meter as user umeter (default password: h.lnxmtr). 2.
Installation and Configuration Guide Chapter 3: Configuring Devices n 3PAR InForm IP/Hostname – Enter either the IP address or hostname of the 3PAR InForm OS server. n 3PAR Device Name – Enter the user-friendly name of the disk array. n 3PAR InForm Info – Enter a description for the Inform OS server (optional text to be associated with this Inform OS server). n 3PAR Model Number – In the drop-down list, select the appropriate model number.
Installation and Configuration Guide Chapter 3: Configuring Devices where model is the model of the 3PAR array, serial is the serial number of the array, and IPAddress is either the fully qualified domain name or IP address of the 3PAR InForm OS managing the device. The -info parameter is optional. 3. When prompted, enter the password for the specified userName required to log on to the 3PAR Inform OS server.
Installation and Configuration Guide Chapter 3: Configuring Devices n New Device Info –Enter a description for the PPU WBEM Partition/Server (optional text to be associated with this device). n Username – Enter the username of the PPU WBEM Partition/Server. n Password – Enter the password of the PPU WBEM Partition/Server. 5. Click Modify. Modify a PPU WBEM Partition/Server from the Command Line To modify a PPU WBEM Partition/Server using the command line, complete the following steps: 1.
Installation and Configuration Guide Chapter 3: Configuring Devices $ umadmin list List of devices Device Name = deviceName Type = deviceType Address = IPAddress Device ID = deviceID Info = info You should see the device listed with the modified values. Modifying an EVA Storage Array Modify an EVA Storage Array from the GUI To modify an EVA array using the GUI complete the following steps: 1. Open a browser and enter the Utility Meter's fully qualified domain name into the address bar. 2.
Installation and Configuration Guide Chapter 3: Configuring Devices 5. Click Modify. Modify an EVA Storage Array from the Command Line To modify an EVA array using the command line, complete the following steps: 1. Log on to the Utility Meter as user umeter (default password: h.lnxmtr). 2.
Installation and Configuration Guide Chapter 3: Configuring Devices n New CVAE Instance Info – (optional text to be associated with this CVAE) Enter a description for the CVAE. n XP CLI Location – Enter the directory path to the instance of CVAE CLI on the Utility Meter that will be used for the XP disk array being added. n Is URS Device? check box – A usage report will be created for each array that has this check box selected. It provides a way to temporarily stop usage reports from being created.
Installation and Configuration Guide Chapter 3: Configuring Devices $ umadmin list List of devices Device Name = deviceName Type = URSXP Address = IPAddress Device ID = deviceID Info = info Path = path Model = model Serial = serial Enabled = enabled You should see the XP array listed with the modified values. Modifying a 3PAR Storage Array Modify a 3PAR Storage Array from the GUI To modify a 3PAR array using the GUI, complete the following steps: 1.
Installation and Configuration Guide Chapter 3: Configuring Devices n Is URS Device? check box – A usage report will be created for each array that has this check box selected. It provides a way to temporarily stop usage reports from being created. 5. Click Modify. Modify a 3PAR Storage Array from the Command Line To modify a 3PAR array using the command line, complete the following steps: 1. Log on to the Utility Meter as user umeter (default password: h.lnxmtr). 2.
Installation and Configuration Guide Chapter 3: Configuring Devices Note: This test can only performed using the umadmin command. 1. Log on to the Utility Meter as user umeter (default password: h.lnxmtr). 2. Enter the following command: $ umadmin test -name deviceName where deviceName is the name of the device you want to test connectivity to. The results of the connectivity test will be displayed.
Installation and Configuration Guide Chapter 3: Configuring Devices usage report, and send it to HP for either all devices or a single device. The umadmin collect command has two variations: l umadmin collect -all will generate a usage report for all devices and return the report IDs if successful. l umadmin collect -name deviceName [-nowait], will generate a usage report for the specified deviceName, return the report ID if successful and wait for the report to be transmitted to HP.
Installation and Configuration Guide Chapter 3: Configuring Devices 4. The View my list page shows the devices that you have added to the portal. The first time you visit this page, you will need to add your devices by clicking the Setup product list link. Figure 3.2. View My List Page 5. Once your devices have been added, click the System Serial Number link for PPU Page 41 of 65 HP Pay per use Utility Meter II Software (9.
Installation and Configuration Guide Chapter 3: Configuring Devices devices or the Device Serial Number-Product ID for URS devices of the device you want to verify. Figure 3.3. View My List Page 6. You should see a page similar to the following page that shows when the last usage report was received. If you see the following page, then the PPU partition is properly connected to the UPS portal through the Utility Meter. Figure 3.4.
Installation and Configuration Guide Chapter 3: Configuring Devices 3. Select the Device Management tab. 4. Select the device you want to delete and click Delete Device. 5. Click OK in the pop-up confirmation window to delete the device. 6. Verify the device was deleted by checking for it in the left menu tree. You should no longer see the device(s) that you deleted listed. Deleting Devices from the Command Line To delete a device using the command line, complete the following steps: 1.
Installation and Configuration Guide Chapter 3: Configuring Devices 1. Make sure all partitions have version A.02.09.08 or later of WBEM installed. This is critical because the following steps assume that the defect QXCR1001089629: "According to the DMTF standards, the WBEM namespaces are not case sensitive, but the cimauth command processes namespaces as case sensitive." has been fixed. Reference the HP WBEM Services Version A.02.09.08 Release Notes, located here: http://bizsupport2.austin.hp.
Installation and Configuration Guide Chapter 3: Configuring Devices 4. Verify that the certificate on each partition has the correct FQDN listed for the commonName field (two places): # ssltrustmgr -l -f /etc/opt/hp/sslshare/cert.pem If the commonName has the incorrect FQDN, recreate it using the following: # cimserver -s # gen_wbem_certs # cimserver Date and Time Synchronization The date and time of the meter and all of the partitions should be synchronized. This can be done by using the NTP service.
Installation and Configuration Guide Chapter 3: Configuring Devices 6. Click the Model/ModuleName, for example, HB. 7. Click the filename. The XML Output displays in the right pane. Note: Usage reports for VSP and vPars v6.1 devices contain a different structure than the other usage reports. Page 46 of 65 HP Pay per use Utility Meter II Software (9.
Chapter 4 Troubleshooting the Utility Meter This chapter explains how to troubleshoot the Utility Meter hardware and software if you are not seeing correct usage data on the Utility Pricing Solutions (UPS) Web portal at http://www.hp.com/go/payperuse.
Installation and Configuration Guide Chapter 4: Troubleshooting the Utility Meter l n There may be a network connection problem. n The OA may be resetting, for example. the OA is being rebooted. n The OA may be hung. The PPU WBEM Partition/Server has a problem. If the PPU WBEM Partition/Server is not reporting data, the reason could be one or more of the following: n The PPU WBEM Partition/Server is turned off. n The PPU WBEM Partition/Server has never been turned on.
Installation and Configuration Guide Chapter 4: Troubleshooting the Utility Meter The umadmin status command displays the status of the ucd daemon process so that you can verify the Utility Meter is running. Or view the status of the ucd daemon process in the Daemon Status section on the Troubleshoot tab in the Utility Meter GUI.
Installation and Configuration Guide Chapter 4: Troubleshooting the Utility Meter The following configuration files are located in the /etc/opt/hp/RemoteSupport/umeter/config/ folder: n uc_config.xml This contains information about devices being monitored by the Utility Meter. n uc_properties.xml This contains information that should never be modified. n uc_properties_delta.xml This contains properties that the meter modifies via the GUI or umadmin.
Installation and Configuration Guide Chapter 4: Troubleshooting the Utility Meter The pid number will differ in your case. You should see output similar to the above. The Utility Meter process will be started automatically using the monit process. If you want to manually start or stop the Utility Meter use the following commands: $ umadmin stop $ umadmin start To check the status of monit, log in as root and execute the following command and verify that the ucd process is running: $ monit -c /home/umeter/.
Installation and Configuration Guide Chapter 4: Troubleshooting the Utility Meter l “Troubleshooting an OA Device” l “Troubleshooting a WBEM Device” l “Troubleshooting a Storage Device” Troubleshooting an OA Device This section contains general tips on how to troubleshoot a Utility Meter with configured OA devices. If you are having trouble with this type of configuration, see this list of possible reasons: l The OA is down or unreachable.
Installation and Configuration Guide Chapter 4: Troubleshooting the Utility Meter n HP_NParProviderModule n ComputerSystemModule If any of the CIM provider modules are not listed, then they need to be installed. Troubleshooting a Storage Device This section contains general tips on how to troubleshoot a Utility Meter with configured storage devices. If you are having trouble with this type of configuration, see the following list of possible reasons: l The storage array is down or unreachable.
Installation and Configuration Guide Chapter 4: Troubleshooting the Utility Meter not the case, usage reports may be produced but no usage data will be posted on the public URS portal. Page 54 of 65 HP Pay per use Utility Meter II Software (9.
Appendix A. Site Preparation Form for Pay Per Use Use the Utility Meter Site Preparation Form to plan the configuration of the Utility Meter PPU installation. Items of interest are: l You can have up to 10 email addresses for the Meter Contact Email. HP recommends using an email alias or an email distribution list as the contact address for your Utility Meter. l Ensure that the network's DNS server(s) tables contain the IP address and hostname of the Utility Meter.
Installation and Configuration Guide Appendix A. Site Preparation Form for Pay Per Use Question Answer PPU Report Transfer to HP (Only provide answers for one transport method below: email or https) If transport of the PPU Usage Data is through email: 1. Hostname and domain name of Internet mail relay host 2. What is the masqueraded domain to create the “Return address” for the emails? 1. 2. If the transport of PPU Usage Data is through https: 1.
Installation and Configuration Guide Appendix A. Site Preparation Form for Pay Per Use Networking details for PPU Onboard Administrators Fill out the table below for each Onboard Administrator (OA) to be monitored using GSOAP. If more than 10 PPU OAs are to be monitored, please duplicate this page and complete one entry for each OA. Note:The username/password must have GSOAP access for all of the hardware, including the OA, device bays, and interconnect device bays.
Installation and Configuration Guide Appendix A. Site Preparation Form for Pay Per Use Question Answer Username/password[1] of an account for this partition/server with WBEM access. 1. 2. 3. 4. 5. [1] For security Page 58 of 65 reasons, this information can be made available at the time of installation only. HP Pay per use Utility Meter II Software (9.
Appendix B. Site Preparation Form for Utility Ready Storage Use the Utility Meter Site Preparation Form to plan the configuration of the Utility Meter URS installation. Items of interest are: l You can have up to 10 email addresses for the Meter Contact Email. HP recommends using an email alias or an email distribution list as the contact address for your Utility Meter. l Ensure that the network's DNS server(s) tables contain the IP address and hostname of the Utility Meter.
Installation and Configuration Guide Appendix B. Site Preparation Form for Utility Ready Storage Question Answer PPU Report Transfer to HP (Only provide answers for one transport method below: email or https) If transport of the URS Usage Data is through email: 1. Hostname and domain name of Internet mail relay host 1. 2. What is the masqueraded domain to create the “Return address” for the emails? 2. 3.
Installation and Configuration Guide Appendix B. Site Preparation Form for Utility Ready Storage Question Answer the email addresses separated by semicolons or use an email alias or an email distribution list as the contact email address. [1] For security reasons, this information can be made available at the time of installation only. Note: 1. The Utility Meter has an iLO2 board built in.
Installation and Configuration Guide Appendix B.
Glossary 3PAR Refers to the 3PAR storage arrays that are supported in the URS solution. 3PAR InForm OS Refers to the onboard operating system that runs on 3PAR storage arrays. OA Refers to the Onboard Administrator. CIM Refers to the Common Information Model. CLI Command-line interface. An interface comprised of various commands which are used to control operating system responses. CVAE HP StorageWorks Command View Advanced Edition.
Installation and Configuration Guide Glossary Refers to the HP-UX server that runs the Utility Meter software. Utility Meter software Refers to the HP Pay per use Utility Meter II Software (HP product T2258AA). vPar Refers to a virtual partition. vPars v6.1 A virtual partition that is created and managed from the VSP. VSP Refers to Virtualization Services Platform. The management platform for creating and managing virtual partitions version 6.1 and later.
Index modifying an XP storage array A adding a 3PAR storage array 30 adding an EVA storage array 27 adding an XP storage array 28 avoiding refresh conflicts 24 35 O ordering the Utility Meter 15 P Pay Per Use (PPU) 55 R C checking the web portal for data arrival 40 configuring devices 25 recommended hardware 9 S configuring the Utility Meter parameters 19 site preparation form 59 CVAE CLI 24 software backup 11 CVAE Device Manager 24 supported PPU servers supported URS disk arra