
9.3 HP Pay per use Utility Meter II Software Installation and Configuration Guide (July 2011)
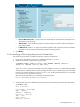
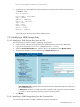


• New CV EVA Instance Info – (optional text to be associated with the CV EVA for this EVA) Enter a
description for the disk array.
• SSSU Location – Enter the directory path to the SSSU instance that will be used for the EVA disk
array being added.
• Is URS Device? checkbox – A usage report will be created for each array that has this box checked.
It provides a way to temporarily stop usage reports from being created.
5. Click Modify.
3.2.2.2 Modifying an EVA Storage Array from the Command Line
Use the following procedure to modify an EVA array using the command line:
1. Log on to the Utility Meter as user umeter (default password: h.lnxmtr).
2. Modify the EVA array using the following command:
$ umadmin moddev -name deviceName -type URSEVA -address IPAddress
-path path -enabled enabled [-info info]
where deviceName is the name of the EVA array to be modified, IPAddress is either the fully qualified
domain name or IP address of the CV EVA managing the device, path is the directory path to the SSSU
instance to be used for the EVA, and enabled is true or false to indicate if URS reports are to be created
for the array. The -info parameter is optional.
After entering the information, you should see the following output:
Device deviceName modified successfully.
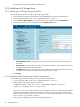
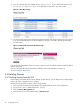
3. Verify the EVA array was modified by listing the devices that are being monitored by the Utility Meter:
$ umadmin list
List of devices -
Device Name = deviceName
Type = URSEVA
Address = IPAddress
Device ID = deviceID
Info = info
Path = path
Enabled = enabled
3.2 Modifying Devices 33