HP Pay per use Utility Meter II Software Installation and Configuration Guide HP Part Number: 5900-1723 Published: June 2011, Edition 3
© Copyright 2011 Hewlett-Packard Development Company, L.P. Legal Notices Confidential computer software. Valid license from HP required for possession, use or copying. Consistent with FAR 12.211 and 12.212, Commercial Computer Software, Computer Software Documentation, and Technical Data for Commercial Items are licensed to the U.S. Government under vendor's standard commercial license. The information contained herein is subject to change without notice.
Table of Contents About This Document.....................................................................................7 1 2 3 4 5 Intended Audience...............................................................................................................................7 Publishing History................................................................................................................................7 Document Organization..............................................................
3.2.1 Modifying a PPU WBEM Partition/Server....................................................................................31 3.2.1.1 Modifying a PPU WBEM Partition/Server from the GUI..........................................................31 3.2.1.2 Modifying a PPU WBEM Partition/Server from the Command Line..........................................32 3.2.2 Modifying an EVA Storage Array..............................................................................................32 3.2.2.
List of Figures 1-1 3-1 3-2 3-3 3-4 Flow of Metered Usage Data............................................................................................................10 UPS Portal Welcome Page................................................................................................................39 View My List Page...........................................................................................................................39 View My List Page........................................
About This Document 1 Intended Audience This document provides instructions for installing, configuring, and verifying the operation of version 9.3 of the HP Pay per use Utility Meter II software (HP product T2258AA) on supported HP servers.
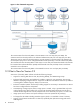
1 Introduction 1.1 Overview Pay per use (PPU) and Utility Ready Storage (URS) are part of HP's Utility Pricing Solutions (UPS) program. In this program, customers are charged according to usage of the PPU resources (servers) and URS resources (disk arrays) under a UPS contract. For more information on this program, see the HP Utility Pricing Web page: http://www.hp.com/go/utility. The usage data for PPU and URS is collected by the Utility Meter software, which runs on the Utility Meter server. Version 9.
Figure 1-1 Flow of Metered Usage Data The communication from the Utility Meter to the PPU Partition runs over https (TCP port 5989). The communication from the Utility Meter to the Onboard Administrator (OA) runs over https (TCP port 443). These ports must be open from the Utility Meter to any PPU partition or OA that needs to be metered. No non-transparent proxy server can be configured between the PPU partition(s) or the OA and the Utility Meter.
• Additional fields in URS usage reports sent to HP for display on the Web Portal to provide additional information (than provided by Utility Meter 8.17) on a URS device. • Support for CVAE 7.0 for XP devices. • Tighter version checking of CV CLI and CVAE versions for XP devices. • The latest supported CLI and SSSU versions are automatically installed (user only needs to install older versions if needed). • Upgrade path to facilitate future installation of Utility Meter releases. 1.
• • EVA: • EVA4400 • EVA6400 • EVA8400 XP: • P9500 • XP20000 • XP24000 NOTE: The Utility Meter version 9.3 does not support the monitoring of XP arrays that contain THP Pools with external volumes. • 3PAR: • F200 • F400 • T400 • T800 NOTE: HP does not support iSCSI connectivity to hosts. NOTE: HP does not support Adaptive Optimization on any 3PAR array. 1.6 Utility Meter Software Version 9.
CLI, you do not need to install CVAE CLI or run SetupCLI. If you want to install a different version of CVAE CLI, see Section 2.5: “URS XP Only – Installing the CVAE CLI Software” for details. • For Utility Ready Storage 3PAR installations: InForm OS version 2.3.1. 1.6.2 Utility Meter Software Back Up The Utility Meter configuration files should be backed up on a regular basis because they include a list of devices being monitored.
1.7 Installation and Support Services The installation of the Utility Meter software cannot be performed by the customer. An installation service (HP part number HA113A1 Option 57B for PPU or HA113A1 Option 57U for URS) is required for Utility Meter software installation. An HP Services representative installs the Utility Meter software by using the Service Delivery Guide (SDG) and the HP Pay per use Utility Meter II Software Installation and Configuration Guide (this guide).
1.10 Missing Usage Reports IMPORTANT: HP requires that an email address of a customer contact is configured and monitored as the Utility Meter's system contact. This ensures that HP can send a notification email to the customer in case HP does not receive PPU or URS usage reports from the Utility Meter. HP recommends using an email alias or an email distribution list as the contact email address for your Utility Meter.
See the following information to verify Utility Meter operation or troubleshoot the Utility Meter: • Verifying operation: Section 3.3: “Verifying Connectivity” • Troubleshooting: Chapter 4: “Troubleshooting the Utility Meter” 1.11 Ordering Each of the following items must be ordered from HP to build a Utility Meter: • An HP ProLiant DL 320 server to run the Utility Meter software (for details, see Section 1.
2 Installing and Configuring the Utility Meter Software This chapter provides information about installing and configuring the Utility Meter software. 2.1 Obtaining the Utility Meter Software Download the latest version of the HP Pay per use Utility Meter II software from the HP Software Depot web site http://software.hp.com. Search for product number T2258AA. The Software Depot download is an ISO image that includes a hardened version of Red Hat Enterprise Linux Server and the Utility Meter software.
7. 8. Once the installation is completed, the system will reboot automatically. When the system begins rebooting, make sure to return to the Virtual Media dialog and disconnect the ISO image from the virtual media, otherwise the installation will repeat after the system reboots. Once the install is complete and the system has rebooted, log on as user umeter (default password: h.lnxmtr).
2.3 Configuring the Utility Meter Parameters Except for the initial setting of hostname and network type, which must be done using umadmin configure (see Section 2.2.2, Step 9), the Utility Meter software can be configured using the GUI or by using the umadmin configure command. The following values must be configured before any data can be sent to HP: • SMTP (email) or HTTPS transport • Customer contact email address • Timezone • Date and time • Hostname • Network parameters 2.3.
6. Enter 5 to configure the transport protocol. The transport protocol can be either HTTPS or SMTP: • HTTPS Protocol: Enter 1 to use HTTPS protocol and enter the following parameters if a proxy is being used: • HTTP Proxy • HTTP Proxy Port • HTTP Proxy Login • HTTP Proxy Password If no proxy is used press the Enter key. Enter y to confirm your settings. The Utility Meter daemon will be restarted to update to the new settings.
• HTTP Proxy Login • HTTP Proxy Password If no proxy is used, leave the fields blank. c. d. 4. • Mail Relay Host • Domain Masquerade Click Submit. This will cause the Utility Meter daemon to be restarted when using HTTPS, and sendmail to be reconfigured when using SMTP. Set the customer contact email address: a. b. 5. If using the SMTP protocol, enter the following parameters: Enter the customer contact email address. If more than one email address is needed, separate them with semicolons.
6. Set the hostname: a. b. 7. Enter the fully qualified domain name. Click Submit. Set the network parameters: a. b. c. Select either the DHCP or Static option. For a static configuration enter the following parameters: • IP Address • Net Mask Address • Gateway Address • DNS #1 Address • DNS #2 Address (optional) Click Submit. 2.
software in the /home/umeter/CLI directory. Utility Meter 9.3 supports CVAE CLI 6.4 in conjunction with CVAE 6.4, CVAE CLI 7.0.1 in conjunction with CVAE 7.0.1., and CVAE CLI 7.1.0 in conjunction with CVAE 7.1.0 No other versions are supported. Consult the HP StorageWorks Command View Advanced Edition Software Installation Guide for how to obtain and install the CVAE CLI software. Installing multiple versions of CVAE CLI is supported. This way multiple Command View versions are supported.
3 Configuring Devices 3.1 Adding Devices 3.1.1 Adding a PPU WBEM Partition/Server IMPORTANT: For a Superdome 2 server, both the Onboard Administrator (OA) and the partitions it manages need to each be added as separate devices. 3.1.1.1 Adding a PPU WBEM Partition/Server from the GUI Use the following procedure to add a PPU WBEM Partition/Server using the GUI: 1. 2. 3. 4. 5. 6. 7. Open a browser and enter the Utility Meter's fully qualified domain name into the address bar.
3.1.1.2 Adding a PPU WBEM Partition/Server from the Command Line Use the following procedure to add a PPU WBEM Partition/Server using the command line: 1. 2. Log on to the Utility Meter as user umeter (default password: h.lnxmtr).
6. 7. • CV EVA Instance IP/Hostname – Enter either the IP address or hostname of the EVA Command View server. If CV EVA and CVAE are installed on the same system, do not use the same hostname for both in this field. In case DNS is enabled on the network segment for the URS environment, use the short hostname for the CV EVA instance and the long hostname for the CVAE instance or vice versa. Or you can use the short/long hostname for CV EVA and the IP address for CVAE or vice versa.
Device deviceName added successfully. 4. Verify the EVA array was added by listing the devices that are being monitored by the Utility Meter: $ umadmin list List of devices Device Name = deviceName Type = URSEVA Address = IPAddress Device ID = deviceID Info = info Path = path You should see the EVA that you added in Step 2 listed. 3.1.3 Adding an XP Storage Array 3.1.3.1 Adding an XP Storage Array from the GUI Use the following procedure to add an XP array using the GUI: 1. 2. 3. 4. 5.
6. 7. • CVAE Instance Info – (optional text to be associated with this device) Enter a description for the CVAE. • Array Model Number – In the drop-down list, select the appropriate model number. • Array Serial Number – Enter the 5-digit serial number of the disk array. • XP CLI Location – Enter the directory path to the instance of CVAE CLI on the Utility Meter that will be used for the XP disk array being added. • Username for CVAE – Enter the username that can be used to log on to the CVAE.
5. 6. 7. Enter the information about the 3PAR array into the Add Device form: • 3PAR InForm IP/Hostname – Enter either the IP address or hostname of the 3PAR InForm OS server. • 3PAR Device Name – Enter the user-friendly name of the disk array. • 3PAR InForm Info – (optional text to be associated with this Inform OS server) Enter a description for the Inform OS server. • 3PAR Model Number – In the drop-down list, select the appropriate model number.
Device deviceName added successfully. 4. Verify the 3PAR array was added by listing the devices that are being monitored by the Utility Meter: $ umadmin list List of devices Device Name = deviceName Type = URS3PAR Address = IPAddress Device ID = deviceID Info = info Model = model Serial = serial You should see the 3PAR array that you added in Step 2 listed. 3.2 Modifying Devices 3.2.1 Modifying a PPU WBEM Partition/Server 3.2.1.
3.2.1.2 Modifying a PPU WBEM Partition/Server from the Command Line Use the following procedure to modify a PPU WBEM Partition/Server using the command line: 1. 2. Log on to the Utility Meter as user umeter (default password: h.lnxmtr).
5. • New CV EVA Instance Info – (optional text to be associated with the CV EVA for this EVA) Enter a description for the disk array. • SSSU Location – Enter the directory path to the SSSU instance that will be used for the EVA disk array being added. • Is URS Device? checkbox – A usage report will be created for each array that has this box checked. It provides a way to temporarily stop usage reports from being created. Click Modify. 3.2.2.
You should see the EVA listed with the modified values. 3.2.3 Modifying an XP Storage Array 3.2.3.1 Modifying an XP Storage Array from the GUI Use the following procedure to modify an XP array using the GUI: 1. 2. 3. 4. 5. Open a browser and enter the Utility Meter's fully qualified domain name into the address bar. Log on to the Utility Meter as user umeter (default password: h.lnxmtr). Select the Device Management tab, select the device to be modified and click Modify Device.
Device deviceName modified successfully. 3. Verify the XP array was modified by listing the devices that are being monitored by the Utility Meter: $ umadmin list List of devices Device Name = deviceName Type = URSXP Address = IPAddress Device ID = deviceID Info = info Path = path Model = model Serial = serial Enabled = enabled You should see the XP array listed with the modified values. 3.2.4 Modifying a 3PAR Storage Array 3.2.4.
1. 2. Log on to the Utility Meter as user umeter (default password: h.lnxmtr). Modify the 3PAR array using the following command: $ umadmin moddev -name deviceName -type URS3PAR -address IPAddress -enabled enabled [-info info] where deviceName is the name of the 3PAR array to be modified, IPAddress is either the fully qualified domain name or IP address of the 3PAR InForm OS managing the device, and enabled is true or false to indicate if URS reports are to be created for the array.
Use the following procedure to verify connectivity of the Utility Meter to all devices and to HP: NOTE: 1. 2. This test can only performed using the umadmin command. Log on to the Utility Meter as user umeter (default password: h.lnxmtr). Enter the following command: $ umadmin e2etest e2etest will be run for the following devices: 1.deviceNamePPUOA 2.deviceNamePPUPARTITION 3.deviceNameURSEVA 4.deviceNameURSXP 5.deviceNameURS3PAR This may take several minutes to complete.
See Section 3.3.4: “Checking the Web Portal for Data Arrival” to verify that usage report arrived at the UPS portal. WARNING! The umadmin collect command does not work for PPUSD1 devices. See “Known Issues”. 3.3.4 Checking the Web Portal for Data Arrival IMPORTANT: To view usage reports using the UPS portal, you must first generate a usage report on the Utility Meter system. See Section 3.3.2: “Running the End-to-End Test” for details about generating a usage report.
3. In the UPS portal Welcome page, click the View my list link in the left menu. Figure 3-1 UPS Portal Welcome Page 4. The View my list page shows the devices that you have added to the portal. The first time you visit this page, you will need to add your devices by clicking the Setup product list link. Figure 3-2 View My List Page 3.
5. Once your devices have been added, click the System Serial Number link for PPU devices or the Device Serial Number-Product ID for URS devices of the device you want to verify. Figure 3-3 View My List Page 6. You should see a page similar to the following page that shows when the last usage report was received. If you see the following page, then the PPU partition is properly connected to the UPS portal through the Utility Meter.
5. 6. Click OK in the delete confirmation window. Verify the device was deleted by checking for it in the left menu tree. You should no longer see the device(s) that you deleted listed. 3.4.2 Deleting Devices from the Command Line Use the following procedure to delete a device using the command line: 1. 2. Log on to the Utility Meter as user umeter (default password: h.lnxmtr).
NOTE: All of the WBEM commands are located in /opt/wbem/sbin. If this directory is not in your $PATH, you should add it. a. # cimconfig -lc The following parameters need to be set differently than the default: sslClientVerificationMode=optional enableSubscriptionsForNonprivilegedUsers=true enableNamespaceAuthorization=true b.
4 Troubleshooting the Utility Meter This chapter explains how to troubleshoot the Utility Meter hardware and software if you are not seeing correct usage data on the Utility Pricing Solutions (UPS) Web portal at http://www.hp.com/go/payperuse. This chapter contains the following sections: • Section 4.1: “Troubleshooting Overview” • Section 4.2: “General Troubleshooting Information” • Section 4.3: “Utility Meter Software” • Section 4.4: “Troubleshooting a Device” 4.
• Communication fails between the PPU partition and the Utility Meter. The traffic between the PPU partition and the Utility Meter runs over port 5989 (WBEM over HTTPS). This port needs to be open on a firewall that is between the partition and the Utility Meter. If one meter is used for multiple sites or partitions, port 5989 must be open on the firewalls interconnecting the sites. There cannot be a proxy server between a partition and the Utility Meter.
Change the value attribute from INFO to DEBUG: NOTE: Be sure to disable debug mode as soon as you are finished so that the debug information is no longer saved to the log files. 4.3 Utility Meter Software Here are suggestions for evaluating the Utility Meter software on the Utility Meter hardware. • Ensure you have the correct Utility Meter software by executing the following rpm command.
status monitoring status load average cpu memory usage data collected running monitored [0.00] [0.00] [0.00] 0.0%us 0.0%sy 0.2%wa 77580 kB [1.8%] Mon Jul 12 23:56:15 2010 To reinstall the Utility Meter software, see Chapter 2: “Installing and Configuring the Utility Meter Software”. 4.4 Troubleshooting a Device The most prominent reason why HP does not receive usage data from a Utility Meter is because the file-transfer connection between the Utility Meter and HP is broken.
• HP_UtilizationProviderModule • HP_NParProviderModule • ComputerSystemModule If any of the CIM provider modules are not listed, then they need to be installed. 4.4.3 Troubleshooting a Storage Device This section contains general tips on how to troubleshoot a Utility Meter with configured storage devices. If you are having trouble with this type of configuration, here is a list of possible reasons: • The storage array is down or unreachable.
A Site Preparation Form for Pay Per Use Use the Utility Meter Site Preparation Form below to plan the configuration of the Utility Meter PPU installation. Items of interest are: • You can have up to 10 email addresses for the Meter Contact Email. HP recommends using an email alias or an email distribution list as the contact address for your Utility Meter. • Ensure that the network's DNS server(s) tables contain the IP address and hostname of the Utility Meter.
NOTE: The username/password must have GSOAP access for all of the hardware, including the OA, device bays, and interconnect device bays. Question Answer IP address or hostname of the OA to be monitored under a PPU contract. 1. 2. 3. 4. 5. 6. 7. 8. 9. 10. Username/password1 of an account for this OA with GSOAP access for all the hardware. 1. 2. 3. 4. 5. 6. 7. 8. 9. 10. 1 For security reasons, this information can be made available at the time of installation only. A.
B Site Preparation Form for Utility Ready Storage Use the Utility Meter Site Preparation Form below to plan the configuration of the Utility Meter URS installation. Items of interest are: • You can have up to 10 email addresses for the Meter Contact Email. HP recommends using an email alias or an email distribution list as the contact address for your Utility Meter. • Ensure that the network's DNS server(s) tables contain the IP address and hostname of the Utility Meter.
1. 2. The Utility Meter has an iLO2 board built in. Please configure network access to the iLO2 board upfront and have its username/password available during installation. A configured iLO2 board helps also in the troubleshooting at a later stage. The configuration of the Utility Meter software requires a browser (MSIE, Firefox) or a console to complete the configuration of URS. B.1 Networking Details on the Windows Server Running Command View EVA URS needs Command View EVA to inventory EVA arrays.
1 For security reasons, this information can be made available at the time of installation only. B.
Glossary 3PAR Refers to the 3PAR storage arrays that are supported in the URS solution. 3PAR InForm OS Refers to the onboard operating system that runs on 3PAR storage arrays. CIM Refers to the Common Information Model. CLI Command-line interface. An interface comprised of various commands which are used to control operating system responses. CV EVA Refers to the HP StorageWorks Command View EVA software. CVAE HP StorageWorks Command View Advanced Edition.
Index C configuring devices, 25 configuring the Utility Meter parameters, 19 CVAE CLI avoiding conflicts, 23 installation, 22 CVAE Device Manager avoiding refresh conflicts, 23 D data transport methods, 14 directory structure, 13 I installing Utility Meter software from HP Software Depot, 17 M missing usage reports, 15 ordering, 16 overview, 9 recommended hardware, 11 Site Preparation Form, 49, 51 software, 12 software back up, 13 supported PPU servers, 11 supported URS disk arrays, 11 troubleshooting,