
8.16 HP Utility Meter User's Guide (June 2010)
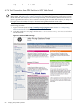
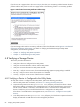
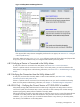
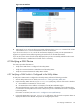

Figure 4-6 VLS Interface
2. Alternatively, log on to the VLS device using SSH and execte the GetChassis command. The column
with header Revision shows the firmware version of the VLS device.
If you do not see version 2.3.1 or 3.3.0 of the VLS firmware displayed, contact your HP representative to
migrate to a supported version before registering the VLS device into the URS environment.
If you see the correct version of the firmware displayed, then you have successfully verified that the correct
version of the firmware is installed and no further action is necessary.
4.9 Verifying a SAN Device
This section provides information to:
• Verify that a SAN device is configured in the Utility Meter.
• Verify the connection between a SAN device and the Utility Meter.
• Verify the connection between the Utility Meter and HP.
4.9.1 Verifying a SAN Switch is Configured in the Utility Meter
To verify that a SAN Switch is configured in the Utility Meter, perform the following procedure:
1. Start the Utility Meter GUI. For details, see Section 3.1: “Starting the Utility Meter GUI”.
2. Inspect the Utility Meter GUI's Managed Devices Tree (left pane), and see if the switch is listed as:
1. the IP address or hostname for a Cisco switch
2. the WWN below the IP address or hostname of an HP/Brocade SMI-S agent
The switch should have a green circle to the left of the IP address or hostname, which indicates that it
is connected to the Utility Meter. If the switch is listed, then you have verified that the switch is configured
in the Utility Meter.
If the switch is not listed, see Section 3.5.1: “Configure a Device (Add Device)”.
3. In the Utility Meter GUI's Managed Devices Tree (left pane), click the switch's expansion button to
display the URS and non-URS disk arrays that are managed by the device.
4.9 Verifying a SAN Device 89