
8.16 HP Utility Meter User's Guide (June 2010)


previously added VLS device from the Managed Devices Tree, use the Remove Device task in the
Devices tab of the Utility Meter GUI. For more information about removing devices, see Section 3.5.4:
“Remove Device”.)
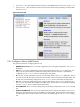
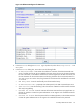
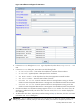
After you have added a VLS device into the Utility Meter the IP address or hostname appears in the Managed
Devices Tree. Note that the green circle to the left of the IP address or hostname indicates that the VLS
device is connected to the Utility Meter.
IMPORTANT: A newly added VLS device that is correctly configured in the Utility Meter has a green circle
next to the VLS device's IP address or hostname in the Managed Devices Tree. For an example of a
correctly configured device, see Figure 3-3: “Utility Meter GUI Managed Devices Tree”. If the VLS device's
IP address or hostname has a red box next to it, the VLS device was not correctly configured into the Utility
Meter. To resolve this problem, see Section 5.4: “Fixing a Disconnected Device (with Red Box)”.
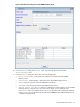
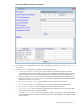
3.5.1.5 Add a Cisco SAN Switch
This task allows you to add one or more Cisco SAN switches to the Utility Meter. The configured SAN
switches are visible in the Utility Meter GUI's Managed Devices Tree in the Managed Devices (left) pane.
IMPORTANT: If you are going to require a server certificate for the SAN switch, you need to update the
sandevices.pem file before you add the SAN switch.
When a SAN switch is added to the Utility Meter you have the option of requiring a server certificate when
the switch is accessed. The certificate is different for each switch that you want to connect to. For each
metered switch, you need to copy the certificate file from the remote switch to the Utility Meter and then add
it into /var/opt/meter/sandevices.pem, which is used to store the certificates for every SAN switch
for which you want to require a certificate. To copy the certificate from the metered switch and add it to
sandevices.pem, use the following procedure:
1. Create a file called ssl.conf. The distinguished_name should be unique for each switch. Here
is the sample ssl.conf:
[req]
distinguished_name = server.domain.com
prompt = no
[server.domain.com]
CN = server.domain.com
emailAddress = user@domain.com
2. Generate a private key and certificate using the following openssl command:
# openssl req –x 509 –days 365 –newkey ras:2048 –nodes –config ./ssl.conf
–keyout ./key.pem –out ./cert.pem
3. Concatenate the private key and certificate into a single file:
# cat key.pem cert.pem > cimserver1.pem
4. Login into switch and copy the certificate from the source to the switch:
# copy source/cimserver1.pem switch:cimserver1.pem
5. Enable the certificate in cimserver configuration:
# config t
# cimserver certificate switch:cimserver1.pem
# cimserver enableHttps
# cimserver enable
6. Copy the certificate to the Utility Meter server.
60 Performing Utility Meter Tasks