
8.15 HP Utility Meter User's Guide (January 2010)

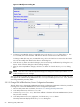

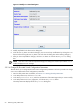
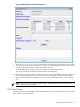
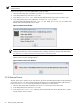
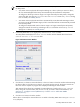


Table Of Contents
- HP Utility Meter User's Guide for version 8.15
- Table of Contents
- About This Document
- 1 Introduction
- 2 Installing and Configuring the Utility Meter Software
- 2.1 Overview
- 2.2 Skills Required
- 2.3 Before Going to the Customer Site
- 2.4 Configuring the HP-UX System Parameters
- 2.5 Obtaining and Installing the Utility Meter Software
- 2.6 Configuring the Utility Meter Parameters
- 2.7 URS XP Only – Installing the CV XP AE CLI Software
- 2.8 URS EVA Only – Installing the CV EVA SSSU Software
- 2.9 URS HP/Brocade SAN Switch Only – Installing the SMI-S Agent Software
- 2.10 URS Cisco SAN Switch Only – Enabling the CIM Server
- 2.11 Email Hostname Masquerading
- 2.12 Configuring PPU Partitions and URS Devices
- 2.13 Verifying the Utility Meter Operation
- 2.14 Completing the Utility Meter Installation and Configuration
- 2.15 Upgrading the Utility Meter Software to Version 8.15
- 3 Performing Utility Meter Tasks
- 4 Verifying Utility Meter Operation
- 4.1 Verifying the Utility Meter Hardware is Operational
- 4.2 Verifying the Utility Meter Software is Operational
- 4.3 Verifying the CIM Server Software Is Operational
- 4.4 Verifying Connectivity from the Utility Meter to HP
- 4.5 Verifying the Data Acquisition Server is Running
- 4.6 Verifying the Utility Meter Data Transport Method
- 4.7 Verifying a PPU Partition
- 4.8 Verifying a Storage Device
- 4.8.1 Verifying a Device is Configured in the Utility Meter
- 4.8.2 Verifying a Device is Connected to the Utility Meter
- 4.8.3 Verifying the Connection from the Utility Meter to HP
- 4.8.4 XP Only – Verifying the Correct Version of CV XP AE CLI is Installed
- 4.8.5 EVA Only – Verifying the Correct Version of CV EVA SSSU is Installed
- 4.9 Verifying a SAN Device
- 5 Troubleshooting the Utility Meter
- A Site Preparation Form for Pay Per Use
- B Site Preparation Form for Utility Ready Storage
- C Data Fields Sent from the Utility Meter to HP
- Glossary
- Index

Figure 3-16 Modify PPU WBEM Partition/Server Dialog Box
5. Modify any fields for the device in the dialog box.
6. Click the Modify button to make the changes. (You can cancel any modifications by clicking the Done
button without clicking the Modify button. This will close the dialog box without making changes.)
7. After you have completed the changes, click the Done button to close the Modify Device dialog
box.
NOTE: If an error occurs with the requested changes, the dialog box remains open and the Status
window displays the error message.
3.5.2.3 Change Cisco SAN Switch Configuration Parameters
This task allows you to change Cisco SAN switch configuration parameters. Follow this procedure to change
one or more Cisco SAN switch configuration parameters:
1. Start the Utility Meter GUI. For details, see Section 3.1: “Starting the Utility Meter GUI”.
2. In the Utility Meter GUI, click the Devices tab.
3. In the Managed Devices Tree, select the IP address or hostname of the Cisco SAN switch that you
want to modify.
4. In the Utility Meter GUI Tasks (right) pane, click the Modify Device button.
The Utility Meter GUI displays the Modify Device dialog box.
3.5 Utility Meter Devices Tasks 63