
8.15 HP Utility Meter User's Guide (January 2010)


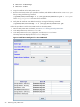


Table Of Contents
- HP Utility Meter User's Guide for version 8.15
- Table of Contents
- About This Document
- 1 Introduction
- 2 Installing and Configuring the Utility Meter Software
- 2.1 Overview
- 2.2 Skills Required
- 2.3 Before Going to the Customer Site
- 2.4 Configuring the HP-UX System Parameters
- 2.5 Obtaining and Installing the Utility Meter Software
- 2.6 Configuring the Utility Meter Parameters
- 2.7 URS XP Only – Installing the CV XP AE CLI Software
- 2.8 URS EVA Only – Installing the CV EVA SSSU Software
- 2.9 URS HP/Brocade SAN Switch Only – Installing the SMI-S Agent Software
- 2.10 URS Cisco SAN Switch Only – Enabling the CIM Server
- 2.11 Email Hostname Masquerading
- 2.12 Configuring PPU Partitions and URS Devices
- 2.13 Verifying the Utility Meter Operation
- 2.14 Completing the Utility Meter Installation and Configuration
- 2.15 Upgrading the Utility Meter Software to Version 8.15
- 3 Performing Utility Meter Tasks
- 4 Verifying Utility Meter Operation
- 4.1 Verifying the Utility Meter Hardware is Operational
- 4.2 Verifying the Utility Meter Software is Operational
- 4.3 Verifying the CIM Server Software Is Operational
- 4.4 Verifying Connectivity from the Utility Meter to HP
- 4.5 Verifying the Data Acquisition Server is Running
- 4.6 Verifying the Utility Meter Data Transport Method
- 4.7 Verifying a PPU Partition
- 4.8 Verifying a Storage Device
- 4.8.1 Verifying a Device is Configured in the Utility Meter
- 4.8.2 Verifying a Device is Connected to the Utility Meter
- 4.8.3 Verifying the Connection from the Utility Meter to HP
- 4.8.4 XP Only – Verifying the Correct Version of CV XP AE CLI is Installed
- 4.8.5 EVA Only – Verifying the Correct Version of CV EVA SSSU is Installed
- 4.9 Verifying a SAN Device
- 5 Troubleshooting the Utility Meter
- A Site Preparation Form for Pay Per Use
- B Site Preparation Form for Utility Ready Storage
- C Data Fields Sent from the Utility Meter to HP
- Glossary
- Index

6. Click the Add button. An information message appears. If no errors occur, such as duplicate device ID,
the XP device is added and listed in the Status field. If an error occurs, the Status field displays the
error message.
7. To add another XP device, repeat this procedure starting with Step 5; otherwise, click the Done button
to close the Add Device dialog box.
IMPORTANT: Prior to adding any XP devices, you can click the Done button to close the window without
making any additions. However, after you click the Add button, the entries are accepted. (To remove a
previously added XP device from the Managed Devices Tree, use the Remove Device task in the
Devices tab of the Utility Meter GUI. For more information about removing devices, see Section 3.5.4:
“Remove Device”.)
After you have added an XP device into the Utility Meter the newly added XP device's IP address appears
in the Managed Devices Tree. Note that the green circle to the left of the IP address indicates that the
XP device is connected to the Utility Meter.
IMPORTANT: A newly added XP device that is correctly configured in the Utility Meter has a green circle
next to the XP Command View (CV) server's IP address in the Managed Devices Tree. For an example
of a correctly configured device, see Figure 3-3: “Utility Meter GUI Managed Devices Tree”. If the XP CV
server's IP address has a red box next to it, the device did not have an associated disk array correctly
configured into the Utility Meter. To resolve this problem, see Section 5.4: “Fixing a Disconnected Device
(with Red Box)”.
3.5.1.3 Add a PPU WBEM Partition/Server
This task allows you to add one or more PPU WBEM Partitions/Servers to the Utility Meter. The configured
PPU WBEM Partitions/Servers are visible in the Utility Meter GUI's Managed Devices Tree in the Managed
Devices (left) pane.
IMPORTANT: If you are going to require a server certificate for the PPU WBEM Partition/Server, you need
to update the servers.pem file before you add the PPU WBEM Partition/Server.
When a PPU WBEM Partition/Server is added to the Utility Meter you have the option of requiring a server
certificate when the partition/server is accessed. The certificate is different for each server that you want to
connect to. For each metered server, you need to copy the certificate file from the remote server to the server
the meter is running on and then add it into /var/opt/meter/servers.pem, which is used to store the
certificates for every PPU WBEM Partition/Server for which you want to require a certificate. To copy the
certificate from the metered server and add it to servers.pem, use the following procedure:
1. Log on to the remote server where the certificate is located. The certificate can be found in the following
locations:
• HP-UX: /etc/opt/hp/sslshare/cert.pem
• Linux: /etc/Pegasus/server.pem
2. Copy the certificate to the Utility Meter server.
3. Browse to the location where you copied the certificate, and add the certificate to the servers.pem
file by running the following command:
/opt/wbem/sbin/ssltrustmgr -a -f /var/opt/meter/servers.pem -c
<new_cert_file>
where <new_cert_file> is the name of the certificate.
4. Verify that the certificate was added correctly by running the following command:
/opt/wbem/sbin/ssltrustmgr -l -f /var/opt/meter/servers.pem
Follow this procedure to add a PPU WBEM Partition/Server into the Utility Meter:
1. Start the Utility Meter GUI. For details, see Section 3.1: “Starting the Utility Meter GUI”.
2. In the Utility Meter GUI, click the Devices tab.
3.5 Utility Meter Devices Tasks 55