
8.15 HP Utility Meter User's Guide (January 2010)
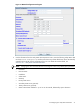

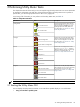
Table Of Contents
- HP Utility Meter User's Guide for version 8.15
- Table of Contents
- About This Document
- 1 Introduction
- 2 Installing and Configuring the Utility Meter Software
- 2.1 Overview
- 2.2 Skills Required
- 2.3 Before Going to the Customer Site
- 2.4 Configuring the HP-UX System Parameters
- 2.5 Obtaining and Installing the Utility Meter Software
- 2.6 Configuring the Utility Meter Parameters
- 2.7 URS XP Only – Installing the CV XP AE CLI Software
- 2.8 URS EVA Only – Installing the CV EVA SSSU Software
- 2.9 URS HP/Brocade SAN Switch Only – Installing the SMI-S Agent Software
- 2.10 URS Cisco SAN Switch Only – Enabling the CIM Server
- 2.11 Email Hostname Masquerading
- 2.12 Configuring PPU Partitions and URS Devices
- 2.13 Verifying the Utility Meter Operation
- 2.14 Completing the Utility Meter Installation and Configuration
- 2.15 Upgrading the Utility Meter Software to Version 8.15
- 3 Performing Utility Meter Tasks
- 4 Verifying Utility Meter Operation
- 4.1 Verifying the Utility Meter Hardware is Operational
- 4.2 Verifying the Utility Meter Software is Operational
- 4.3 Verifying the CIM Server Software Is Operational
- 4.4 Verifying Connectivity from the Utility Meter to HP
- 4.5 Verifying the Data Acquisition Server is Running
- 4.6 Verifying the Utility Meter Data Transport Method
- 4.7 Verifying a PPU Partition
- 4.8 Verifying a Storage Device
- 4.8.1 Verifying a Device is Configured in the Utility Meter
- 4.8.2 Verifying a Device is Connected to the Utility Meter
- 4.8.3 Verifying the Connection from the Utility Meter to HP
- 4.8.4 XP Only – Verifying the Correct Version of CV XP AE CLI is Installed
- 4.8.5 EVA Only – Verifying the Correct Version of CV EVA SSSU is Installed
- 4.9 Verifying a SAN Device
- 5 Troubleshooting the Utility Meter
- A Site Preparation Form for Pay Per Use
- B Site Preparation Form for Utility Ready Storage
- C Data Fields Sent from the Utility Meter to HP
- Glossary
- Index

NOTE: You must be logged in as root to start the Utility Meter GUI.
The following procedure assumes:
• You are running the Utility Meter GUI on the Utility Meter system.
• A graphical display, running X11, is attached to the Utility Meter system.
To start the Utility Meter GUI, perform the following procedure:
1. Start a terminal session on the Utility Meter system.
2. Log in as root in the terminal window.
3. Ensure the DISPLAY environment variable is set so that an X11 application is locally displayed.
As a test, the following command should bring up the xclock application:
# /usr/bin/X11/xclock &
If the X11 application is not displayed properly, you must set the DISPLAY environment variable
to the hostname or the IP address of the system you started the terminal window from. For example,
if you started the terminal window on node 10.1.2.3, set the environment variable with the
following command when in the Bourne shell:
# export DISPLAY=10.1.2.3:0.0
After you have set the DISPLAY environment variable, try to display the xclock application again.
If this fails, consult a networking specialist at the customer site.
4. Execute the following command:
# /opt/meter/bin/umGUI
• Using a web browser:
Open a web browser and type in the following URL:
/opt/hpws/apache/htdocs/UtilityMeterApplet.jnlp
Microsoft Internet Explorer has been tested to work fine.
By either using the X-Windows capable procedure or the web browser procedure, the window in Figure 3-1
appears showing the Utility Meter GUI.
40 Performing Utility Meter Tasks