
8.15 HP Utility Meter User's Guide (January 2010)
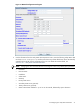

Table Of Contents
- HP Utility Meter User's Guide for version 8.15
- Table of Contents
- About This Document
- 1 Introduction
- 2 Installing and Configuring the Utility Meter Software
- 2.1 Overview
- 2.2 Skills Required
- 2.3 Before Going to the Customer Site
- 2.4 Configuring the HP-UX System Parameters
- 2.5 Obtaining and Installing the Utility Meter Software
- 2.6 Configuring the Utility Meter Parameters
- 2.7 URS XP Only – Installing the CV XP AE CLI Software
- 2.8 URS EVA Only – Installing the CV EVA SSSU Software
- 2.9 URS HP/Brocade SAN Switch Only – Installing the SMI-S Agent Software
- 2.10 URS Cisco SAN Switch Only – Enabling the CIM Server
- 2.11 Email Hostname Masquerading
- 2.12 Configuring PPU Partitions and URS Devices
- 2.13 Verifying the Utility Meter Operation
- 2.14 Completing the Utility Meter Installation and Configuration
- 2.15 Upgrading the Utility Meter Software to Version 8.15
- 3 Performing Utility Meter Tasks
- 4 Verifying Utility Meter Operation
- 4.1 Verifying the Utility Meter Hardware is Operational
- 4.2 Verifying the Utility Meter Software is Operational
- 4.3 Verifying the CIM Server Software Is Operational
- 4.4 Verifying Connectivity from the Utility Meter to HP
- 4.5 Verifying the Data Acquisition Server is Running
- 4.6 Verifying the Utility Meter Data Transport Method
- 4.7 Verifying a PPU Partition
- 4.8 Verifying a Storage Device
- 4.8.1 Verifying a Device is Configured in the Utility Meter
- 4.8.2 Verifying a Device is Connected to the Utility Meter
- 4.8.3 Verifying the Connection from the Utility Meter to HP
- 4.8.4 XP Only – Verifying the Correct Version of CV XP AE CLI is Installed
- 4.8.5 EVA Only – Verifying the Correct Version of CV EVA SSSU is Installed
- 4.9 Verifying a SAN Device
- 5 Troubleshooting the Utility Meter
- A Site Preparation Form for Pay Per Use
- B Site Preparation Form for Utility Ready Storage
- C Data Fields Sent from the Utility Meter to HP
- Glossary
- Index

IMPORTANT: It is important that you enter an email address in the Meter Contact Email
field. HP recommends using an email alias or an email distribution list as the contact address for
your Utility Meter.
4. Select the data transport method (either Transfer data through HTTPS, or Transfer data
through email Depending on the selected data–transport method, additional fields need to be filled
in:
• HTTPS: If there is a proxy server between the Utility Meter and HP, the proxy server's
hostname.domain name, port, login account, and account password must be provided. TCP port
443 on the customer's firewall must be open between the Utility Meter and gnome.hprsn.com,
which currently has an IP address of 15.217.96.63. gnome.hprsn.com is the host that receives
usage reports.
• Email: The IP address of the outbound email relay host must be provided. If necessary, provide the
masquerading email domain. Port 25 must be open on any firewall between the Utility Meter and
the SMTP relay host. If the SMTP relay has an access list, ensure the Utility Meter is on this list. For
details on required email hostname masquerading, see “Email Hostname Masquerading”.
5. After you have entered all of the information into the Network Configuration dialog box, click
the Done button to save your settings.
6. HP recommends that you save a copy of the Utility Meter configuration into a safe place (for example,
a CD, network-attached file system, or a flash drive). The Utility Meter parameters are stored in the
/etc/opt/meter/meter.xml file. The Copy the Meter's configuration task allows you to
create a copy of these parameters. To save a copy of the Utility Meter configuration, see Section 3.4.2:
“Copy the Meter's Configuration”.
7. You can now close the Utility Meter GUI by clicking the upper-left corner of the GUI and selecting the
Close drop-down list item.
After changing any Utility Meter software settings, you need to restart the Utility Meter application to pick
up the changes. To restart the Utility Meter application, execute these commands:
1. # /opt/meter/bin/monitor stop
2. # /opt/meter/bin/monitor start
2.7 URS XP Only – Installing the CV XP AE CLI Software
If any of the metered devices are URS XP devices, then you must install version 6.1 or 6.2 of the HP
StorageWorks XP Command View Advanced Edition Command Line Interface (CLI) software on the Utility
Meter. Consult the
HP StorageWorks XP Command View Advanced Edition Software Installation Guide
for
how to obtain and install the XP CLI software.
NOTE: You may need to install more than one version of the HP StorageWorks XP Command View
Advanced Edition CLI software on the Utility Meter. The version of the CLI software on the meter must be
equal to or lower than the version of the Command View software installed on the XP Command View
server(s). If more than one version of the CLI software is installed, execute the below command for each
version.
When installation is complete, execute the following command on the Utility Meter:
# /opt/meter/bin/SetupCLI CLI_path
where CLI_path is the directory path to Command View XP CLI files.
This script completes the setup of the CLI software and sets the proper permissions for the files.
2.7.1 Avoiding CVAE Device Manager Refresh Conflicts
The XP CLI is used to execute a refresh of the CVAE Device Manager database prior to collecting URS XP
usage information. The refresh ensures that up-to-date XP array usage information is obtained. However, the
refresh can fail for the following reasons:
32 Installing and Configuring the Utility Meter Software