User’s Guide Color Monitor Series v72
© 2003 Hewlett-Packard Development Company, L.P. HP, Hewlett-Packard, and the Hewlett-Packard logo are trademarks of Hewlett-Packard Company in the U.S. and other countries/regions. Microsoft, MS-DOS, Windows, and Windows NT are trademarks of Microsoft Corporation in the U.S. and other countries/regions. Intel, Pentium, Intel Inside, and Celeron are trademarks of Intel Corporation in the U.S. and other countries/regions.
Contents 1 Introduction Kit Contents . . . . . . . . . . . . . . . . . . . . . . . . . . . . 1–1 2 Safety and Maintenance Guidelines Safety Guidelines . . . . . . . . . . . Power Requirements . . . . . . Important Safety Information . Maintenance Guidelines . . . . . . Removing the Monitor Base . . . . . . . . . . . . . . . . . . . . . . . . . . . . . . . . . . . . . . . . . . . . . . . . . . . . . . . . . . . . . . . . . . 2–1 2–1 2–1 2–2 2–4 3 Installation Monitor Base Installation . . . .
A Troubleshooting Solving Common Problems . . . . . . . . . . . . . . . . . A–1 Using the World Wide Web . . . . . . . . . . . . . . . . A–4 Preparing to Call Technical Support . . . . . . . . . . . A–4 B Technical Specifications v72 Series Monitor . . . . . . . . . . . . . . . . . . . . . . . B–1 C Agency Regulatory Notices Federal Communications Commission Notice. . . . . Modifications . . . . . . . . . . . . . . . . . . . . . . . . Cables. . . . . . . . . . . . . . . . . . . . . . . . . . . . .
1 Introduction Your microprocessor-based, digitally controlled color monitor is a high-performance and easy-to-use product. It employs the latest on-screen menu technology.
Introduction 1–2 User’s Guide
2 Safety and Maintenance Guidelines Safety Guidelines Power Requirements Refer to the “Power Cord Set Requirements” on page C–4 for information on the correct power cord set for this device. Important Safety Information Å WARNING: To reduce the risk of electric shock or damage to your equipment, do not disable the power cord grounding feature. This equipment is designed to be connected to a grounded (earthed) power outlet that is easily accessible to the operator.
Safety and Maintenance Guidelines Maintenance Guidelines To enhance the performance and extend the life of your monitor, follow these guidelines: Ä 2–2 ■ Do not open your monitor cabinet or attempt to service this product yourself. If your monitor is not operating properly, or has been dropped or damaged, first unplug from power outlet, then contact your Hewlett-Packard authorized dealer, reseller, or service provider. ■ Adjust only those controls that are discussed in the operating instructions.
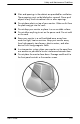
Safety and Maintenance Guidelines ■ Slots and openings in the cabinet are provided for ventilation. These openings must not be blocked or covered. Never push objects of any kind into cabinet slots or other openings. ■ Do not place plants on top of your monitor. Water or dirt from the plant may get into the vents. ■ Do not drop your monitor or place it on an unstable surface. ■ Do not allow anything to rest on the power cord. Do not walk on the cord.
Safety and Maintenance Guidelines Removing the Monitor Base In the event that you need to disassemble the base from the monitor, follow these instructions: 1. If you must remove the base attachment, release the catch and slide the base toward the back of your monitor. 2. Lift the base up and away from your monitor.
3 Installation Monitor Base Installation On some monitors, the base must be attached prior to monitor installation. If you need to attach the base, follow these steps: 1. Align the hooks on the base with the sockets on the bottom of the monitor and attach the base.
Installation 2. Push the base toward the front of the monitor until it stops. Monitor Installation Before installing your monitor, place it in a convenient, well-ventilated location near your computer. 1. Turn off the power to your computer and other peripheral devices. 2. Connect the video cable (blue connector) 1 from the back of the monitor to the blue 15-pin connector on the back of the computer. Tighten the cable screws to secure the cable to the connector.
Installation 3. Connect the power cord 2 to the back of the monitor, then connect the power cord to a power outlet. 4. Power on your computer and monitor. If your monitor fails to function properly, refer to Appendix A, “Troubleshooting.” 5. If necessary, adjust the front panel monitor controls according to your personal preference. See “Front Panel Controls” on page 4–5 for detailed information. Your monitor installation is now complete.
Installation 3–4 User’s Guide
4 Operation Information Files The CD-ROM included with this monitor contains two data files that must be installed onto your computer: An .INF file and an .ICM file. The .INF file designates software and defines monitor resources used by Microsoft Windows to ensure monitor compatibility with the graphics adapter in your computer. The .ICM file provides color matching consistency between your monitor screen and your printer.
Operation Installing Drivers The HP monitor comes with driver software allowing you to take advantage of the Plug and Play feature of the Windows Me, Windows 2000, or Windows XP operating system. This software enables the computer to communicate with the monitor and use all the monitor features. HP computers may come with the Plug and Play drivers pre-installed.
Operation Windows Me users The procedure for installing the driver for your operating system may vary. To install the driver for the v72 monitor: 1. Click Start, select Settings, and then click Control Panel. 2. Double-click Display. 3. Click the Settings tab. 4. Click the Advanced button. 5. Select the Monitor tab. 6. Click the Change button. 7. Select the Specify the location of the driver box, and then click Next. 8. Find and open the hp_v72.
Operation 8. Click Properties. 9. Select the Driver tab. 10. Click Update Driver. 11. Select the Install from a list or specific location box, and then click Next. 12. Select the Don’t search box, and then click Next. 13. Click Have Disk. 14. Click Browse. 15. Find and open the hp_v72.inf file on the CD-ROM disc in the Drivers directory, and click OK. 16. Click Next to install the monitor driver.
Operation Front Panel Controls Item Icon Front Panel Controls Name Function Select Launches on-screen displays, selects functions and adjustments, and exits menus and On-Screen Display. Left Adjustment Moves backward through menu options or decreases adjustment levels. Right Adjustment Moves forward through menu options or increases adjustment levels. Power/LED Controls power to the monitor. The LED on the power button indicates the state of the monitor.
Operation On-Screen Display The On-Screen Display (OSD) adjusts the screen image based on your viewing preferences. To access the OSD, do the following: 1. If the monitor is not already on, press the Power button to turn on the monitor. 2. Press the Select button to display the On-Screen Display menu. A screen similar to this one appears. For a description of the icons that appear on the screen, see “On-Screen Display Functions” on page 4–7. 3.
Operation On-Screen Display Functions Use the Right-Adjustment and Left-Adjustment buttons found on the front control panel of your monitor to adjust these functions. Icon User’s Guide On-Screen Display Icons and Functions Function Description Contrast Right-Adjustment increases the contrast and Left-Adjustment decreases the contrast. Brightness Right-Adjustment increases the brightness and Left-Adjustment decreases the brightness.
Operation On-Screen Display Icons and Functions (Continued) Icon Function Description 4–8 Parallelogram This control corrects the tilted vertical edges of the image on both sides of the screen that are in the same direction. Tilt (Rotation) Right-Adjustment tilts the sides of the image to the right and Left-Adjustment tilts the sides of the image to the left. Degauss This control demagnetizes the screen to reduce color impurities.
Operation Monitor Messages No Signal Message If a “No Signal” message displays on your monitor, check to be sure your video cable is properly connected and ensure that your computer is powered on.
Operation Out of Frequency Range Message If an “Out of Frequency Range” message displays on your monitor, your video resolution and/or refresh rate are set higher than the levels your monitor supports. To change the video resolution or refresh rate on your monitor, follow these steps: 1. Restart your computer. 2. Enter Safe Mode on your computer. Refer to your computer’s operating system Help for instructions on entering Safe Mode. 3.
Operation Using the Energy Saver Mode Your monitor is designed to meet strict Environmental Protection Agency (EPA) Energy Star® requirements for reduced power consumption. Using a combination of hardware and software functions, this energy-saving feature allows your computer to control your monitor’s power consumption and reduce your monitor’s power state when not in use.
Operation 4–12 User’s Guide
A Troubleshooting Solving Common Problems The following table lists possible problems, the possible cause of each problem, and the recommended solutions. Problem Possible Cause Solution Screen is blank. Power cord is disconnected. Connect the power cord. Power switch is off. Turn on power. Video cable is improperly connected. Connect video cable properly. Screen blanking utility is active. Depress any key on the keyboard or move the mouse. Brightness and contrast are too low.
Troubleshooting Problem Color is abnormal. Image is too large or too small. Image is not centered. A–2 (Continued) Possible Cause Solution A magnetic object may be nearby. Move the object farther away. Monitor may have been moved or inadvertently bumped. Press the SELECT button to access the On-Screen Display. Select Degauss to activate. Hewlett-Packard suggests you not degauss more than once within a 30-minute period of time. Horizontal width may need adjustment.
Troubleshooting Problem (Continued) Possible Cause “No Signal” is displayed on screen. Monitor video cable is disconnected. Connect the 15-pin monitor video cable to the computer. Be sure that the computer power is on. “Out of Frequency” is displayed on screen. Video resolution and/or refresh rate are set higher than what your monitor supports. Restart your computer and enter Safe Mode. Change your settings to a supported setting (see “Technical Specifications”).
Troubleshooting Using the World Wide Web Before contacting customer services, refer to the support Web site at: http://www.hp.com Preparing to Call Technical Support If you cannot solve a problem using the troubleshooting tips in this section, you may need to call technical support.
B Technical Specifications v72 Series Monitor Screen Size 17” (43 cm) visual diagonal Viewable screen size 16” (40.6 cm) Dot Pitch 0.
Technical Specifications (Continued) Inrush Current 30 amps @ 120V 60 amps @ 220V Power Consumption 100 W (Max.) Dimension (W x H x D) Unpacked w/attached base 16.6 x 17 x 17.5 inches (maximum) 410 x 432 x 445 mm (maximum) Weight 38 lb Max. 17 kg Max. Operating Temperature 50o F to 95o F 10o C to 35o C Storage Temperature –22o F to 140o F –30o C to 60o C Humidity 20% to 80% (non-condensing) Altitude Up to 10,000 ft.
C Agency Regulatory Notices Federal Communications Commission Notice This equipment has been tested and found to comply with the limits for a Class B digital device, pursuant to Part 15 of the FCC Rules. These limits are designed to provide reasonable protection against harmful interference in a residential installation.
Agency Regulatory Notices Cables Connections to this device must be made with shielded cables with metallic RFI/EMI connector hoods to maintain compliance with FCC Rules and Regulations. Declaration of Conformity for Products Marked with FCC Logo, United States Only This device complies with Part 15 of the FCC Rules.
Agency Regulatory Notices Avis Canadien Cet appareil numérique de la classe B respecte toutes les exigences du Règlement sur le matériel brouilleur du Canada. European Notice Products with the CE Marking comply with both the EMC Directive (89/336/EEC) and the Low Voltage Directive (73/23/EEC) issued by the Commission of the European Community.
Agency Regulatory Notices EPA Energy Star Compliance Monitors that are marked with the Energy Star® Logo meet the requirements of the EPA Energy Star program. As an Energy Star Partner, Hewlett-Packard Company has determined that this product meets the Energy Star guidelines for energy efficiency. Specific details on using the Energy Saving features can be found in the energy saver or power management section of the computer manual.
D TCO‘99 Requirements You have just purchased a TCO’99 approved and labelled product. Your choice has provided you with a product developed for professional use. Your purchase has also contributed to reducing the burden on the environment and also to the further development of environmentally adapted electronics products.
TCO‘99 Requirements There are also other characteristics of a computer, such as energy consumption levels, that are important from the viewpoints of both the work (internal) and natural (external) environments. Since all methods of electricity generation have a negative effect on the environment (for example, acidic and climate-influencing emissions, radioactive waste), it is vital to save energy. Electronics equipment in offices is often left running continuously and thereby consumes a lot of energy.
TCO‘99 Requirements Below you will find a brief summary of the environmental requirements met by this product. The complete environmental criteria document may be ordered from: TCO Development SE-114 94 Stockholm, Sweden Fax: +46 8 782 92 07 Email (Internet): development@tco.se Current information regarding TCO’99 approved and labelled products may also be obtained via the Internet, using the address: http://www.tco-info.
TCO‘99 Requirements Cadmium Cadmium is present in rechargeable batteries and in the color-generating layers of certain computer displays. Cadmium damages the nervous system and is toxic in high doses. The relevant TCO’99 requirement states that batteries, the color-generating layers of display screens and the electrical or electronics components must not contain any cadmium. Cadmium is a heavy metal that is Bioaccumulative. Mercury Mercury is sometimes found in batteries, relays and switches.
Lead Lead can be found in picture tubes, display screens, solders and capacitors. Lead damages the nervous system and in higher doses, causes lead poisoning. The relevant TCO´99 requirement permits the inclusion of lead since no replacement has yet been developed. Lead is a heavy metal that is Bioaccumulative.
D–6 User’s Guide