English HP Pavilion M40, M50, and M70 Multimedia Displays User’s Guide
HP Pavilion M50 and M70 Multimedia Displays Notice The information contained in this document is subject to change without notice. Hewlett-Packard® Company makes no warranty of any kind with regard to this material, including, but not limited to, the implied warranties of merchantability and fitness for a particular purpose. HP shall not be liable for errors contained herein or for incidental or consequential damages in connection with the furnishing, performance, or use of this material.
Hewlett-Packard is a registered trademark of Hewlett-Packard Company in the United States of America and other countries. Other brand or product names are trademarks of their respective holders.
English Table of Contents 1 Introduction 1 For Your Safety 2 2 Installation 5 Unpacking the Display 5 Locating the Display 5 Connecting the Power and Video Cables 6 Connecting the Speakers 8 3 Using the Display 11 Turning the Display On and Off 11 Degaussing the Display 12 Setting the Screen Resolution 13 Minimizing Eyestrain 13 Minimizing Energy Use 14 Care and Cleaning 15 Cleaning the Screen 15 Adjusting the Viewing Angle 17 4 Changing Display Settings 19 Using the Front Panel 19 Setting the Custom P
1 Introduction HP Pavilion Multimedia Displays 5 Technical Information 35 M40 Display Information 35 M40 Video Modes 37 M40 Pin Assignments 38 M50 Display Information 40 M50 Video Modes 41 M50 Pin Assignments 43 M70 Display Information 44 M70 Video Modes 45 M70 Pin Assignments 47 DPMS Power-Management Features 48 6 Regulatory Information 51 FCC Statement 51 X-Ray Radiation Notice 52 General Notice 53 vi
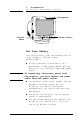
The HP Pavilion M40, M50, and M70 Multimedia Displays (Models D5269A, D5258A, and D5259A) are highresolution, multi-scan color monitors designed for use with HP Pavilion and other computers. Each display includes a built-in microphone and mounts for the speakers supplied with HP Pavilion computers. The displays comply with EPA ENERGY STAR standards and include automatic power-management features. Other features include Non-glare picture tube to reduce the reflection of ambient light (except U.
1 Introduction HP Pavilion Multimedia Displays Microphone Control panel Power button For Your Safety For your safety and the protection of your display, follow these precautions: WARNING To completely disconnect power from the display, you must remove the power cable from the power socket. 2 Always connect the display to a grounded, three-prong power outlet. Use only the factory-supplied power cord. To prevent electrical shock, do not remove the back cover of the display.
To avoid the risk of damage to the display and electrical shock to yourself, do not expose the display to rain or moisture. Adjust only those controls whose operations are covered in this manual. Improperly adjusting other controls may result in damage and could require repair by a service technician. If any of the following conditions occur, unplug the display and contact a qualified service technician: The power cord or plug is frayed or damaged.
English 2 Installation Follow the instructions in this chapter to install your HP Pavilion M40, M50, or M70 Multimedia Display. NOTE Before installing the display, refer to your computer and video adapter documentation. You may need to make changes to accommodate the display.
2 Installation HP Pavilion Multimedia Displays Connecting the Power and Video Cables Before connecting any cables, make sure to read the safety instructions at the beginning of the manual. The computer and display must be turned off.
2 Installation HP Pavilion Multimedia Displays English To connect the power and video cables 1. Connect the power cord to the back of the display. 2. Plug the power cord into a power outlet. 3. Connect the orange plug on the video cable to the video port of your computer. If you have an HP Pavilion computer, this port is marked in orange. (The illustration below is for reference only. Check your computer manual for the video port location.
2 Installation HP Pavilion Multimedia Displays Microphon e Video connector 4. Plug the yellow microphone connector into the sound input port of your computer. On HP Pavilion computers, the port is marked in yellow. Connecting the Speakers The display is designed for use with the HP/Polk Audio speakers supplied with HP Pavilion computers. To connect the speakers 1. Extend the cables attached to the two speakers. 2. Identify the left and right speakers.
2 Installation HP Pavilion Multimedia Displays English right side of the display, then push down until the speaker is secure.
2 Installation HP Pavilion Multimedia Displays 4. Clip the speaker wires to the underside of the monitor as shown in the illustration. Y- 5. Plug the two speaker wire connectors into the Y-connector. 6. Plug the single connector on the end of the Y-connector’s cable to the sound-out port on your computer. (Check in the computer’s documentation for the location of the port.
This chapter contains information about using your HP Pavilion M40, M50, or M70 Multimedia Display. Turning the Display On and Off You use the power button on the front panel to turn the display on and off. When the display is on, the light near the power button is illuminated. The light is green when the display and computer are active and amber when the display is in one of its reduced power modes.
3 Using the Display HP Pavilion Multimedia Displays period. You can turn the display off even if you leave the computer running. WARNING To completely disconnect power from the display, you must remove the power cable from the power socket. To turn the display on or off Press the power button on the front of the display. Degaussing the Display Each time you turn on the display, it is automatically degaussed. Degaussing removes magnetism that causes unwanted color variations.
Setting the Screen Resolution The screen resolution determines the amount of information shown in the display. Screen resolution refers to the number of the dots or pixels used to make up an image. A low screen resolution means that the display uses a relatively small number of relatively large dots. A higher resolution means that more dots of a smaller size make up the image. With higher screen resolutions, icons, windows, and text are smaller on the screen, but more information can be displayed.
3 Using the Display HP Pavilion Multimedia Displays Video Modes” in Chapter 5 show the image refresh rates supported by the displays at different screen resolutions. Minimizing Energy Use All HP Pavilion computers and many other computers support VESA display power management. Power-management features reduce the display’s power consumption after a period of keyboard inactivity.
3 Using the Display HP Pavilion Multimedia Displays English Care and Cleaning To maximize screen life and prevent damage to the picture tube, HP recommends that you Use the display power-management system (if available on your computer) or a screen saver program. Turn off the display or reduce its brightness and contrast to minimum levels when you won’t be using the display for an extended period. This is particularly important if you don’t use a power-management system or screen saver.
3 Using the Display HP Pavilion Multimedia Displays 2. Spray a soft cotton cloth with glass cleaner and gently wipe the screen. 3. Dry the screen with a soft cotton cloth. 4. Plug in the display and turn it on.
3 Using the Display HP Pavilion Multimedia Displays English Adjusting the Viewing Angle The display’s pedestal mounting enables you to adjust the viewing angle. You can tilt and turn the display to find the most comfortable viewing position.
3 Using the Display HP Pavilion Multimedia Displays 18
English 4 Changing Display Settings You use the OSD (On-Screen Display) features of the Pavilion displays to change their settings. The buttons on the front panel control on-screen icons and windows. Using the Front Panel You use the six buttons on the front of the display to control OSD functions. MODE The Mode button allows you to choose from the display’s custom preset modes. See the next section, “Setting the Custom Preset Mode,” for instructions.
4 Changing Display Settings HP Pavilion Multimedia Displays The minus button decreases a setting if an adjustment window is open. In the OSD main window, the button moves backward through the icons. The plus button increases a setting if an adjustment window is open. In the OSD main window, the button moves forward through the icons. Setting the Custom Preset Modes Your display is configured for excellent performance right out of the box.
4 Changing Display Settings HP Pavilion Multimedia Displays English You choose the mode in the Mode window, which displays the following icons: Productivity mode is designed for best results in office environments and with applications like word processors and spreadsheets. Photos/Graphics mode has the same settings used by graphics professionals in photographic and pre-press applications and environments. Gaming mode offers higher contrast and the same color settings found in TV and arcade games.
4 Changing Display Settings HP Pavilion Multimedia Displays To set the display mode 1. Press the Mode button to display the Mode window. 2. To immediately change to the next mode, press the Mode button again. (Alternatively, press the + or – button to move through the icons.) 3. When the display mode you want is highlighted, press the Select button to close the Mode window. (Alternatively, wait five seconds for the window to close automatically.
4 Changing Display Settings HP Pavilion Multimedia Displays English If you turn off the display, it will be in Personal Setup mode when you turn it back on. Any changes previously made to Productivity, Photos/Graphics, or Gaming modes are lost. The display’s power-saving features don’t affect temporary changes to custom preset modes.
4 Changing Display Settings HP Pavilion Multimedia Displays Adjusting the Brightness and Contrast You can change the display’s brightness or contrast quickly by pressing the brightness or contrast button on the front panel. (You can also adjust the brightness and contrast through the OSD main window as described in the next section, “Using the OSD Main Window.”) Brightness adjusts the black level, while contrast adjusts the difference between the dark and light parts of the image.
4 Changing Display Settings HP Pavilion Multimedia Displays English (Alternatively, wait five seconds for the window to close automatically.) Using the OSD Main Window The OSD main window enables you to make changes to a variety of display settings. You open the window by pressing the Select button when no other OSD windows are displayed on the screen. In the OSD main window, you select icons for the settings you want to change: Select the brightness icon to adjust the black level in the image.
4 Changing Display Settings HP Pavilion Multimedia Displays Select the pincushion icon to adjust any tapering or bowing of the sides of the image. Select the trapezoid icon to adjust distortion where the top of the image is larger or smaller than the bottom of the image. Select the color temperature icon to adjust the color temperature or white balance of the image. See the next section, “Choosing the Color Temperature,” for instructions.
Select the exit icon to close the OSD main window and save any changes you have made. In most cases, when you select an icon, an adjustment window appears below the OSD main window. The adjustment window contains a control bar that you shorten or lengthen with the + or – key. A number next to the control bar shows the percentage of the current setting relative to its maximum value.
4 Changing Display Settings HP Pavilion Multimedia Displays There are some exceptions to this pattern, however: Selecting the color temperature icon opens a window where you can make additional choices. See the next section, “Choosing the Color Temperature,” for instructions. The degauss, factory reset, and exit options don’t have adjustment windows. They take effect immediately after you select them. To use the OSD main window 1.
4 Changing Display Settings HP Pavilion Multimedia Displays English If you selected another option, an adjustment window appears for the option you selected. 1024x768 / 75HZ 50 4. Press the + or – button to change the current setting. 5. Press the Select button to save your changes and close the adjustment window. 6. To close the OSD main window, select the Exit icon or wait five seconds for the window to close automatically.
4 Changing Display Settings HP Pavilion Multimedia Displays In Productivity and Gaming Modes, you can choose between two settings: 9300K and 6500K. In Photos/Graphics mode, you can also choose a third setting—5000K. This setting is represented by the camera icon. In Personal Setup mode, you can choose colors to suit the color of the ambient lighting in your environment. 9300K is often used for office environments or fluorescent lighting. 6500K is often used for incandescent lighting.
4 Changing Display Settings HP Pavilion Multimedia Displays 9300 English 1024x768 / 75HZ 6500 3. Press the + or – button to move to the color temperature option you want. 4. Press the Select button to select the color temperature and close the adjustment window. Setting Red, Green, and Blue Values You may need to make very precise adjustments to the screen color.
4 Changing Display Settings HP Pavilion Multimedia Displays If you have difficulty getting an exact color match, reset each color to its middle value (50%), then readjust to find the color setting you want. To set RGB values 1. Press the Mode button, and press the + or – button to select the Personal Setup mode. 2. Press the Select button to activate the Personal Setup mode. 3. Press the Select button again to open the OSD main window. 4.
move to the Personal Setup icon. 7. Press the Select button to open the RGB adjustment window. The Exit icon is highlighted by default. R 50 G 50 B 50 8. If you want to accept the current RGB values, press the + or - button to close the window. 9. To make changes to color values, press the Select button to move to the red adjustment bar, then press the + or - button to adjust the value. 10. Press the Select button to move to the green adjustment bar, then press the + or – button to adjust†it. 11.
English 5 Technical Information This chapter contains technical information about the M40, M50, and M70 displays. These displays are compatible with IBM PC, PC/XT, PC/AT, PS/2, and other PCcompatible computers. They are also compatible with VESA power-management standards. (See “DPMS Power-Management Features” at the end of this chapter.) M40 Display Information Picture tube 14 in (35.6 cm), 90° deflection, nonglare, black matrix, light transmission 57% phosphor P22 medium short, 0.
5 Technical Information HP Pavilion Multimedia Displays Hz Maximum power consumption 74 W Dot rate 65 MHz Pedestal Tilt: -5° forward, 12° backward Swivel: 90° left or right 36
Dimensions (W x H x D) 372 x 401 x 395 mm 14.9 x 16.0 x 15.8 in Net weight 11 kg (24.3 lb) Operating Conditions Temperature 5° to 35°C (41° to 95°F ) Humidity 20% to 80% Storage Conditions Temperature Humidity English 5 Technical Information HP Pavilion Multimedia Displays -25° to 55°C (-13° to 131°F ) 20% to 80%, noncondensing M40 Video Modes The display supports the following industry-standard combinations of screen resolution and refresh rates.
5 Technical Information HP Pavilion Multimedia Displays 1024 x 768 CAUTION 60 Hz Setting the screen resolution/refresh rate combination higher than 1024 x 768 at 60 Hz can damage the display. M40 Pin Assignments The following figure illustrates the 15-pin D-sub male video connector used by the M40 monitor. The table shows the pin assignments.
are subject to change without notice.
5 Technical Information HP Pavilion Multimedia Displays M50 Display Information Picture tube 15 in (38.1 cm), 90° deflection, nonglare, black matrix, light transmission 57% phosphor P22 medium short, 0.28 mm dot pitch Maximum viewable area 280 mm (H) x 210 mm (V) 11 in (H) x 8.
5 Technical Information HP Pavilion Multimedia Displays Operating Conditions 13 kg (28.6 lb) Temperature 5° to 35°C (41° to 95°F ) Humidity 20% to 80% Storage Conditions Temperature Humidity English Net weight -25° to 55°C (-13° to 131°F ) 20% to 80%, noncondensing M50 Video Modes The display supports the following industry-standard combinations of screen resolution and refresh rates. Other combinations are possible, but may require adjustments to the image size and position.
5 Technical Information HP Pavilion Multimedia Displays CAUTION 42 Setting the screen resolution/refresh rate combination higher than 1024 x 768 at 60 Hz can damage the display.
M50 Pin Assignments The following figure illustrates the 15-pin D-sub male video connector used by the M50 monitor. The table shows the pin assignments.
5 Technical Information HP Pavilion Multimedia Displays M70 Display Information Picture tube 17 in (43.1 cm), 90° deflection, nonglare, light transmission 52% phosphor P22 medium short, 0.28 mm dot pitch Maximum viewable area 320 mm (H) x 240 mm (V) 12.8 in (H) x 9.
5 Technical Information HP Pavilion Multimedia Displays Operating Conditions Temperature Humidity Storage Conditions Temperature Humidity 19 kg (41.9 lb) English Net weight 5° to 35°C (41° to 95°F ) 20% to 80%, noncondensing -25° to 60°C (-13° to 140°F ) 20% to 80%, noncondensing M70 Video Modes The M70 display supports the following industry-standard combinations of screen resolution and refresh rates. Other combinations are possible, but may require adjustments to the image size and position.
5 Technical Information HP Pavilion Multimedia Displays CAUTION 46 Setting the screen resolution/refresh rate combination higher than 1280 x 1024 at 60 Hz can damage the display.
M70 Pin Assignments The following figure illustrates the 15-pin D-sub male video connector used by the M70 display. The table shows the pin assignments.
5 Technical Information HP Pavilion Multimedia Displays DPMS Power-Management Features The HP Pavilion M40, M50, and M70 displays can recognize powermanagement signals from VESA DPMS video adapters, such as those in HP Pavilion and many other computers. When the display receives an appropriate signal, it reduces its power but remains ready for quick use. The power light on the front panel turns amber when the display is in a power-saving mode.
. On Activ Yes e Yes 74W 90W 130W Standb Blank No y Yes <15W <15W <30W Suspen Blank Yes d No <15W <15W <30W Sleep No <8W <8W <8W Blank No 49 English 5 Technical Information HP Pavilion Multimedia Displays
English 6 Regulatory Information FCC Statement This equipment has been tested and found to comply with the limits for a Class B digital device pursuant to Part 15 of the FCC Rules. These limits are designed to provide reasonable protection against harmful interference in a residential installation. This equipment generates, uses, and can radiate radio frequency energy. If not installed and used in accordance with the instructions, it may cause harmful interference to radio communications.
6 Regulatory Information HP Pavilion Multimedia Displays WARNING television are on separate electrical circuits. Make sure that all your peripheral devices are also FCC Class B certified. Consult your computer dealer, Hewlett-Packard, or an experienced radio/TV technician for help. Hewlett Packard’s system verification tests were conducted with HP-supported peripheral devices and HP shielded cables, such as those you received with your system.
controls have been adjusted to ensure safe operation. Only qualified personnel should perform any internal adjustments, as specified in the service manual for this product. Replace the cathode-ray tube with an identical CRT only. General Notice The HP Pavilion M40 (except North American models), M50, and M70 Multimedia Displays have been tested according to MPR 1990:8 for emission properties and meet the guidelines as given by MPR 1990:10 (2.01 – 2.04). NOTE This display is a Class 1 LED product.
English DECLARATION OF CONFORMITY according to ISO/IEC Guide 22 and EN 45014 55
6 Regulatory Information HP Pavilion Multimedia Displays Hewlett-Packard Company Manufacturer’s Name: Manufacturer’s Address: 10500 Ridgeview Ct.
6 Regulatory Information HP Pavilion Multimedia Displays English European Contact: Your local Hewlett-Packard Sales and Service Office or Hewlett-Packard GmbH, Department HQ-TRE Standards Europe, Herrenberger Straße 130, D-71034 Böblingen (FAX: + 49-7031-14-3143) USA Contact: Product Regulations Manager, Hewlett-Packard, HPD, 10500 Ridgeview Ct.
6 Regulatory Information HP Pavilion Multimedia Displays 58