
HP P4000 G2 10 GbE SFP+ Installation Instructions (B7E22-96001, December 2013)

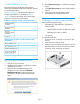


NOTE: Note the locating key on the
RAM, and in the mating RAM slots on the
motherboard. Make sure the locating key
in the RAM matches up with the locating
key in the motherboard slot. Failure to do
so and forcing the RAM in place will
damage the system motherboard and/or
RAM.
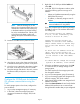
13. Install the air baffle back in place as shown.
14. Align the top cover to the chassis and then slide
it towards the front panel to position it into place.
15. Once the cover is attached to the chassis, tighten
the screw on the top cover with a T-10 wrench.
16. Place the storage node back in the rack, connect
the Ethernet cable, and power on the storage
node.
Configure the 10 GbE ports for LeftHand
OS software communication using the
CMC
For each storage system in the cluster, configure the
ports as follows:
1. Log in to the management group, if necessary.
2. In the CMC, select the storage system and
navigate to the Network category TCP/IP tab
window.
3. Right-click the 10 GbE port labeled eth2 and
select Edit.
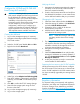
4. In the Edit TCP/IP Configuration window, select
one of the following options to assign an IP
address:
• Obtain an IP address automatically using the
DHCP/BOOTP protocol
• IP Address, to manually assign a static IP
address
IMPORTANT: Use static IP addresses, or
reserved addresses if using DHCP.
If you are prompted with the following message,
click OK to continue. The condition described is
not actually true.
The storage system’s IP address,
0.0.0.0, is not reachable by the
cluster’s Virtual IP (VIP).
Change the storage system's IP
address or cluster's VIP address
and/or subnet masks to ensure they
are on the same network. Then try
again.
To allow this IP address click OK.
(Note: The storage system's IP
address must be on the same network
as the cluster's VIP and subnet
mask.)
To cancel and not change the storage
system's IP address, click Cancel.
5. When the confirmation prompt opens, click OK
to confirm the TCP/IP settings change on this
storage system.
The CMC searches for the storage system with
the changed IP address.
6. Log in to the management group (if necessary).
7. Log in to the storage system and navigate to the
Network category TCP/IP tab window.
8. Verify that the eth2 interface was assigned an IP
address successfully.
9. Select the Communication tab and verify that the
LeftHand OS Interface is set to communicate
through the eth2 interface that you just configured.
Page 5