
9.5 HP P4800 G2 SAN Solution for Bladesystem Maintenance Guide (AX696-96151, September 2011)


3 Maintaining the HP P4800 G2 solution
This chapter provides information to troubleshoot, upgrade, and recover the HP P4800 G2 solution.
Troubleshooting
For detailed troubleshooting information about the HP P4800 G2 solution components, see the
documents listed in Table 1 (page 13).
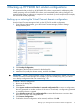
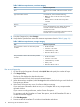
Table 1 Component troubleshooting information
ResourceComponent
HP ProLiant BL460c G7 Server Blade User GuideHP 4460sb G2 server blade
HP ProLiant Servers Troubleshooting Guide
HP ProLiant BL460c G6 Server Blade User GuideHP 4000sb server blade
HP ProLiant Servers Troubleshooting Guide
HP Smart Array Controllers for HP ProLiant Servers User Guide.HP Smart Array P700m controller
HP 3Gb SAS BL Switch user guideHP 3Gb SAS BL switch
HP 600 Modular Disk System Maintenance and Service GuideDisk enclosure
HP BladeSystem c-Class Enclosure Troubleshooting GuideBlade enclosure
CMC does not detect drives
Symptom
• The server blade will not boot the CMC, or the CMC does not list the storage drives or OS
boot drives.
Cause
• The BIOS was reset to factory defaults.
Resolution
Reset the BIOS by selecting Onboard P410i as the boot controller.
1. Restart the server blade, upon power on, press F9 to enter BIOS setup menu.
2. Select Boot Controller Order.
3. Select Ctrl:2 PCI Embedded HP Smart Array P410i controller.
4. Select Controller Order 1.
5. To exit the submenu, press Esc.
6. To exit the setup menu, press Esc.
7. To confirm the changes, press F10.
8. Confirm that the PCI Embedded HP Smart Array P410i controller is listed as the Current Boot
Controller.
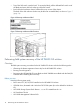
Locating the HP P4800 G2 solution warranty entitlement labels
You must locate and identify the serial number on the HP P4800 G2 solution components to obtain
service under the warranty. A warranty entitlement label (see Figure 6 (page 14)) is placed in each
of the following locations on the HP P4800 G2 solution:
• Top of the disk enclosure drawer. To access the label, pull out a disk enclosure drawer and
look at the top of the drawer near the front.
• Right side of the server blade. To access the label, pull out the affected server blade and look
on the right side of the blade.
Troubleshooting 13