Technical Note SAPConnect This technical note describes how to configure and fax with HP SAPconnect Server, which integrates the SAP BC-CON interface with HP Output Server. NOTE: The images in this section are from SAP R/3 GUI version 5.0. Before configuring the HP SAPconnect Server, complete the following: • Install HP Output Server (see Installing and Configuring for HP Output Server). • Install HP Output Manager for SAP.
SAPConnect Configuring HP SAPconnect Server Attributes Description -sapcon-client-logon-retry-fa ctor Optional: This attribute sets the SAPCON RFC client logon retry factor (in seconds). -sapcon-client-logon-retry-ma x Optional: This attribute sets the SAPCON RFC client maximum logon retry interval (in seconds).
SAPConnect Configuring HP SAPconnect Server The following is a sample saprfc.ini file. DEST=DZL_RFC_DESTINATION TYPE=R PROGID=host.dzl_sapcond GWHOST=SAPhost GWSERV=sapgw01 RFC_TRACE=0 DEST=SID TYPE=A ASHOST=SAPhost SYSNR=01 RFC_TRACE=0 ABAP_DEBUG=0 USE_SAPGUI=0 DZL_DEST=C00 DZL_CLIENT=001 DZL_USERNAME=DZLFAX DZL_PASSWORD=password DZL_LANGUAGE=E DZL_RFC_TRACE=0 NOTE: In most instances, the numeric values for the SAP gateway (GWSERV) and the SYSNR should be the same. To deliver the same sample saprfc.
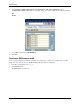
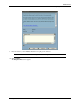
SAPConnect Configuring HP SAPconnect Server . 4. 4 Click Create.
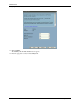
SAPConnect Configuring HP SAPconnect Server 5. Enter a name in the RFC destination field (for example, DZL_RFC_DESTINATION). 6. Enter T in the Connection type field. You will also be required to enter a text description of your RFC destination in the Description field. 7. Click Save (CTRL+S). Additional options appear. 8. Click Registration. 9. Enter the Program ID of the fax system, for example, host.dzl_sapcond, where host is the host name. The value appears in the PROGID field of the saprfc.
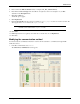
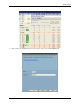
SAPConnect Configuring HP SAPconnect Server 2. Select Settings>Communication methods. The Display View “SAPconnect: Maintenance view communication methods”: Overview screen appears. This screen contains a table with the following headings: Typ Method 3. For type Fax, select method SAPCONNECT. 4. Click Save. Creating a SAPconnect node Once you have defined the communication method and format groups, you then create a SAPconnect node.
SAPConnect Configuring HP SAPconnect Server 3. Enter a name in the Node field and a short description of the node in the Description field.
SAPConnect Configuring HP SAPconnect Server 4. Click Continue. 5. Enter the RFC destination in the RFC destination field (for example, DZL_RFC_DESTINATION.) 6. Click Continue. 7. The Node field appears in the Create Nodes screen. Select Fax. 8. Click Continue. The Address area field appears within the Create nodes screen.
SAPConnect Configuring HP SAPconnect Server 9. Enter an asterisk (*) in the Address area field to trap all generic addresses. NOTE: Contact SAP for information on specific address configurations. 10. Click Continue. The Output formats screen appears.
SAPConnect Configuring HP SAPconnect Server 11. Click Continue. The Country code for node location screen appears. 12. Enter the appropriate country in the Country field.
SAPConnect Configuring HP SAPconnect Server 13. Click Continue. This sets the address type for your SAPconnect node. 14. Under Set further address types, select N (No).
SAPConnect Configuring HP SAPconnect Server 15. Click Continue. The Failed send attempt screen appears. 16. Enter values for Hours and Minutes in their corresponding fields.
SAPConnect Configuring HP SAPconnect Server 17. Click Continue. 18. Select Node is ready for use. 19. Click Continue. The SAPconnect: Administration (nodes) screen appears. The node is saved and is located under FAX Telefax.
SAPConnect Configuring HP SAPconnect Server Testing the connection The SAPconnect node connection should be tested to ensure that all steps were successfully executed and the connection is operable. 1. In the command field, enter /nsm59. 2. Select TCP/IP connections from the menu under RFC destinations. 3. Double-click on your RFC destination (DZL_RFC_DESTINATION). 4. Click Test connection.
SAPConnect Configuring HP SAPconnect Server 5. Close the RFC - Connection Test screen. Configuring personal address settings 1. In the command field, enter /nso12. The Private office setting screen appears. 2. Press F9. The Address maintenance screen appears. Configure your personal address settings in this screen. 3. Save your settings and exit both screens.
SAPConnect Configuring HP SAPconnect Server Starting the routing test 1. In the command field, enter /nscon. 2. Select Utilities>Routing test (CTRL+F10). The SAPconnect: Test routes screen appears: 3. Press F2. This prompts the SAPconnect: Explanation of Routing and Address Conversion screen, which provides a full description of each component of the SAPconnect node connection. NOTE: After you run the routing test, return to the previous screen and press Enter.
SAPConnect Configuring HP SAPconnect Server Creating a test fax request Fax documents can be created and delivered through SAPconnect. To deliver a fax document, complete the following: 1. In the command field, enter /nso02.
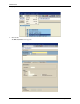
SAPConnect Configuring fax and e-mail with HP SAPConnect server 2. Click the New message button: The Create document screen appears: 3. Enter a document title and a description of the document contents. 4. Enter the country and fax number of your choice in the Recipient column and choose Fax number in the Recip. type column. 5. Click the send button (Shift+F8): 6. You can observe the status of your fax request in the Business Workplace screen or in Job Tracker.
SAPConnect Configuring fax and e-mail with HP SAPConnect server • Configuring SAPoffice NOTE: The menu references and screen images in this section are from SAP GUI version 6.40, and SAP R/3 Enterprise 4.7. The following table describes each of the buttons in the SAP GUI that you use to configure SAPconnect: SAP GUI Button Description The Create button in the SAP GUI allows you to create new objects. The Save button in the SAP GUI saves any changes you have made to the SAP instance.
SAPConnect Configuring fax and e-mail with HP SAPConnect server Task 1: Creating an RFC destination This section identifies the steps that are necessary to create an RFC destination. To create an RFC destination, perform the following steps: 1. Start the SAP GUI and log in to the SAP instance in which you want to configure the RFC destination for SAPconnect. 2. In the R/3 command field, type /nsm59. 3. Under RFC destinations, select and expand TCP/IP connections. 4. On the Edit menu, click Create.
SAPConnect Configuring fax and e-mail with HP SAPConnect server 2. Click Create. The Create nodes screen appears. 3. Enter a name in the Node field and a short description of the node in the Description field. 4. Click Continue. The Create nodes screen prompts you to supply the node type that you want to create. 5. Select RFC Node. 6. Click Continue. The Create nodes screen prompts you to assign an RFC destination to the node. 7.
SAPConnect Configuring fax and e-mail with HP SAPConnect server The Create nodes screen prompts you for more information about the node. 23. Do not configure anything on this screen. Click Continue. The Create nodes screen prompts you for information about node readiness for use and whether the node supports expanded functions. 24. Select the Node is ready for use check box. 25. Click Continue. The SAPconnect: Administration (nodes) screen appears.
SAPConnect Configuring fax and e-mail with HP SAPConnect server SYSNR=SYSNR RFC_TRACE=0 ABAP_DEBUG=0 USE_SAPGUI=0 DZL_DEST=SAP system ID DZL_CLIENT=SAP client of CPIC user DZL_USERNAME=CPIC user name DZL_PASSWORD=CPIC password DZL_LANGUAGE=E DZL_RFC_TRACE=0 The first section of the sample file, beginning with DEST=RFC destination and ending with RFC_TRACE=0, specifies the RFC destination and SAP gateway host.
SAPConnect Configuring fax and e-mail with HP SAPConnect server The second section of the sample file, beginning with DEST=SAP system ID and ending with USE_SAPGUI=0 specifies options for the SAP application server. Following is additional information about selected fields in this section of the sample file: Option Description DEST In the second section of the sample file, this option is the SAP system ID.
SAPConnect Configuring fax and e-mail with HP SAPConnect server HP Output Manager for SAP provides the following attributes that enable you to configure, start, stop, and retrieve the status of the HP SAPconnect server from the HP Output Server command line interface. : Table 1.
SAPConnect Configuring fax and e-mail with HP SAPConnect server where logicalemailName is the name of the logical e-mail destination in HP Output Server and serverName is the name you choose for the HP SAPconnect server. NOTE: The -sapcon-logical-fax-dest attribute is required in this command, even though you are configuring the HP SAPconnect server to submit e-mail messages to an e-mail logical destination. Without the -sapcon-logical-fax-dest attribute, the HP SAPconnect server cannot start.
SAPConnect Configuring fax and e-mail with HP SAPConnect server • mercury - application server • apollo - application server If you would like to have an HP SAPconnect server configured to deliver for zeus, mercury, and apollo, you must configure one HP SAPconnect server for each of these instances. For more information, see “Creating multiple HP SAPconnect servers” in this section. saprfc.ini and SAP logon groups The GWHOST attribute in the saprfc.
SAPConnect Configuring fax and e-mail with HP SAPConnect server This prompts the SAPconnect: Explanation of Routing and Address Conversion screen, which provides a full description of each component of the SAPconnect node connection. NOTE: After you run the routing test, return to the previous screen and press Enter. This should retrieve the Node and Recipient addr. values in the Outbound node and modified recipient address window.