HP Data Protector A.06.
Index Introduction ......................................................................................................................................... 3 Data Protector A.06.00 Installation on Windows Vista and Windows Server 2008 systems ......................... 3 Digital Certificate ............................................................................................................................. 3 Support matrix .............................................................................
Introduction This document describes how to install Data Protector A.06.00 clients on Windows Vista and Windows Server 2008. It also provides the configuration procedure, a description of the installation directory structure and the procedure for backup and recovery process for Windows Vista and Windows Server 2008. Data Protector A.06.
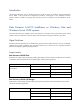
HP-UX (PA-RISC/IA64)* Linux Solaris Core Patch PHSS_38402/PHSS_38403 Cell Server Patch PHSS_38404/PHSS_38405 Cell Console Patch PHSS_38406/PHSS_38407 Core Patch DPLNX_00055 Cell Server Patch DPLNX_00056 Cell Console Patch DPLNX_00057 Core Patch DPSOL_00343 Cell Server Patch DPSOL_00344 Cell Console Patch DPSOL_00345 *Higher patch number is for HP-UX IA64 platforms Data Protector A.06.
To remotely add new clients, the installation gives options to choose two locations: the program files and the program data location for Data Protector. Both of these values can be changed. See figure 13 in the Remote Installation section. Client Installation Prerequisites To install a Data Protector client, use the Administrator account. The Windows system that will become the Data Protector Client system must meet the following requirements: Installation of Microsoft Internet Explorer 5.0 or higher.
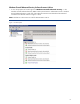
Windows Firewall Advanced Security for Data Protector A.06.xx 1. To view the properties of firewall right click “Windows Firewall Advanced Security” in the Windows Firewall Advanced Security MMC console (Control Panel-> Administrative Tools-> Windows Firewall Advanced Security ) and verify if the inbound connections are blocked and the outbound connections are allowed as shown in figure 1 and 2. Note: The features in this section are valid for Data Protector A.06.xx.
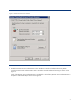
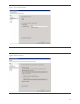
Figure 2: Outbound connections are allowed 2. Enable the Remote Service Administration in the Windows Firewall with Advanced Security MMC console (Control Panel-> Administrative Tools-> Windows Firewall Advanced Security) as shown in the figure 3. Verify if the Remote Service Administration is enabled for “All Profiles” (Remote Service Administration-> Properties-> Advanced Tab) as shown in the figure 4.
Figure 3: Remote Service Administration (NP) is preconfigured in firewall rules Figure 4: Remote Service Administration 3.
port 5555 as shown in figure 5,6,7,8 and 9. Enter an appropriate name for the new rule as shown in figure 10 and click Finish to create the rule.
Figure 7: Type in specific port 5555 Figure 8: Allow all connections 10
Figure 9: Profile Settings Figure 10: Appropriate rule name 11
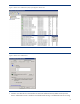
Remote installation from Cell Manager using Data Protector A.06.00 GUI 1. Select Start->Programs->HP Storage Data Protector->Data Protector Manager. In the Data Protector Manager, switch to the Clients context. 2. In the Scoping Pane, right-click Clients and click Add Clients. 3. Type the names of the clients or search for the clients (on Windows GUI only) the user wants to install as shown in figure 11. 4. Click Next. Figure 11: Add Clients 5.
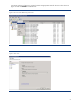
Figure 12: Add components to clients 6. To change the default user account and target directories (on Windows only) for the installation, click Options as shown in figure 13.
Figure 13: Specify options for the client installation Options display two target directories: Program Files: Contains all the Data Protector program files. Data Files: Contains all the Data Protector data files. 7. If the user selects more than one client and the user needs to install different components on each client, click I want to customize this option for client systems independently and then click Next. Select the components user wants to install for each client independently. 8.
Uninstalling Data Protector A.06.00 Client on Windows Vista and Windows Server 2008 Systems For information about uninstalling the Data Protector Client on Windows Vista and Windows Server 2008 systems, see “Uninstalling a Data Protector Client” in the installation guide. Directory Structure for Data Protector A.06.
Figure 15: Data Protector Data Files Directory Structure Omnirc template file location By default the omnirc file, which is used for enabling or disabling specific behavior of Data Protector is located in the “Program Data” directory on Windows Vista and Windows Server 2008. Prerequisites for Backup and Restore Adding Users To explore the Microsoft Windows Network and search for an existing user to add to the user group, a prior connection to the remote system where the user account resides is required.
Sharing Files or Directories within the local system To share Files or directories within the same host for other users in that host, right click on the directory and click on Share. A dialog box for adding permissions and users is displayed. Add appropriate users and permissions. This shared directory is not visible across network and can be verified by trying to access the directory by entering \\system_name\sharename from a different host in the network.
Active Directory database restore In Windows Server 2008, restoring of Active Directory database requires the host to be booted in Directory Service Restore Mode (DSRM). To boot the Windows Server 2008 in DSRM mode the server must meet the following requirements: 1. Set the registry value “DSRMAdminLogonBehavior” (HKLM\System\CurrentControlSet\Control\Lsa\ DSRMAdminLogonBehavior) to 2. 2. Reboot the server. 3. Press F11 key till a list of boot option is displayed. 4.
Note that omniinetpasswd does not add, remove, or change user accounts in the operating system configuration. OPTIONS –version Displays the version of the omniinetpasswd command. –help Displays the usage synopsis for the omniinetpasswd command. –add {User@Domain | Domain\User} [Password] Adds the specified user account from the local Inet configuration. Omniinetpasswd prompts for the password if not specified in the command line.
For More Information HP Data Protector software www.hp.com/go/dataprotector © Copyright 2008 Hewlett-Packard Development Company, L.P. The information contained herein is subject to change without notice. The only warranties for HP products and services are set forth in the express warranty statements accompanying such products and services. Nothing herein should be construed as constituting an additional warranty. HP shall not be liable for technical or editorial errors or omissions contained herein.