
HP OneView for VMware vCenter Installation Guide (7.4)


NOTE:
• If you have a Proxy-enabled Windows client and an vSphere 5.x/ESXi 5.x host using iLO or
other management software, disable or bypass the Proxy Server for the connection between
the HP OneView for vCenter/vSphere Client and iLO on the ProLiant server running as an
vSphere 5.x/ESXi 5.x host system.
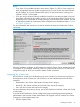
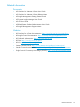
• If you are using a Windows firewall, enable the firewall to access the ports listed in the final
panel that is presented by the installer as shown in the sample figure below. The list will vary
depending on the combination of modules (Storage, Server, RMV) that are installed. The sets
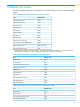
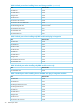
of default port numbers for combinations of the modules that are installed are listed in “Default
port values” (page 29).
For more information and instructions, see the HP OneView for VMware vCenter User Guide or
online help.
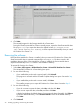
When the installation completes, an HP OneView for VMware vCenter - Server Administrator Portal
icon appears on your desktop. Double-click the icon to open the HP OneView for vCenter Server
configuration page, at which you can add or delete vCenter credentials.
Assigning the vCenter role
HP OneView for vCenter uses role-based security access. Windows or domain users/groups can
be assigned any of the vCenter roles. HP OneView for vCenter classifies these roles into three
categories:
• Administrator—the vCenter administrator role maps to this category
• Read-only—The vCenter read-only and view-only roles map to this category
• User—All other vCenter roles map to this category
For more information about security access, see the HP OneView for VMware vCenter User Guide
or online help.
To access the HP OneView for vCenter configuration pages and storage provisioning features,
administrators must have the vCenter Administrator role assigned in the HP OneView for vCenter
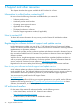
To assign the vCenter Administrator role:
1. Start the vSphere Client.
Installing the software 21