
HP Insight Control for VMware vCenter Server Installation Guide (6.3)


15. When the system reboot is finished, the Storage Module for vCenter installation resumes.
Follow the on-screen instructions to import the Storage Module for vCenter data and complete
the upgrade process.
Removing the software
This section describes the procedures for removing the Storage Module for vCenter and Insight
Control for vCenter.
NOTE: The Storage Module for vCenter and the Insight Control for vCenter software products
are listed as two separate programs in the Add or Remove Programs Control Panel.
• To remove the Storage Module for vCenter, the core module, and the Server Module for
vCenter (if installed), first remove the Storage Module for vCenter, and then remove Insight
Control for vCenter. For instructions, see “Removing the Storage Module for vCenter” (page 20)
and “Removing Insight Control for vCenter” (page 21).
• To remove the Storage Module for vCenter while retaining the core module and the Server
Module for vCenter, remove only the Storage Module for vCenter as described in “Removing
the Storage Module for vCenter” (page 20).
Removing the Storage Module for vCenter
To remove the Storage Module for vCenter software:
1. Exit the vSphere Client on the system from which you will remove the Storage Module for
vCenter.
2. Access the Windows Control Panel, and double-click one of the following:
• Add or Remove Programs (Windows Server 2003)
• Programs and Features (Windows Server 2008)
A list of programs appears.
TIP: You can also start the removal process by starting the Storage Module for vCenter
installer and selecting the Uninstall option.
3. Select HP Insight Control Storage Module for vCenter, and then click one of the following:
• Change/Remove (Windows Server 2003)
• Uninstall (Windows Server 2008)
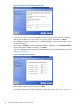
The Uninstall HP Insight Control Storage Module for vCenter dialog box opens.
4. Click Next to continue.
A dialog box prompts you to export Storage Module for vCenter data, which is useful for
importing the data to future installations.
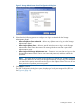
5. Perform one of the following steps:
• If you do not want to export the data, select No, and then click Uninstall.
• If you want to export the data, select Yes, and then click Uninstall.
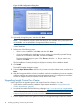
A dialog box displays the default directory for exporting the data. Optionally, click Choose
to select a different directory, or click Restore Default to revert to the default directory. To
export the data to the selected directory and finish removing the product, click Uninstall.
The data is exported to the file export.si in the selected directory.
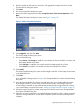
NOTE: If the export file already exists in the selected directory, the installer prompts
you to overwrite the file or choose another directory. Click No, choose a different folder
or Yes, overwrite the current file.
20 Installing, upgrading, and removing the software