
HP Insight Control for VMware vCenter Server Installation Guide (6.3)


9. Click Install.
The Install Complete dialog box opens and the Insight Control for vCenter Setup wizard starts
in the default browser.
IMPORTANT: If you selected only the Storage option in Step 6, the Insight Control for vCenter
Setup wizard does not start automatically.
10. Click Done.
If you selected the Storage option in Step 6, the Storage Module for vCenter installer
Introduction dialog box opens.
11. Leave the Storage Module for vCenter Introduction dialog box open (if applicable) and switch
to the Insight Control for vCenter Setup wizard browser window. If the Insight Control for
vCenter Setup wizard did not start automatically, double-click the Insight Control for vCenter
icon on the Desktop. Proceed to the section “Setting up Insight Control for vCenter” (page 12).
Setting up Insight Control for vCenter
Use this procedure to set up the core module of Insight Control for vCenter.
1. If you have a Proxy-enabled Windows client and an ESX host using iLO 3, disable or bypass
the Windows Proxy Server for the connection between the Insight Control for vCenter/vSphere
client and iLO 3 on the ProLiant server running as an ESX/ESXi host system. For more
information and instructions, see the HP Insight Control for VMware vCenter Server User Guide
or online help.
2. If the Insight Control for vCenter Setup wizard is not already open, double-click the Insight
Control for vCenter icon on the Desktop.
3. If a security certificate error opens when the browser launches the wizard, select Continue to
this website (not recommended) to log on and continue with the setup process.
A Security Warning box opens.
4. If you trust the website, click Yes to continue.
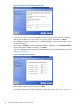
5. When prompted to enter the login credentials for the Insight Control for vCenter server, enter
the user name and password, and then click OK.
The Enter Insight Control for vCenter Information page opens.
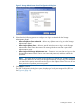
6. Enter the host name or IP address of the server for Insight Control for vCenter. Click Next.
IMPORTANT: When you enter a host name, the only supported characters are a–z (case
insensitive), 0–9, and the hyphen.
If a host name contains an underscore, HP recommends changing the host name before
installing the product.
The wizard prompts you to enter vCenter Server information.
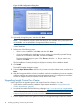
7. Enter the host name or IP address, user name, password, and comment (optional). Click Add.
IMPORTANT: Enter the fully qualified host name for the vCenter Server. Do not enter
localhost or a loopback IP address.
8. If you want to add more than one vCenter Server, repeat Step 7 until all vCenter Servers are
included in the list at the bottom of the dialog box.
NOTE: To remove a vCenter Server from the list, click Remove next to the appropriate server
in the list.
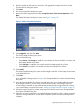
9. Click Next.
The wizard prompts you to enter HP SIM information.
12 Installing, upgrading, and removing the software