
- HP Officejet 7610 Manual


Table Of Contents
- Contents
- Get started
- Accessibility
- HP EcoSolutions (HP and the Environment)
- Understand the printer parts
- Use the printer control panel
- HP Digital Solutions
- Select print paper
- Load an original on the scanner glass
- Load an original in the automatic document feeder (ADF)
- Load paper
- Insert a memory device
- Install the accessories
- Maintain the printer
- Update the printer
- Open the HP printer software (Windows)
- Turn the printer off
- Scan
- Copy
- Fax
- Send a fax
- Receive a fax
- Receive a fax manually
- Set up backup fax
- Reprint received faxes from memory
- Poll to receive a fax
- Forward faxes to another number
- Set the paper size for received faxes
- Set automatic reduction for incoming faxes
- Block unwanted fax numbers
- Receive faxes to your computer using HP Digital Fax (Fax to PC and Fax to Mac)
- Set up speed-dial entries
- Change fax settings
- Fax and digital phone services
- Fax over Internet Protocol
- Use reports
- Web Services
- Work with ink cartridges
- Solve a problem
- HP support
- General troubleshooting tips and resources
- Solve printer problems
- Print quality troubleshooting
- Solve paper-feed problems
- Solve copy problems
- Solve scan problems
- Solve fax problems
- Solve problems using Web Services and HP websites
- Solve memory device problems
- Solve network problems
- Configure your firewall software to work with the printer
- Solve printer management problems
- Troubleshoot installation issues
- Understand the Printer Status Report
- Understand the network configuration page
- Printhead maintenance
- Uninstall and reinstall the HP software
- Clear jams
- Technical information
- Warranty information
- Printer specifications
- Physical specifications
- Product features and capacities
- Processor and memory specifications
- System requirements
- Network protocol specifications
- Embedded web server specifications
- Paper specifications
- Print resolution
- Copy specifications
- Fax specifications
- Scan specifications
- Web Services specifications
- HP website specifications
- Environmental specifications
- Electrical specifications
- Acoustic emission specifications
- Memory device specifications
- Regulatory information
- Regulatory Model Number
- FCC statement
- Notice to users in Korea
- VCCI (Class B) compliance statement for users in Japan
- Notice to users in Japan about the power cord
- Noise emission statement for Germany
- GS Declaration (Germany)
- Notice to users of the U.S. telephone network: FCC requirements
- Notice to users of the Canadian telephone network
- Notice to users in the European Economic Area
- Notice to users of the German telephone network
- Australia wired fax statement
- European Union Regulatory Notice
- Regulatory information for wireless products
- Environmental product stewardship program
- Third-party licenses
- HP supplies and accessories
- Additional fax setup
- Set up faxing (parallel phone systems)
- Select the correct fax setup for your home or office
- Case A: Separate fax line (no voice calls received)
- Case B: Set up the printer with DSL
- Case C: Set up the printer with a PBX phone system or an ISDN line
- Case D: Fax with a distinctive ring service on the same line
- Case E: Shared voice/fax line
- Case F: Shared voice/fax line with voice mail
- Case G: Fax line shared with computer modem (no voice calls received)
- Case H: Shared voice/fax line with computer modem
- Case I: Shared voice/fax line with answering machine
- Case J: Shared voice/fax line with computer modem and answering machine
- Case K: Shared voice/fax line with computer dial-up modem and voice mail
- Serial-type fax setup
- Test fax setup
- Set up faxing (parallel phone systems)
- Network setup
- Set up the printer for wireless communication
- Change basic network settings
- Change advanced network settings
- HP wireless direct printing
- Printer management tools
- Index
b. Locate any jammed paper inside the printer, grasp it with both hands, and then pull it towards you.
CAUTION: If the paper tears when you are removing it from the rollers, check the rollers and
wheels for torn pieces of paper that might be remaining inside the printer. If you do not remove all
the pieces of paper from the printer, more paper jams are likely to occur.
c. If the jam is not there, push the latch on top of the duplexer and lower the cover. If paper is jammed
inside, carefully remove it. Close the cover.
d. Reinsert the duplexer into the printer until it snaps into place.
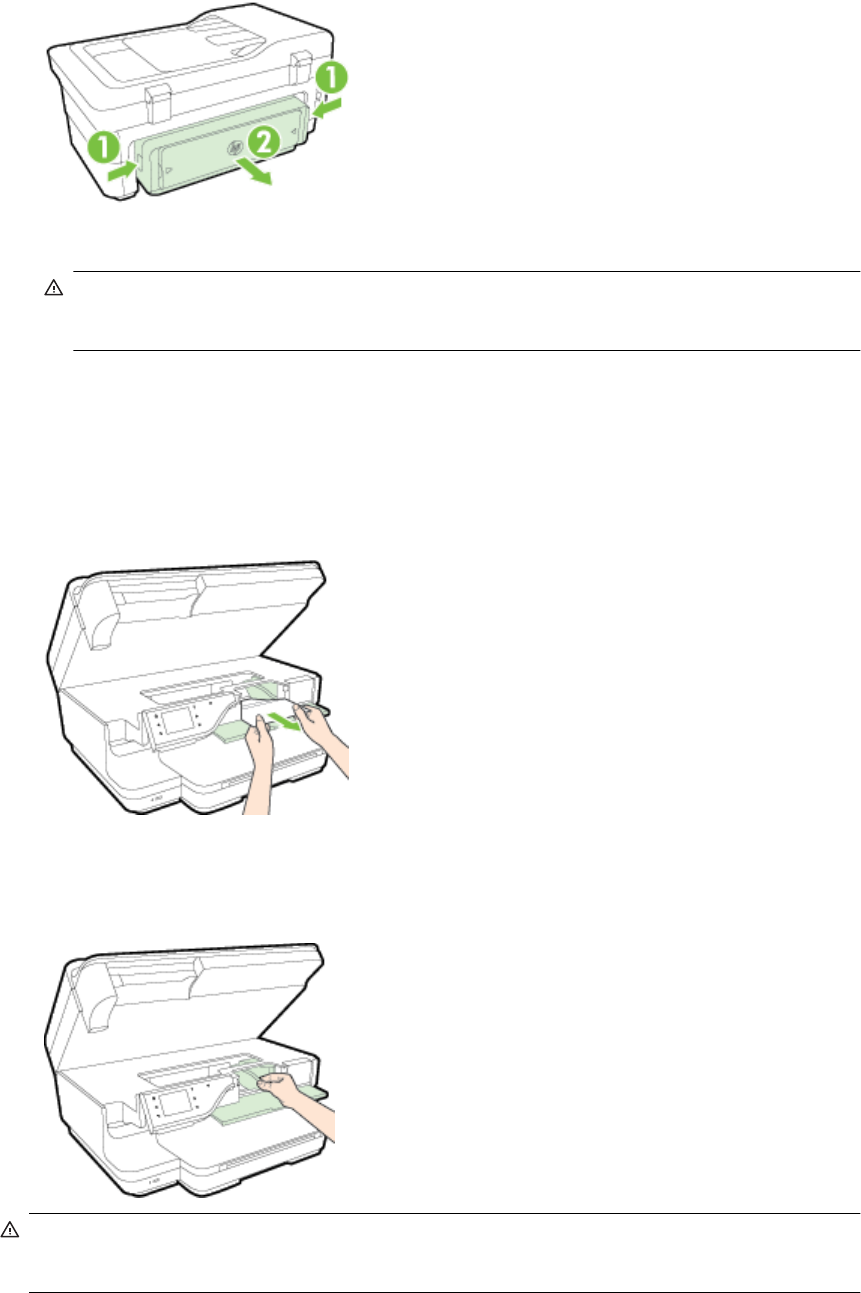
3. Check the front of the printer.
a. Open the ink cartridge access door.
b. If there is paper remaining inside the printer, ensure the carriage has moved to the right of the printer,
free any paper scraps or wrinkled media, and pull paper towards you through the front of the printer.
c. Move the carriage to the left, locate any jammed paper inside the printer on the right side of the
carriage, free any paper scraps or wrinkled paper, and pull the paper towards you through the front of
the printer.
WARNING! Do not reach into the printer when it is turned on and the carriage is stuck. When you open
the ink cartridge access door, the carriage should return to its position on the right side of the printer. If it
does not move to the right, turn off the printer before you remove any jam.
4. After clearing the jam, close all covers, turn on the printer (if you turned it off) and resend the print job.
Clear jams 107