
HP Network Protector SDN Application Administrator Guide

The file must follow the following format {address}(,{comment}), where the address field
contains the address of the website. The address must contain at least two levels and cannot contain
wild cards . Optionally, you can enter a comment in the comment field.
NOTE: You cannot enter a comma in the comment field. You cannot upload the file, if the comment
field contains a comma.
Example 1 Whitelist entry
{www.example.com}(,{added this website in the custom whitelist for test purpose.})
Loading the whitelist from a file
Complete the following steps to load the whitelist from a file:
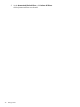
1. Select Databases →Custom Whitelist.
The Custom Whitelist page appears.
2. Click Upload.
The Upload page appears.
3. Click Browse and navigate to the whitelist you want to upload and click Upload
The addresses from the list are added to the Custom Whitelist.
About the custom blacklist
In addition to the RepDV database, you can add custom blacklist entries of host names to restrict
access. Specify a time range for the entries during which the access to the host names is restricted.
You can select from a predefined time range or create a custom time range. You can disable a
blacklist entry, so that access to the host name is not restricted temporarily.
For example, in a university campus, you can set the custom blacklist to restrict access to social
media sites which are a distraction during class hours. Restricting access to social media sites
encourages the staff and students to engage more with one another during class.
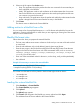
Adding entries to the custom blacklist
1. Select Databases →Custom Blacklist.
The Custom Blacklist page appears.
2. Click the icon.
The Create Entry page appears.
3. Enter the domain name of the host in the Domain Name/IP Address field.
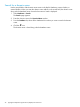
4. Select Always to block the host name all the time.
Or
5. Select Specific range(s) and configure a time range to block the host name at certain time of
the day or week. A default time range appears.
a. Select the default time range.
b. Click the icon.
c. Set the time range based on your requirement.
d. Click the icon to save the time range.
e. Optional. Select the Save option and enter a name for the time range in the Save field.
The custom time range is saved for future use.
44 TippingPoint Reputation Digital Vaccine (RepDV) and custom lists