
HP Network Protector SDN Application Administrator Guide

4 Understanding the application console
About the console
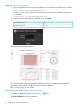
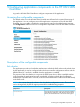
The application console provides at-a-glance insight into your network security status with charts
and graphs that continuously update to reflect the health, status, and events related to your network
traffic. The console also provides the status of all the switches and the VLANs communicating with
the application. This overview, composed of configurable color-coded charts and tables, is the
starting point for:
• Monitoring the health and status of the devices and VLANs.
• Monitoring security alerts or issues.
• Troubleshooting events and issues on your network.
Initial configuration tasks
To set up the application, you will need the RepDV licence key and the SNMPv3 credentials of at
least one switch on your network. You can enter the SNMPv3 credentials of up to three switches
on your network. The application uses the credentials to communicate with the switch and extract
the switch details. It uses these details to configure Service Insertion tunnels.
If you do not provide the SNMPv3 credentials, then the application communicates with the switch
through the OpenFlow channel.
1. Use a supported browser to access the application user interface at the following IP address:
https://ip_addr:8443/networkprotector/ui
Where ip_addr is the IP address of the system on which you have installed the application.
For example:
https://127.0.0.1:8443/networkprotector/ui
A setup wizard appears when you log in to the application for the first time.
2. Enter the RepDV licence key in the TippingPoint RepDV Activation Key field.
NOTE: For more information about RepDV licence key, see “Licensing” (page 19).
3. Enter the proxy server and proxy port details if required.
4. Click Next.
5. Enter SNMPv3 credentials of at least one switch.
6. Click Finish.
The main application Console page appears.
About the console 31