HP Network Protector SDN Application Administrator Guide HP Part Number: 5998-5508 Published: March 2014 Edition: 1
© Copyright 2014 Hewlett-Packard Development Company, L.P. Confidential computer software. Valid license from HP required for possession, use or copying. Consistent with FAR 12.211 and 12.212, Commercial Computer Software, Computer Software Documentation, and Technical Data for Commercial Items are licensed to the U.S. Government under vendor's standard commercial license. The information contained herein is subject to change without notice.
Contents 1 HP Network Protector Solution Overview.......................................................6 HP VAN SDN Controller............................................................................................................7 OpenFlow enabled switches ......................................................................................................7 Service Insertion.......................................................................................................................
Creating a new VLAN group...............................................................................................38 About general policies............................................................................................................38 About VLAN group policies......................................................................................................39 Setting policies for a group.................................................................................................
10 Troubleshooting the application................................................................62 Basic troubleshooting techniques..............................................................................................62 Application is not monitoring the DNS traffic..............................................................................62 I can access a website even when it is on the blacklist.................................................................
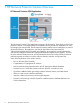
1 HP Network Protector Solution Overview The HP Network Protector SDN Application leverages HP Networking, TippingPoint, and ArcSight products to deliver a converged solution that addresses security threats in a completely new way by leveraging the network itself. The HP Network Protector enables network intelligence on network infrastructure devices.
Figure 1 High Level Network Protector Architecture Click here to view a video of the HP Network Protector SDN Application overview. HP VAN SDN Controller The HP Network Protector SDN Application is deployed as an application that runs on top of the HP VAN SDN Controller.
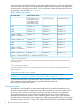
to send the traffic which matches the flow rules to the application for action. The rest of the traffic, which does not match any flow rules programmed by either the SDN Controller or the application, continues to flow normally from the switch. For more information about the supported switches for the application, see the table Table 1 (page 8). Table 1 Switch support matrix HP Switch model Switch software version K/KA/WB.15.10.yyyym K/KA/WB.15.10.yyyy K/KA/WB.15.11.yyyy K/KA/WB.15.12.yyyy K/KA/WB.15.13.
by switch CPU through a Service Insertion tunnel. The desired best performance for application is achieved with switches that support OpenFlow and tunnel technology for Service Insertion. For more information about Service Insertion, see the HP Service Insertion Guide Wired Switches K/KA/WB 15.15 in the SDN information library at http://www.hp.com/go/sdn/infolib.
for searching, indexing, reporting, analysis, and retention. And in the age of BYOD and mobility, it enables comprehensive management of increasing volume of log data from an increasing number of sources. The application supports ArcSight CEF syslog output so events can be sent directly to ArcSight Logger for enterprise visibility. ArcSight CEF is compatible with many generic syslog servers and supports all standard syslog servers.
2 Deployment examples This chapter contains a few approaches to deploy the application that were implemented during the development, testing, and deployment phases. Use this section to understand certain important aspects before deploying the application in your network. In the current release, you cannot deploy the application in the following network environments: • On a HP VAN SDN Controller teamed installation. • On switches in stacked mode and are using OOBM (out-of-band management) port.
Figure 3 DNS inspection using an instance approach Aggregate approach to DNS inspection In Aggregation mode, all VLANs in the switch are part of an OpenFlow instance. The exception is the management VLAN and a VLAN that communicates to the controller. Similar to a lab environment the OpenFlow controller manages all the switching and routing for the switch. This example shows the aggregate mode configuration on the EDGE switches.
• Each device has a single OpenFlow instance that is configured to include all VLANs except the controller VLAN. • DNS inspection is automatic when endpoints are browsing because the transparent proxy deployment is used. In a transparent proxy deployment, HTTP requests are automatically directed to a Proxy server without requiring manual browser configuration. Example configuration file to use OpenFlow 1.3 in aggregate mode. controller-id 8 ip 15.146.194.
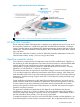
Figure 4 DNS inspection using an aggregate approach Fuzzy edge approach to DNS inspection In the fuzzy edge approach, the endpoints are connected to the edge switches but there are also endpoints connected to the distribution switch. In this example, you choose to inspect DNS requests at the distribution switch in addition to the edge switches. Using this approach allows specify which VLANs you want the application to inspect. Figure 5 (page 15) illustrates this example.
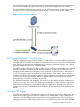
Figure 5 DNS inspection using a “fuzzy edge” approach Edge routing approach to DNS inspection In this example, you configure the solution to perform DNS inspection at the edge routers. Figure 6 (page 16) illustrates this example. In this example: • Each edge router, such as an HP 5406 switch, is connected to the HP VAN SDN Controller, is configured to use OpenFlow, and is routing packets. • The application performs inspection and control on VLAN 20, 30, 40, 50, 60, and 70.
Figure 6 DNS inspection at edge routers DNS inspection at HTTP Proxy In this example, HTTP request for hostname example.com reaches the HTTP Proxy server. This request is an HTTP GET (TCP) instead of DNS UDP (UDP) request and therefore the application does not inspect the request. The HTTP proxy can be deployed in two ways: • Explicit proxy deployment. In this deployment the browser is explicitly configured to send HTTP requests directly to a proxy server. • Transparent proxy deployment.
Figure 7 HTTP proxy configuration For more information about how to configure the Proxy Access Control (PAC) file to direct the HTTP requests from the web browsers to the DNS server, see “I can access a website even when it is on the blacklist” (page 62) MSM wireless deployment This example shows an MSM (MultiService Mobility Controller) wireless deployment comprising of Non-Access Controlled Virtual Service Communities (VSCs) and Mobility Traffic Manager (MTM) with the application.
• • Service Insertion is required in situations where the egress VLAN is inspected and the device is routing. This situation is depicted in Figure 8 (page 18) with the Core 8212 switch. ◦ DNS inspection is occurring on the 8212 device and redirected out to the SDN Controller. ◦ Pure OpenFlow configuration on 8212 will not work in this scenario as packet-out normal cannot be performed by the 8212 switch when it is routing.
3 Licensing Overview The HP Network Protector SDN Application uses electronic licenses. Each electronic license is an SKU (Storage Keeping Unit) on the HP CPL (Corporate Price List) that you can purchase from HP through resellers. You can purchase electronic licenses at different times and from different resellers. You must have the VAN SDN Controller licenses installed before can install the Network Protector licenses.
Grace allowance The HP Network Protector SDN Application controls the number of users by licenses and provides a grace allowance of 20% for the application users. For example, if you purchase a 100–user HP Network Protector SDN Application base license, the maximum number of concurrent users allowed in active sessions is 120. There is no grace time allowance for the HP Network Protector RepDV subscription licenses.
3. Enter your application base license order number or registration ID in the field provided, and then click Next. The registration details screen appears, as shown in Figure 10 (page 21). Figure 10 Entering the Install ID 4. In the Install ID field, enter your HP VAN SDN Controller Install ID number. You can find the Install ID on the HP VAN SDN Controller under General→Licenses. 5. 6. Optional: Enter a Friendly name and Customer notes for this license. Click Next.
Figure 12 Reviewing your registration 8. 9. Review your license registration details, and record the License key listed. Optional: To download the license key file, click Save as, and then save it to your local hard drive. 10. Optional: To e-mail the registration details: a. Enter one or more email addresses, separated by a comma or semicolon in the field provided. b. Optional: Enter Comments about this license. c. Click Send email. 11.
5. Verify whether the activation of the application base license is successful. To verify: • On the HP VAN SDN Controller UI, navigate to General→Licenses. If the license is successfully activated, the status of the license is ACTIVE. See Figure 13 (page 23).
Figure 14 Adding RepDV activation key e. 24 Licensing Enter the SNMP credentials and click Finish.
3. To verify whether the activation of the HP Network Protector RepDV subscription license is successful: a. On the application UI, navigate to Databases→Overview. b. Press F5 to refresh the page. If the license is successfully activated, the RepDV Activation Key Validation Status is Valid. See Figure 15 (page 25). Figure 15 RepDV Activation Key Validation Status NOTE: After you enter the RepDV activation key, the application connects to the TippingPoint database and verifies the RepDV status.
Transferring licenses You can transfer your HP Network Protector SDN Application license from one machine to another. To transfer, you must first deactivate your application and HP VAN SDN Controller base licenses on the HP VAN SDN Controller. For transferring the HP Network Protector RepDV subscription license, deactivation is not required. You can transfer it directly.
7. Note down the uninstallation key number. See Figure 17 (page 27). Figure 17 HP VAN SDN Controller base license deactivation Transferring licenses After you deactivate your HP Network Protector SDN Application and HP VAN SDN Controller base licenses, you can transfer them. To transfer licenses: 1. Log on to My Networking portal. 2. From the My Licenses section, select Transfer licenses to new platform. 3.
Figure 19 Reviewing details before transfer 5. Verify that this is the license you want to transfer, and then click Next. The target install ID screen appears, as shown in Figure 20 (page 28). Figure 20 Entering target install and uninstall IDs 6. 28 Licensing Enter the Install ID in the Target Install ID field and a license uninstall key in each Uninstall field, and then click Transfer.
NOTE: For the transfer process to succeed, you must enter an Uninstall value for every registered license, except for the HP Network Protector RepDV subscription license. For the transfer of the HP Network Protector RepDV subscription license, uninstall value is not required to be entered. New license registration information appears on the license transfer confirmation and license details screens, as shown in Figure 21 (page 29). Figure 21 Viewing license transfer confirmation and details 7.
8. Optional: To email transferred license details: a. Enter one or more email addresses, separated by a comma or semicolon in the field provided. b. Optional: Enter comments about this license transfer in the Comments field. c. Click Send email. The license screen displays the status of the original licenses as Transferred, and the new Install IDs as Active, as shown in Figure 22 (page 30).
4 Understanding the application console About the console The application console provides at-a-glance insight into your network security status with charts and graphs that continuously update to reflect the health, status, and events related to your network traffic. The console also provides the status of all the switches and the VLANs communicating with the application.
Logging into the console 1. Use a supported browser to access the application user interface at the following IP address: https://ip_addr:8443/networkprotector/ui Where ip_addr is the IP address of the system on which you have installed the application. For example: https://127.0.0.1:8443/networkprotector/ui 2. Enter user name and password credentials, then click Login.
Adding administrator or user You can add administrators and users to perform specific actions within the application. An administrator can configure the application and monitor the performance. The administrator can add and manage users to the application. A user does not have the privileges to configure the application. A user can monitor the performance of the application and view reports and settings. 1. Click on the application console. The User Preferences dialog box appears. 2. Click User List.
Disabling the application You can choose to disable application on your network. When you disable application on your network, the DNS traffic is not monitored by application and the traffic flows normally. Disabling application on the network does not affect the configuration and operation of the network. To disable the application, click Disable DNS Protector on the application console. You can enable the application on your network to start monitoring the DNS traffic again.
5 Configuring application components in the HP VAN SDN Controller Log into the HP VAN SDN Controller to configure components of the application . Accessing the configurable components The default values set in the HP VAN SDN Controller are sufficient for the optimal functioning of the application. You can configure some of the application components on the HP VAN SDN Controller. You can enable or disable the components for testing and troubleshooting purposes.
Component Description and the data is not monitored by the application. The default value is 7 seconds. refresh.interval Intervals in seconds at which the application will refresh the DNS redirect and normal rule on the switch. The default value is 3 seconds. rule.refresher.enabled You can enable or disable the rule refresher. By default the rule refresher is enabled. Tunnel heartbeat manager NOTE: You cannot change the values in the tunnel heartbeat manager configuration section.
Component Description stat.limit The maximum number of records that are requested in a single query to the CSD. stat.retention.day The data retention interval (in days) for day-granularity data in the CSD. stat.retention.hour The data retention interval (in days) for hour-granularity data in the CSD. stat.retention.min The data retention interval (in days) for minute-granularity data in the CSD. Throttle manager You cannot change the values in the throttle configuration section.
6 Setting Policies VLAN Groups You can group the VLANs into logical groups to assign policies. You can create custom policies for each logical group based on the requirement of the group. For example, in a university campus, you can create two VLAN groups. You can group all the VLANs in the main university campus into one group and all the VLANs in the dormitory as the other group. You can apply customized policies to manage both groups. Creating a new VLAN group 1. Select Groups. 2. 3. 4.
Action Description For example, when a host is quarantined, all the traffic from that host is blocked, but the host can access the IP phone, if the IP phone server is listed in the ACL. Quarantine and Notify The application quarantines the host and sends a mail notification to the administrator. About VLAN group policies Policies are a collection of filters or rules that provide a method for setting up security configuration options for VLAN groups.
Table 4 (continued) Threat type Meaning weak points in a network security system to bypass filters and reach data and services. These attackers seek to use intrusion methods against areas, such as software back-doors and poorly protected hosts and ports. Worm A worm is also a malicious software that spreads from one computer to another, leaving infections as it travels. Worms use either the network vulnerability or social engineering to trick the user to spread.
4. 5. 6. Enter the threshold value in the Threshold Value text box. Select one of the actions from the Actions list. Enter time in minutes in the Action Expiration text box to set the time interval for the set action, and click Update. The general policy is saved. Setting policies to quarantine hosts The application quarantines a host if the host satisfies the quarantine criteria set in the general threshold policy.
2. Under Quarantined/Blocked Clients, click Release All Clients. All the quarantined hosts are released.
7 TippingPoint Reputation Digital Vaccine (RepDV) and custom lists About the RepDV database RepDV database is a subscription service that enables the application to monitor and block outbound communications with known malicious and undesirable host names. The RepDV database includes hundreds of thousands of known malicious or undesirable hosts. A threat score of 0 to 100 is assigned to each host name based on analysis of the activity, source, category, and threat.
The file must follow the following format {address}(,{comment}), where the address field contains the address of the website. The address must contain at least two levels and cannot contain wild cards . Optionally, you can enter a comment in the comment field. NOTE: You cannot enter a comma in the comment field. You cannot upload the file, if the comment field contains a comma. Example 1 Whitelist entry {www.example.com}(,{added this website in the custom whitelist for test purpose.
6. 7. Select one of the options from Action menu: • Drop: The application drops the packet when the user accesses the host name that you have configured in the blacklist. • Notify: The application sends a mail notification to the administrator that a host name listed in the blacklist was accessed. application does not drop the packet and the user can continue to access the host name.
Search for a domain name Use the search field to filter domain name entries in the RepDV database, custom whitelist, or custom blacklist. When you enter the domain name address in the search field, the domain name along with the database name where the host name is listed is displayed. 1. Select Databases →Search. The Search page appears. 2. 3. Enter the domain name in the Domain Name text box. From the Database list, select all the databases from where you want to search the domain name. 4.
8 Monitoring HP Network Protector panels The application console provides configurable panels that enable you to view, monitor, and analyze health, status, and events at system and switch levels. These panels provide a high-level warning system for potential health and performance problems with your system and devices. The system status tool monitor characteristics of system health and report on the basic health and status of the network.
Figure 23 Example of VLAN health status view The device status panel displays the details of the switch such as: • The IP and MAC address of the switch • The manufacturer and model details of the switch • The firmware installed on the switch • Switch connection status on the VLAN The application uses the switch firmware information to decide if the communication with the switch is through OpenFlow channel or through the application Insertion tunnel. For firmware versions K.15.
3. Hover over the Health Status of the switch connection to view the health status of the switch connections configured on the VLAN.
Figure 24 Example of VLAN status view The DNS details are represented graphically and provide the details of DNS requests originating from each VLAN configured in the network. You can tune the policies for each VLAN based on the following reports and threat types: • Total and malicious DNS requests • The average DNS requests • The top malicious DNS requests NOTE: For OVS (Open Virtual Switch) discovered in the application, the VLAN is captured as UNKNOWN_VLAN (4097).
Reports You can generate reports from the network traffic generated in the system and compiled by the application. These reports detail the total network traffic generated, the threats encountered by the system, and the traffic trends. The Reports screen also provides real-time graphs of the DNS network statistics and report management and scheduling features. Type of reports When you create a report, you select a template and modify its settings.
5. 6. 7. 8. 9. Optional. Select a graph type. Click the Time Range to set the duration for which you want to view the reports. Click the Time Interval to set the frequency at which you want to generate the reports. Click the Render report to generate the report. Scroll down or click configure - icon at the top to view the generated report. Alerts Alerts give notification of internal events that affect the application operation, and in some cases indicate that some action is needed to correct a condition.
Change the Display and Alert Listing Order In the default display shown in Figure 25, alerts are displayed in descending order from newest to oldest, based on the alert date and time. You can change the display order in any of the following ways by clicking on the appropriate column heading: Column heading Severity Description Groups alerts by alert level; to or the reverse. Date/Time Oldest to newest (the default) or the reverse.
Audit Log data fields include the following: • Timestamp: A time stamp (in UTC format) marking when the HP VAN SDN Controller created the audit log entry. • Administrator: A string representing the user that performed the operation that triggered the log entry. • Audit Action: A string description providing detail about the audit log entry. • Description: A string describing any additional description of the audit action.
The application maintains its own support logs. The support logs are disabled by default. You must enable the support log to capture any application errors or issues. Clicking on the Refresh button displays a listing of the most recent log messages, as determined by the currently configured queue size. For example, with a queue size of 100, Refresh lists the 100 most recent log messages.
/opt/sdn/virgo/serviceability/logs/log.log View the SDN Controller logs for details related to the SDN controller and the switch connection issues. This log also contains information about packet in and packet out issues and the general VAN SDN controller functioning. /opt/sdn/cassandra/log/system.log View the Cassandra system log for the database logs of application.
2. Select one of the options: • Open and view the new log zip file in a browser. • Save the log zip file in a default location on your computer. • Set the default operation to always open the directory containing the log zip file. • Show the log zip file in the default directory for receiving downloads. NOTE: The actions resulting from these choices are not managed by the application but are a function of the operating system in use.
is triggered, a notification is sent to the administrator. At the same time, the aggregation timer starts ticking down the aggregation period. During the aggregation period, further event triggers are counted, but no notification is sent. At the end of the aggregation period, a second notification, including the event count, is sent.
Finding session token To set the maxRepetitionsCountTime or the trustedHosts parameter a session token, also called a cookie is needed. To find the value of the session token in your system, you must navigate to the Security tab in your browser. From the Security tab, copy the content from the X-Auth-Token cookie.
5. 6. 7. 8. Enter the IMC service port number in the IMC Service Port text box. Enter the IMC service user name credentials in the IMC Service Username text box. Enter the IMC service password credentials in the IMC Service password text box. Select the Require Proxy option to access IMC server. 9. Click the Monitoring icon to save the IMC settings.
9 Backing up and restoring the application Backup You cannot backup and restore the application separately. When you back up the Controller, the application is backed up along with the Controller. To back up the application, follow the same process as backing up the HP VAN SDN Controller. For more information about backing up HP VAN SDN Controller, see the HP VAN SDN Controller Administrator Guide in the SDN information library at http://www.hp.com/go/sdn/infolib.
10 Troubleshooting the application Basic troubleshooting techniques The application has various troubleshooting tools you can use to resolve issues. By following a combined approach of examining screens and logs, you can obtain a history of activity and the errors encountered. • The audit log displays a log of all changes made on the application, whether user-initiated or application-initiated. • The support log displays a log of all events of interest generated from the working of the application.
// Define Conditions for Sentinel Protected Networks if ( isInNet(myIpAddress(), "10.181.3.0", "255.255.255.0") && isResolvable(host) || isInNet(myIpAddress(), "10.181.4.0", "255.255.255.0") && isResolvable(host) || isInNet(myIpAddress(), "10.181.5.0", "255.255.255.0") && ) return(sentinel_proxy) } //End FindProxyForURL() For more information about PAC files and supported browser information see http:// findproxyforurl.
Symptom Possible cause and recommendation The Application is not installed on the recommended version of operating system 1. Check and ensure you are have installed the Application on the recommended version of operating system.
Symptom Possible cause and recommendation snmpv3 user Symptom Possible cause and recommendation Health status of the switch connection is yellow The SNMPv3 credentials for the switch do not match the credentials configured in the application 1. Check the switch SNMPv3 credentials on the switch 2. Verify that the same credentials are set on the SNMP tab Switch connection configured to use a tunnel but the senttunneld service is not running 1.
Switching off V1 module in a mix of V1 and V2 modules on Provision OS When the application detects a device that is capable of starting Service Insertion but has V1 modules, a Service Insertion tunnel fails to establish and the application will fallback to using OpenFlow. To enable Service Insertion, turn off V1 module. You can turn off V1 module from the CLI or through SNMPv3. • From the CLI, enter the command no allow-v1-modules. The V1 modules are disabled and are not operational. OR 1.
11 Support and other resources To learn how to contact HP, obtain software updates, submit feedback on documentation, and locate links to HP SDN websites and other related HP products, see the following topics.
Care Packs To supplement the technical support provided with the purchase of a license, HP offers a wide variety of Care Packs that provide full technical support at 9x5 or 24x7 availability with annual or multi-year options. To purchase a Care Pack for an HP SDN application, you must have a license for that application and a license for the controller. For a list of Care Packs available for the controller and HP SDN applications, see: http://www.hp.com/go/cpc http://www.hp.
12 Documentation feedback HP is committed to providing documentation that meets your needs. To help us improve the documentation, send any errors, suggestions, or comments to Documentation Feedback (docsfeedback@hp.com). Include the document title and part number, version number, or the URL when submitting your feedback.
Glossary API Application Programming Interface ASIC Application Specific Integrated Circuit BYOD Bring Your Own Device CEF Common Event Format CLI Command Line Interface DNS Domain Name System HTTP Hyper Text Transfer Protocol IMC Intelligent Management Center IPv4 Internet Protocol Version 4 IPv6 Internet Protocol Version 6 MAC Media Access Control Address MSM Multiservice Mobility Controller MTM Mobility Traffic Manager NAT Network Address Translation PAC Proxy Auto Config PV
Index C contact HP, 67 D documentation providing feedback on, 69 F forum user community, 67 H HP contacting, 67 HP Network Protector overview, 6 HP SDN information library, 68 I Inspection Service, 9 O online user forum, 67 OpenFlow enabled switches overview, 7 S Service Insertion overview, 8 T troubleshoot licensing, 64 RepDV database, 64 switch connections, 64 user settings, 63 U user community online forum, 67 W website documentation, 68 HP SDN community forum, 67 HP VAN SDN Controller, 68 71