
Managing the HP NetStorage 6000 Using Telnet


Managing the HP NetStorage 6000 Using Telnet
20
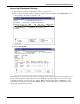
Verifying a Volume
When you verify a Server File System (SFS) volume, important data on the disk is examined for consistency.
Inconsistencies are reported and you are given the option to make repairs.
Note Before you proceed, make sure you want to remove the partition. You cannot undo this action.
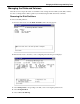
1. From the main menu, select D. Disks & Volumes.
2. Type the letter corresponding to the volume you are verifying.
3. Select Change/delete corresponding to the SFS volume you are verifying.
4. Select 2. Check.
General SFS Volume Information
If you decide to make repairs to the inconsistent SFS volumes, certain rules are followed, attempting to return
the volume to a reasonable state. Some files or file contents may be lost during the repair process. We
recommend you backup the entire volume before attempting repairs.
Inconsistencies in an SFS volume usually indicate a problem with a hardware component. Most often the
problem is faulty memory, controllers and/or disks. If you find an SFS volume with inconsistencies, be sure
to inspect your hardware, following the procedures in the hardware manual included in your package.
If you have no SFS volume on the drive and there is room for one, you have the option to create one. If there
is an SFS volume, menu items appear on the bottom of the screen to check, rename, or delete the volume. To
re-initialize an SFS volume on the drive, delete it, then recreate it.
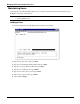
Renaming a Disk Partition
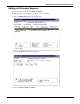
To rename a partition:
1. From the main menu, select D. Disks & Volumes.
2. Type the letter next to the drive you are renaming.
3. Select 1.Change/delete.
4. Select 3.Rename.
5. Enter the new name of the partition and press Enter.
The disk partition has been renamed.
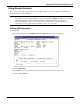
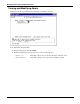
Turning Quotas On and Off
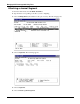
Quotas track and limit the amount of disk space each user and group uses. The quota tracking function can be
turned on and off.
1. From the main menu, select D. Disks & Volumes.
2. Type the letter next to the drive you are renaming.
3. Select 1.Change/delete/ext.
4. Select 4.Quotas on/off.
5. Select 1.Turn quotas on or 8.Turn quotas off.