Managing the HP NetStorage 6000 Using Telnet Table of Contents Accessing Telnet . . . . . . . . . . . . . . . . . . . . . . . . . . . . . . . . . . . . . . . . . . . . . . . . . . . . . . . . . . . 2 Telnet Menu Basics . . . . . . . . . . . . . . . . . . . . . . . . . . . . . . . . . . . . . . . . . . . . . . . . . . . . . . . . . 2 Key Descriptions . . . . . . . . . . . . . . . . . . . . . . . . . . . . . . . . . . . . . . . . . . . . . . . . . . . . . . . . . . . . . . . 3 Viewing the Main Menu . . . . .
Contents Using Remote Services . . . . . . . . . . . . . . . . . . . . . . . . . . . . . . . . . . . . . . . . . . . . . . . . . . . . . 27 Editing NIS Information . . . . . . . . . . . . . . . . . . . . . . . . . . . . . . . . . . . . . . . . . . . . . . . . . . . . . . . . . 27 Viewing and Modifying Admin . . . . . . . . . . . . . . . . . . . . . . . . . . . . . . . . . . . . . . . . . . . . . . 28 Using the Access Control Screens . . . . . . . . . . . . . . . . . . . . . . . . . . . . . . . . . . . . .
0DQDJLQJ WKH +3 1HW6WRUDJH 8VLQJ 7HOQHW T elnet is the alternative method for managing the HP NetStorage 6000 on your network. To use Telnet, you need an ANSI-compatible terminal emulator.
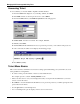
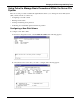
Managing the HP NetStorage 6000 Using Telnet Accessing Telnet To access Telnet, you need an ANSI-compatible terminal emulator. 1. From the Start menu displayed on your desktop taskbar, select Run. 2. In the Run window, use the drop-down arrow to select Telnet. 3. From the Connect menu, select Remote System. The following appears: 4. In Host Name, enter the server name. For example, Server 1. 5. In Port, select telnet. 6. Click Connect.
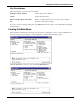
Managing the HP NetStorage 6000 Using Telnet Key Descriptions The following keys are used to edit screen fields: Backspace, Delete, Ctrl+H Deletes the previous character Ctrl+U Deletes the entire field Enter, Ctrl+M, Ctrl+J, Ctrl+I, Tab Entry is complete and the cursor proceeds to the next field Esc Exits the screen with no change If you do not want to change a field value, press Enter and the cursor skips over the field without changing the information.
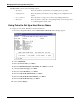
Managing the HP NetStorage 6000 Using Telnet The Main Menu consists of the following sections: • Operations Press any number to perform the corresponding server operation. • Configurations Press any letter to perform the corresponding server configuration command. • Access Control Press any letter to set up access to the corresponding menu items. • Extensions Press any letter to select the corresponding extension. Use the space bar to scroll through the extension list.
Managing the HP NetStorage 6000 Using Telnet Using Telnet to Manage Basic Procedures Within the Server File System There are several procedures available through Telnet that allows you to manage the Server File System (SFS) volumes. The most common are: • Configuring a new disk volume • Deleting a disk volume • Creating and deleting sfsext partitions • Combining an extended disk partition with an sfs partition Configuring a New Disk Volume To configure a new disk volume: 1.
Managing the HP NetStorage 6000 Using Telnet 3. Select Create & init partition. The following appears: 4. Select the partition type for the drive. 5. Press Enter to except the default, for example, sfs2, sfs2ext, sfs2jnl, sfs1, or lvm. 6. Enter the disk volume label and press Enter. 7. Enter the disk volume size and press Enter or press Enter for the default size. 8. Select 7. Proceed with create. Wait for the message Initialization OK and Mount OK and press Esc to return to the Configure Disk menu. 9.
Managing the HP NetStorage 6000 Using Telnet Using Telnet to Mange Additional Procedures Within the Server File System Viewing the Activity Monitor The activity screen continuously reports the status of your server. From the main menu, choose 1. Activity Screen. The Activity Monitor lists the following information: • Volume Displays the first 22 file volumes. • Use% Displays the amount of space used on the volume. • Reqs Displays the number of requests processed for the volume in the last 10 seconds.
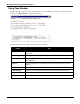
Managing the HP NetStorage 6000 Using Telnet Using Tape Backup The Tape Backup screens control local tape backup, restore, scheduling, and status options. From the main menu, press Y. Tape Backup to display the following: Select the number corresponding to the task you are performing: Number 8 Task 1. Backup Jobs Specify the data to backup and how backups are to be performed by creating and editing backup jobs. 2. Scheduling Backup Determine which day of the week backup jobs will be executed. 3.
Managing the HP NetStorage 6000 Using Telnet Creating and Maintaining Backup Jobs A backup job describes what and how data is to be backed up when the job is run. From the Tape Backup main menu, select 1. Backup Jobs, then either choose the letter of the job you wish to edit or enter 1. Add to create a new job. If you’ve picked an existing job, you may enter 2. Edit to alter the job parameters or 8. Delete to delete the job from the database. To add or edit parameters for a backup job: 1.
Managing the HP NetStorage 6000 Using Telnet Scheduling Backup Jobs From the Tape Backup main menu, select 2. Scheduling Backup to run backup jobs automatically on set days of the week. Enter the letter corresponding to the day of the week you wish to edit, or enter 1. Edit backup time to alter the time of day scheduled jobs are executed. Once you have selected a day of the week, you can either enter 1. Edit to change the job scheduled for that day or enter 8.
Managing the HP NetStorage 6000 Using Telnet Running Unscheduled Backup Jobs From the Tape Backup main menu, select 3. Backup to run a backup job manually. A screen showing the status of the last backup job run or the current backup activity displays. Enter 1. Start backup now to begin execution of a backup job. A screen showing the status of the last backup job run or of current backup activity displays. Enter 1. Start backup now to begin execution of a backup job. To begin execution of a backup job: 1.
Managing the HP NetStorage 6000 Using Telnet Running a Tape Restore From the Tape Backup main menu, select 4. Restore to restore data from a tape. A screen showing the status of the last restore run or the current restore activity displays. Enter 1. Start restore to begin restoring data from tape. Data needed to begin a restore can be obtained by using the Tape Discovery options. To begin a restore: 1. Enter the job name found on the tape you are restoring from. 2.
Managing the HP NetStorage 6000 Using Telnet 6. Enter Y for Directory cleanup if you wish to delete files on disk that did not exist at the time the backup was performed. 7. If you wish to restore data from tape to a location on disk other than where it came from, specify the directory in New location. 8. Enter one or more directories on tape to restore. 9. Enter 1. Edit fields to make further changes to your choice or enter 7. Start restore to begin the restore. Viewing Backup and Restore Status Enter 7.
Managing the HP NetStorage 6000 Using Telnet Determining Tape Magazine Contents From the Tape Backup main menu, select 5. Tape Discovery to read header and label information from the tapes currently loaded into the magazine. Enter the letter corresponding to the tape slot you wish to query. A Data is not ready message displays until the tape drive reads tape header and label information. When the query is complete, a screen displays the contents of the slot queried.
Managing the HP NetStorage 6000 Using Telnet Other Local Backup Operations From the Tape Backup main menu, select 6. Tape Cleaning to access tape cleaning functions. Enter 1. Define cleaning slot to reserve a slot in the magazine for cleaning tapes. This slot will be skipped in all backup and restore operations. If a cleaning slot has been specified, you may enter 4. Start tape cleaning to begin a cleaning operation on the drive. Enter 2.
Managing the HP NetStorage 6000 Using Telnet Showing the Log Use the Show Log screen to display the most recent log entries. From the main menu, select 2. Show Log. The following screen displays: Two types of log entries display: • System Startup Log Entries Reports device configurations, volumes and other pertinent information. • Normal Operation Log Entries Reports device errors, security violations and other routing status information. The release number and software serial number is listed last.
Managing the HP NetStorage 6000 Using Telnet Shutting Down the System The HP NetStorage 6000 is designed for continuous operation. In the event a system shutdown or reboot becomes necessary, follow the procedure below. To shut down the system: 1. From the main menu, select 0. Shutdown. The following appears: 2. From the Shutdown menu, select R. Reboot to reboot the system or select H. Shutdown to turn the system off.
Managing the HP NetStorage 6000 Using Telnet Setting the Time Zone, Time and Date Use the Timezone, Time Date menu option to change time zone, time, and date set on the HP NetStorage 6000. The real-time clock on the motherboard keeps track of local time. To set up time parameters: 1. From the main menu, select B.Timezone, Time, Date. The following appears: 2. Select the appropriate timezone, then press Enter. 3. Select daylight savings time Y or N. 4. Type the new date, then press Enter.
Managing the HP NetStorage 6000 Using Telnet Managing the Disks and Volumes View this screen to inspect the status of a disk drive and to manage the Server File System (SFS) volumes. You have to manage DOS volumes (partitions) from DOS using the fdisk and format commands. Removing the Disk Partitions To remove the disk partitions: 1. From the main menu, select D. Disks & Volumes. The following appears: 2. Enter the letter next to the drive you are configuring. The following screen displays: 3.
Managing the HP NetStorage 6000 Using Telnet Verifying a Volume When you verify a Server File System (SFS) volume, important data on the disk is examined for consistency. Inconsistencies are reported and you are given the option to make repairs. Note Before you proceed, make sure you want to remove the partition. You cannot undo this action. 1. From the main menu, select D. Disks & Volumes. 2. Type the letter corresponding to the volume you are verifying. 3.
Managing the HP NetStorage 6000 Using Telnet Adding an Extension Segment 1. From the main menu, select D. Disks & Volumes. 2. Type the letter corresponding to the drive you are configuring. 3. Select 1. Change/delete. The following appears: 4. Select 5. Segments. The following appears: 5. Select 1. Add an extension segment.
Managing the HP NetStorage 6000 Using Telnet Attaching a Journal Segment 1. From the main menu, select D. Disks & Volumes. 2. Type the letter corresponding to the drive you are configuring. 3. Select 1. Change/delete (the number for this option varies). The following appears: 4. Select 5. Segments. The following appears: 5. Select 5. Segments. 6. Select 2. Attach a journal segment.
Managing the HP NetStorage 6000 Using Telnet Accessing Checkpoint Settings 1. Type the letter of a drive containing the volume you wish to view. 2. Drives can have multiple volumes configured on them. Select the number of the Change/delete option corresponding to the volume you wish to edit. 3. Enter 6. Checkpoints. The checkpoints screen shows the basic checkpoint settings for this volume. The bottom of the display shows the automatic checkpoint schedules that have been enabled.
Managing the HP NetStorage 6000 Using Telnet Maintaining Users Accessing the system through Telnet allows you to modify user information. From the main menu, select E. Users to add, delete, and edit users. Note We do not recommend creating a new user home directory. User home directories should be limited to System Administrators. Adding a User 1. From the main menu, select E. Users. The following screen displays: 2. Type the new user name, then press Enter. 3.
Managing the HP NetStorage 6000 Using Telnet Deleting a User To delete a user: 1. From the main menu, select E. Users. 2. Type the name of the user you are deleting, then press Enter. 3. Select 8. Delete. Editing a User To edit a user: 1. From the main menu, select E. Users. 2. Type the name of the user you are editing, then press Enter. 3. Select 1. Edit. 4. Change the information in the appropriate fields and press Enter to maneuver to the next field. 5. Select 7. Save changes.
Managing the HP NetStorage 6000 Using Telnet Modifying a Host Telnet allows you to modify host information. Note If the host already exists, the host information displays. Adding a Host 1. From the main menu, select F. Hosts. 2. Type the new host name, then press Enter. The system will make sure the host name does not already exists. If not, the following screen displays: 3. Press Enter to add the host. 4. Enter the new host IP address. 5. Select 7. Save Changes. Deleting a Host 1.
Managing the HP NetStorage 6000 Using Telnet Using Remote Services This screen controls Network Information Service (NIS), updates of the hosts, updates of user lists and Network System Logger (SYSLOG). Note Once NIS is set up, periodically inspect the server to see if the master files have changed. When a file changes, it is copied from the NIS server to the local file. The Enable field allows you to disable NIS updates without losing the setup information, so it still exists when you re-enable it.
Managing the HP NetStorage 6000 Using Telnet Viewing and Modifying Admin Admin provides the basic administrative information available to the user. To modify Telnet through Admin: 1. From the main menu, select K. Admin. 2. Within the Admin area, there are two levels of access and protection: 28 • Grant access Click Yes to allow access from network clients, and Yes to deny. • Password Protect Click Yes to enable password protection and Yes to disable.
Managing the HP NetStorage 6000 Using Telnet Using the Access Control Screens Use the Access Control menu options to configure access restrictions to server resources. Caution Once you save the changes, the existing NFS mounts from clients are updated to reflect the new parameters. We recommend you restrict the volume containing the configuration files (the boot directory) to read only. Note Hosts on the trusted list are allowed read/write access regardless of the volume access parameters.
Managing the HP NetStorage 6000 Using Telnet Adding a Trusted Host To add a trusted host: 1. From the main menu, select Trusted Hosts. The following screen displays: 2. Type a new host name, then press Enter. The system will make sure the host name does not already exist. If not, the following screen displays: Note If the trusted host already exists, the host information displays. 3. Select 7. Add to list. The new trusted host has been added and the name displays at the top of the screen.
Managing the HP NetStorage 6000 Using Telnet Deleting a Trusted Host To delete a trusted host: 1. From the main menu, select Trusted Hosts. The following screen displays: 2. Type in the name of the trusted host you are deleting and press Enter. 3. Select 8. Delete. The trusted hosts is automatically removed from the list.
Managing the HP NetStorage 6000 Using Telnet SMB/CIFS Setup SMB/CIFS informs the Windows environment about file availability. Through the set up menu, you organize how Telnet will respond to system queries. To set up the SMB/CIFS: 1. From the Telnet main menu, select W. SMB/CIFS Setup. 2. Enter 1. Edit Fields. 3. Enter a resource domain name (such as, workgroup). 4. If necessary, enter the master (authentication) domain name. 5. Define the scope and description. 6.
Managing the HP NetStorage 6000 Using Telnet SMB/CIFS Shares After the SMB/CIFS set up is complete, SMB/CIFS shares must be defined. Shares define the volumes to be shared by the system. To set up the SMB/CIFS shares: 1. From the main menu, select X: SMB/CIFS Shares. 2. Select the letter of an existing share or select 8. Add a share. 3. Enter a Share name as it will appear to Windows machines browsing this share. 4. Enter a path in the Directory. 5. Enter a Comment about this directory. 6. Enter 1.
Managing the HP NetStorage 6000 Using Telnet Configuring E-mail This menu configures the Telnet ability to send e-mail to specific recipients when there is a problem with the RAID subsystem or the UPS module. The following appears: To configure the RAID/UPS e-mail: 1. From the Telnet main menu press the space bar then select U. E-mail Configuration. 2. From the E-mail Configuration screen, select 1. Edit fields. 3. Type the information requested by each field. Press Enter to move between fields.
&RPPDQGV T he following pages contain reference information about the commands and variables used in rlogin and Telnet. It is arranged in alphabetical order.
Managing the HP NetStorage 6000 Using Telnet ? The ? character is used to obtain help and in wildcard patterns. * The * character is used in wildcard patterns. See wildcard. $ The $ character is used to begin a variable name in command. See variable. # The # character is used to begin a comment in many files. See comment. approve Use the approve command to test the access control configuration.
Commands With an argument, the drive partition table is examined and shown. If there is no SFS partition and enough disk space for one, you are asked if you want to delete the partition. The disk command does not manage volumes. It repairs the partition table in emergencies. After deleting a partition, promptly shutdown and reboot the system. Example: disk disk hrdc0d0 disk aha1d30 echo The echo command simply shows its arguments. It is usually used in command scripts to report progress.
Managing the HP NetStorage 6000 Using Telnet hostlook The hostlook command is used to verify that the hosts file is correct. Each hostname/addr argument is looked up in the hosts file, and the results of the are reported. A hostname/addr argument may be a host name (e.g. a client), or a host Internet address (e.g. 192.3.4.5). Wildcards may not be used. Usage: hostlook hostname/addr … Example: hostlook a client hostlook 192.3.4.
Commands locks The locks command reports the current file locks held by network clients. The actual name of the file on which locks are held is not available. Instead, the volume name and node number are reported, which should help you identify the actual file. Every attempt is made to identify the lock owner as a process ID on a particular client. Usage: locks locks See lockd, statd, and crashlocks. load The load command is used to load a module or to report the loaded modules.
Managing the HP NetStorage 6000 Using Telnet ESC [ row ; col H position the cursor ESC [ 0 m normal video mode ESC [ 1 m bright video mode ESC [ 7 m reverse video mode Usage: netstat menu Use the netstat command to inspect the network interface and network routine table status. Usage: netstat [-i|-r] network file systemSee NFS. nfsunmount Use the nfsunmount command is to unmount a remote NFS volume. Usage: nfsunmount localname Example: nfsunmount /xsvol See nfsmount.
Commands perm The permission this server may allow itself for accessing remote files. This may be for read-only access, in which case this server will make no attempt to create or modify files on the remote server. Or it may be rw for read-write access, in which case this server may create or modify files. In order to restore files from tape to the remote server, this must be set to rw. Default: perm=rw. During backup, the files and directories are read using user ID 0 (root).
Managing the HP NetStorage 6000 Using Telnet pwtest The pwtest command is used to verify a password. The password may be for a user, for administrative access to the command interpreter and menus, or for access to the modems. The last usage synopsis is used when for a user with the name admin or modem. You are asked to enter the password, and as you do the * character is printed for security. When you press the enter key, you are told whether or not the pass-word is correct.
Commands The packets sent are the same as the ping command (ICMP protocol). Nsend is the number of packets to send; the default is one. Size is the size in bytes of each packet sent; the default is 56 bytes. Maxfail is the maximum number of retries for the entire test; the default is three. Usage: ratenet hostname/addr [ nsend [ size [ maxfail ] ] ] Example: ratenet aclient ratenet 192.3.4.10 ratenet aclient 1000 ratenet other 100 1200 ratenet 192.3.4.
Managing the HP NetStorage 6000 Using Telnet • the network parameters • the timezone parameters • the modem and printer configuration When used with no argument, the information is displayed directly to the user. When given a file argument, the information is stored into the named file. When given a printer argument, the information is queued for the named printer. The presence of a / character indicates that the argument is a file name rather than a printer name.
Commands Usage: set varname value Example: set hostname server10 set inet.addr 192.3.4.100 show The show command gives the names and values of variables. With no varname/patn argument, show gives the names and values of all variables. The varname/patn arguments may be a variable name (e.g., hostname), or a wildcard that matches multiple names (e.g., com?.name, inet.*). Usage: show [ varname/patn … ] Example: show show com1.* show *.
Managing the HP NetStorage 6000 Using Telnet Usage: status [ what … ] Example: status status up rm fs tar The tar command is used to manipulate tape archives. The first letter of mode must be one of: c Create a new archive containing directories. Archives created with this mode are written in the traditional tar format, and are easily imported and exported by many different systems. F Make full backup of directories, the file.bdl argument is required.
Commands L Specifies the length of the tape in megabytes. This also enables multi-tape archives (default 0, not multi-tape). This option only has effect when creating a new archive with one of the c, F, or P modes. Most multi-volume tar commands sense the end-oftape based on write errors, but this tar does not. Files are not split across multiple tape volumes. When a file will not fit on the current tape (based on the file size and the tape size), the current tape ends and the next tape is requested.
Managing the HP NetStorage 6000 Using Telnet uptime The uptime command reports how long the server has been running, the current time of day in 24-hour format, and the recent CPU utilization. Usage: userlook uptime The userlook command is used to verify that the passwd file is correct. Each username/uid argument is looked up in the passwd file, and the results of the lookup are reported. A username/uid argument may be a user’s login (e.g., fred, jjsmith), or a user’s UID (e.g., 211, 1047).
Managing the HP NetStorage 6000 Using Telnet Index A access control screens 29 accessing checkpoint settings 23 Telnet 2 activity monitor 7 adding extension segment 21 host 26 trusted host 30 user 24 admin, viewing and modifying 28 attaching a journal segment 22 B backup and restore status 13 backup jobs creating and maintaining 9 scheduling 10 unscheduled 11 C checkpoint 23 commands # 36 $ 36 * 36 ? 36 approve 36 attach 36 cat 36 chkdsk 36 control 36 crashlocks 36 df 36 disk 36 echo 37 exit 37 fsck 37 ha
Managing the HP NetStorage 6000 Using Telnet E S editing host 26 NIS information 27 user 25 e-mail 34 scheduling backup jobs 10 setting the time zone, time and date 18 setting up a host server name 4 SFS volume 20 showing the log 16 shuting down the system 17 SMB/CIFS setup 28, 32 shares 33 G general SFS volume information 20 H host adding 26 deleting 26 editing 26 modifying 26 host server name set up 4 T journal segment 22 tape backup 8 tape magazine contents 14 tape restore 12 Telnet main menu 3