
README for the HP Database Manager (HPDM) (Upd 3 R2.4-P SP2)


NOTE: Note these considerations:
• If you are installing HPDM on Windows Vista and you are logged on as a
non-administrator, you need to install the files in a non-default location (for example,
“C:\user\your_logon_name\HP Database Manager.” Vista does not allow
non-administrators to install files into the “C:\Program Files” folder.
• During installation of the Windows client products (HPDM, NPAT, NCI, and others),
the installer software allows you to install the client for use by yourself or by anyone
who uses your computer. The installer options are Everyone or Just me (the default).
If you intend to select the Everyone option:
— Prior to running the installation, copy the .msi file for the client to a local folder on
your computer where it will not be deleted later.
— Run the installation using this local copy of the .msi file.
When another user starts the client, Windows uses the saved .msi file to install the client
for that user. If the .msi file is not present, the user can receive a message indicating
that the feature the user is trying to access is on a network resource that is unavailable.
When the installation is complete, HPDM prompts you to click the Close button to exit the
setup program.
3. Start HPDM by clicking Start > All Programs > HP Database Manager > HP Database
Manager.
4. If this is the first time you are using the application, you must add the systems that you
want to manage.
a. From the Tools menu, select System Tool to display the System Tool dialog box.
b. Click the Add button to display the Add System dialog box.
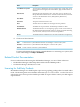
c. Enter the Neoview system connection details:
Installation for Neoview Release 2.4-P 7