
Neoview System Monitor Quick Start (R2.3 SP3, R2.4)

Quick Recording Method
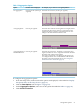
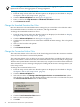
1. In the system monitor screen (see Figure 1-2 (page 11)), right-click anywhere, and select
Start Recording. The Save Recording dialog box appears.
2. Specify a file name.
NOTE: You do not need to specify a file type. The session is saved as a binary file.
3. Click Save. The recording starts immediately and continues until you stop the recording
manually. To stop the recording, see “Stop Recording” (page 29).
Precision Recording Method
1. From the setup screen, make sure that the option tabs are displayed, as described in “Display
the Options Tabs on the Setup Screen” (page 16).
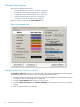
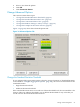
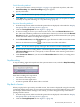
2. Click the Tracing/Playback tab. See Figure 1-7 (page 28).
3. To start recording as soon as you connect to the server, select the Record Session check
box. This control makes it possible to record the entire session. If you do not select the Record
Session check box, you must start the recording manually, and information that you specify
for the File name and the recording limit is ignored.
4. Under Record Session, in the File name field, type a file name in which to store the session
data. Or click the Browse button to select from a list of files and folders:
NOTE: You do not need to specify a file type. The session is saved as a binary file.
5. If you want to set the recording limit to a desired length in minutes or kilobytes, select the
Limit recording to check box, and specify a value. The limit value must be greater than 0
but less than 10001.
6. Click Connect to Server. If you selected the Record Session check box, recording starts
immediately.
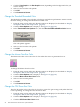
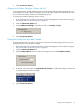
Stop Recording
To stop recording, right-click anywhere in the system monitor screen, and select Stop Recording.
Note that recording also stops when:
• You return to the setup screen.
• You close the client application.
• A limit is specified and the limit value is reached.
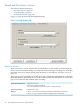
Play Back a Session
When you play back a previously recorded session, the session is displayed using the currently
configured default setup values. If you want to play back the session using different setup values
(for example, different 100% settings or bar colors), you must change the setup values before
playing back the session.
1. From the setup screen, make sure that the option tabs are displayed, as described in “Display
the Options Tabs on the Setup Screen” (page 16).
2. Click the Tracing/Playback tab. See Figure 1-7 (page 28).
Record and Play Back a Session 29