
HP Database Manager (HPDM) User Guide (R2.4 SP1)

DescriptionMenu Item
Uses the values defined in the system definition to establish an ODBC connection with the
system. See “Connect to a System” (page 17).
Connect
Edits an active system. See “Edit a System” (page 22).
Edit
Adds a system like the selected system’s current settings. See “Add a System Like...”
(page 22).
Add System Like This
Removes a selected system. See “Remove a System” (page 23).
Remove System
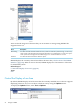
If you select a system from the My Other Systems folder, the right pane displays the Edit System
dialog box. You can edit the system configuration and select [ Test ] or [ Apply ].
Related Topics
“See the Parts of the HPDM Interface” (page 25)
“Add a System” (page 20)
Terms
My Active Systems
My Other Systems
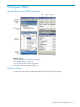
Use the Right Pane
The right pane displays information about the selected objects in the My Favorites pane or the
navigation tree pane. The navigation buttons displayed in the top right pane are:
FunctionButton
Displays the schema folder and all folders for that system.[ Parent ]
Takes you to the previous schema (if any). If no other schemas exist, [ Previous ] is
disabled.
[ Previous ]
Takes you to the next schema (if any). If no other schemas exist, [ Next ] is disabled.[ Next ]
When My Active Systems or My Other Systems are selected, the buttons that are displayed
in the bottom right pane are:
FunctionButton
Tests a selected system and displays the results in the Connection Test Result dialog
box. [ Test ] is enabled if one or more systems is selected.
[ Test ]
Launches the Edit System dialog box with the selected systems’ current settings. [
Edit ] is enabled if one or more systems is selected.
[ Edit ]
Launches the Add System dialog box with blank settings, except for the port number
(which defaults to 18650). The ODBC driver defaults to 2.0. [ Add ] is always enabled.
[ Add ]
Launches the Add Like System dialog box with selected systems’ current settings.
You can use these settings as a starting point for adding a new system. [ Add Like ]
is enabled if only one system is selected.
[ Add Like ]
Launches the Confirm dialog box. [ Remove ] is enabled if one or more systems is
selected.
[ Remove ]
Launches the Confirm dialog box. [ Disconnect ] is enabled if one or more systems
is selected.
[ Disconnect ]
Use the Right Pane 29