
Neoview Database Administrator's Guide (R2.3)


Enabling or Disabling Reorganize and Update Statistics on Tables
The owner of a schema can enable and disable Reorganize and Update Statistics for a table.
1. Start DB Admin and log on using the user ID that owns the schema that the table resides in
or log on as a user authorized to grant privileges to others on that table.
2. Click the Database tab, then navigate to the schema and table you want to change.
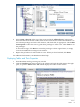
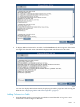
3. Right-click the table you want to change and select Enable Reorganize to enable
reorganization, Disable Reorganize to disable reorganization, Enable Update Statistics to
enable update statistics, or Disable Update Statistics to disable that operation.
The state of the table will be reflected in the items that are available: if Reorganized is already
enabled on a table, Enable Reorganize will be grayed out.
For more information, see Chapter 8 (page 103).
Dropping (Deleting) Tables
1. Start DB Admin and log on using the user ID that created the table or log on as a user
authorized to drop the table.
2. Click the Database tab, then navigate to the schema and table you want to delete.
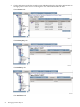
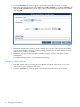
3. Right-click the table name and then select Drop.
4. DB Admin prompts you to select RESTRICT or CASCADE to indicate if you want to drop
dependent objects. Select Drop:
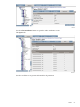
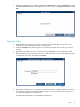
5. DB Admin prompts you to confirm that you want to drop the table. When you click Yes, it
attempts to drop the table and either displays an error or indicates the drop was successful.
For additional information, see DB Admin online help.
Indexes
Since your Neoview platform is not preconfigured with tables, indexes are not configured, but
you can create them immediately.
An index is an ordered set of pointers to rows of a table. Each index is based on the values in
one or more columns. Indexes allow you to quickly access data, in different ways.
Creating Indexes
1. Start DB Admin and log on using the user ID that created the table or log on as a user
authorized to change the table.
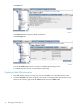
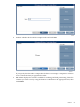
2. Click the Database tab, then navigate to a table in the left pane. Right-click the table and
then select Create index to start the Create Index Wizard.
3. Enter a name for the index and click Next:
58 Managing Database Objects