
Neoview Database Administrator's Guide (R2.2)
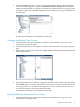
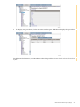


2. Click the Database tab, then navigate to the schema and table and click the materialized
view name in the right pane, or open the Materialized Views Groups folder. DB Admin
displays the materialized view groups for this table. Click the materialized view group name
in the lists in either pane. DB Admin displays the materialized view group’s information in
the right pane:
For additional information, see DB Admin online help.
Changing Materialized View Groups
1. Start DB Admin and log on using the user ID that created the table or log on as a user
authorized to change that table.
2. Click the Database tab, then navigate to a schema and materialized view group in the left
pane.
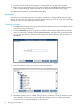
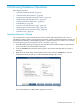
3. Right-click the group name and then select Alter. DB Admin displays the Alter Materialized
View Group Wizard:
4. Select materialized views in the left or right panes and add or remove them using the buttons.
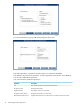
Click Finish when you are done. DB Admin confirms that you want to alter the materialized
view group. When you click Yes it either displays an error or indicates that the alter was
successful and displays the group’s DDL information.
For additional information, see DB Admin online help.
Dropping (Deleting) Materialized View Groups
1. Start DB Admin and log on using the user ID that created the table or log on as a user
authorized to change that table.
Materialized View Groups 71