
Qlogic VMware Online Data Migration Service Using the iSR6200 Applications Note (ISR651401-00 A, December 2011)


5 – Presenting Destination LUNs on VMware ESX 4.0
ISR651401-00 A 6
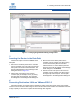
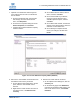
1. Zone the destination LUN with the VMware host
and re-scan the host to show the destination
LUN online on the host (see Figure 5-1).
Figure 5-1. Zoning the Destination LUN (ESX 4.0)
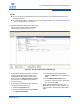
2. In the vSphere Client, select the host in the left
pane, and then click the Configuration tab.
3. On the Configuration page, click Add Storage.
4. Complete the Add Storage wizard as follows:
a. On the Select Storage Type window, click
Disk/LUN, and then click Next.
b. On the Select Disk/LUN window, select a
LUN, and then click Next.
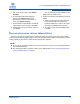
c. On the Select VMFS Mount Options window,
click Assign a new signature, and then
click Next.
d. On the Current Disk Layout window, click
Use ‘Free space’, and then click Next.
e. On the Ready to Complete window, review
the disk layout, and then click Finish to add
this new storage.
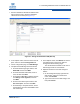
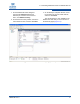
5. In the vSphere Client, click Refresh to view the
new data storage on the host on both the
Configuration and Summary pages.
The virtual machine installed on the source
data storage shows as “inaccessible.”
6. Optional. Rename the new data storage as
follows:
a. On the Configuration page, right-click the
data storage, and then on the shortcut
menu, click Rename.
b. Type a new name for the data storage, and
then press
ENTER
.