
HP MPX200 Data Migration Planning Guide


1. Perform zoning:
a. Connect the FC ports of the data migration appliance to a switch where the storage
controller ports are also logged.
b. Using switch management tools, create a zone, DM_Host_DX440.
c. In this zone, add the WWPN of the data migration appliance FC ports and storage
controller ports.
d. Save the zoning information and activate the new zoning configuration.
2. In a Web browser, open the ETERNUS SF utility by entering the IP address of the array
controller.
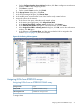
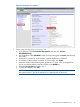
3. In the left pane, click Host Interface Management, and then click Set Host Response.
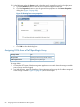
4. In the right pane, click Add Host Response, and then complete the host response information
(see Figure 63 (page 72)):
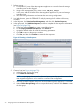
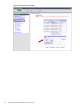
a. In the host response Name box, enter a user-defined name.
b. For the Inquiry Standard Data Version, click Version 3.
c. Accept the default values for all of the remaining parameters.
d. Click OK to return to the previous window.
e. Click Set, and then click Confirm to create the host response.
Figure 63 Creating a Host Response
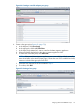
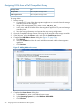
5. Create a host (see Figure 64 (page 73)):
a. In the left pane, click a port group.
b. Click Create FC Port Group.
NOTE: A port group determines the front end ports—ports that provide access to the
data migration appliance—to be used for a common host configuration.
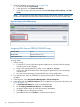
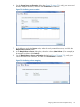
c. Select the controller adapter and port to which the data migration appliance is connected.
d. Under CA Port Group Setting, enter a user-specified name, and then click Create to create
the host group.
72 Assigning LUNs to the MPX200 for data migration