
HP MPX200 Data Migration Planning Guide
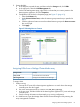

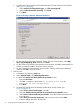


e. Complete the Customize Advanced Volume Parameters (Create Volume) wizard window
(see Figure 57 (page 66)):
i. Under Volume I/O characteristics type, click File system (typical).
ii. Under Preferred controller ownership, click Slot A.
iii. Click Next.
Figure 57 Creating a Volume: Advanced Parameters
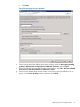
f. On the Specify Volume-to-LUN Mapping (Create Volume) wizard window, select Map
later using the Mappings View and then click Finish.
g. On the Creation Successful (Create Volume) wizard window, click Yes to create additional
volumes as needed, or No to discontinue volume creation.
h. On the Completed (Create Volume) wizard window, read the instructional information,
and then click OK to close the wizard.
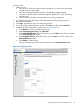
5. Define a host:
a. In SANtricity ES, select the Setup tab.
b. Under Optional Tasks, click Manually Define Hosts.
c. Complete the Specify Host Name (Define Host) wizard window:
i. Enter the Host name.
ii. Click Yes in response to the question Do you plan to use storage
partitions on this storage array?
iii. Click Next.
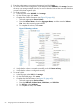
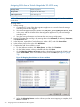
d. Complete the Specify Host Port Identifiers (Define Host) wizard window (see
Figure 58 (page 67)):
i. Under Choose a host interface type, select FC.
ii. Select the Add by selecting a known unassociated host port identifier option.
iii. Under Known unassociated host port identifier, select the WWPN associated with
the router port.
iv. Under Alias (30 characters maximum), enter an alias name, and click Add.
v. Continue adding aliases for all host ports.
66 Assigning LUNs to the MPX200 for data migration