
Qlogic VMware Online Data Migration Service Using the iSR6200 Applications Note (ISR651401-00 A, December 2011)

4 – Presenting Destination LUNs on VMware ESX 3.5
ISR651401-00 A 4
5. Repeat Step 3 and change the LVM
EnableResignature value back to 0.
6. Optional. Rename the new data storage as
follows:
a. On the Configuration page, right-click the
data storage, and then on the shortcut
menu, click Rename.
b. Type a new name for the data storage, and
then press
ENTER
.
7. Optional. If the destination data storage has
more capacity than the source, maximize the
size as follows:
a. On the Configuration page, right-click the
data storage, and then on the shortcut
menu, click Properties.
b. On the data storage Properties dialog box
under Extents, click Add Extent.
c. Complete the Add Extent wizard as follows:
On the Extent Device window, select a
device, and then click Next.
On the Current Disk Layout window,
review the current disk setup, and then
click Next.
On the Extent Size window, select the
Maximum capacity check box, and then
click Next.
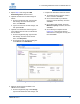
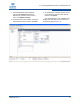
On the Ready to Complete window
(Figure 4-2), verify that the selected
extent device is configured correctly, and
then click Finish.
Figure 4-2. Completed Add Extent Wizard (ESX 3.5)
8. Make the virtual machine available to the
VMware host as follows:
a. On the Configuration page under Storage,
right-click the destination data storage, and