
HP MPX200 Data Migration Planning Guide


1. Perform zoning:
a. Connect the FC ports of the data migration appliance to a switch where the storage
controller ports are also logged.
b. Use switch management tools to create a zone, DM_Host_netapp.
c. In this zone, add the WWPN of the data migration appliance FC ports and storage
controller ports.
d. Save the zoning information and activate the new zoning configuration.
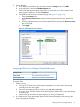
2. Open the SANtricity ES tool.
3. Select the Setup tab, and, under Array Management, select Manage a Storage Array and
then click OK.
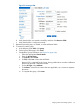
4. Create a logical volume:
a. On the <Unnamed> array configuration window, select the Logical tab.
b. In the left pane, right-click the Free Capacity icon, and then click Create Volume.
c. On the Introduction (Create Volume) wizard window, click Next.
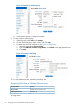
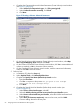
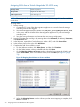
d. Complete the Specify Capacity/Name (Create Volume) wizard window (see
Figure 56 (page 65)):
i. Specify the New volume capacity and Volume name.
ii. Click the Customize settings option.
iii. Click Next.
Figure 56 Creating a Volume: Volume parameters
Assigning LUNs from NetApp Systems 65