
HP MFP Digital Sending Software (DSS) 5.0 - Configuring DSS to Use Two-Server Authentication

Page 2 of 5 white paper
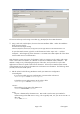
The next several steps involve using a text editor (e.g. Notepad) to edit an XML document.
2. Using a tool such as File Explorer, browse to the DSS installation folder. Within the installation
folder, browse to the file
Hewlett-Packard\HP Digital Sending
Software\FileSystems\Product\Dss\Configuration\HP.Dss.App.Utilities.TwoServerAuthentication.xml.
To open this XML document, right-click on the filename and select “Open with…” and then
“Notepad.” At the beginning of the document is a comment section that explains all of the values
used to enable two-server authentication.
XML documents contain many types of information, but for our purpose we only need to edit certain
values. These values are stored in an “attribute” in the format “<attribute>value</attribute>”. The
attribute is simply a way of identifying the purpose of the value, and it provides a way for other
applications to retrieve a specific value from the document. The two-server XML document contains
values that DSS uses to connect to the LDAP server and retrieve user information. The following values
(in bold) can be set for LDAP queries.
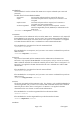
3. Edit the values for the following attributes to match your LDAP server configuration
<UseConfigFile>
If you wish to enable two-server authentication you must set this value to true.
<UseConfigFile>true</UseConfigFile>
To disable two-server authentication set this value to false.
<UseConfigFile>false</UseConfigFile>
<Server>
The IP address or host name of the LDAP server.
<Server>servername</Server>
<Port>
The port is determined by the LDAP server. DSS needs to use the same port number for
communicating as the LDAP server is using. This is typically 389, or if your server uses SSL it is
often 636.
<Port>389</Port>