
Building Disaster Recovery Serviceguard Solutions Using Metrocluster with Continuous Access for P9000 and XP A.11.00
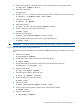

4. Create the disk group to be used with the vxdg command only on the primary system.
# vxdg init <dgName> disk 2
5. Verify the configuration.
# vxdg list
6. Use the vxassist command to create the logical volume. (XXXX is the size of the volume)
# vxassist -g <dgName> make <lvol> XXXX
7. Verify the configuration.
# vxprint -g <dgName>
8. Make the filesystem.
# newfs -F vxfs /dev/vx/rdsk/<dgName>/<lvol>
9. Create a directory to mount the volume group.
# mkdir /logs
10. Mount the volume group.
# mount /dev/vx/dsk/<dgName>/<lvol> /logs
11. Verify whether the file system exists, then unmount the file system.
# umount /logs
IMPORTANT: VxVM 4.1 does not support the agile DSF naming convention with HP-UX 11iv3.
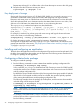
Importing VxVM disk groups at the Remote Site
The following section describes how to import the VERITAS disk groups on nodes in the recovery
site:
1. Deport the disk group.
# vxdg deport <dgName>
2. Enable other cluster nodes to have access to the disk group.
# vxdctl enable
3. Suspend the Continuous Access link and have SVOL Read/Write permission.
# pairsplit -g <devgrpA> -rw
4. Import the disk group.
# vxdg -tfC import <dgName>
5. Start the logical volume in the disk group.
# vxvol -g <dgName> startall
6. Create a directory to mount the volume.
# mkdir /logs
7. Mount the volume.
# mount /dev/vx/dsk/<dgName>/<lvol> /logs
8. Verify to ensure the file system is present, then unmount the file system.
# umount /logs
9. Deport the disk group.
# vxdg deport <dgName>
Configuring LVM volume group and VxVM disk group 25