
Building Disaster Recovery Serviceguard Solutions Using Metrocluster with Continuous Access EVA A.05.01
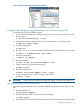

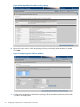

Figure 3 P6000/EVA Command View for the WWN identifier
Configuring LVM volume group using Metrocluster with Continuous Access EVA
Configuring volume groups
To configure volume groups:
1. Define the appropriate Volume Groups on each node that might run the application package.
Run the following commands:
# mkdir /dev/<vgname>
# mknod /dev/<vgname>/group c 64 0xnn0000
where the name /dev/<vgname> and the number nn are unique within the cluster.
NOTE: If you are using the March 2008 version or later of HP-UX 11i v3, skip step 1;
vgcreate (1m) will create the device file.
2. Create the volume group on the source volume.
# pvcreate -f /dev/rdisk/disk3
# vgcreate /dev/vgname /dev/disk/disk3
NOTE: If you are using LVM PVLinks, to add all the paths of the disk to the volume group,
run the following command:
# vgextend /dev/<vgname> /dev/disk/disk3
3. Create the logical volume. (XXXX indicates size in MB)
# lvcreate -L XXXX /dev/<vgname>
4. Install a VxFS file system on the logical volume.
# newfs -F vxfs /dev/<vgname>/rlvol1
5. Deactivate the Volume Group.
# vgchange -a n /dev/<vgname>
6. Start the cluster and configure the Volume Group.
# cmruncl (if cluster is not already up and running)
# vgchange -c y /dev/<vgname>
22 Configuring an application in a Metrocluster environment