HP Matrix 7.2 KVM Private Cloud Getting Started Guide nl About this guide This guide is intended for use by infrastructure administrators who need a quick reference guide for getting started using the HP Matrix KVM Private Cloud.
© Copyright 2013 Hewlett-Packard Development Company, L.P. Confidential computer software. Valid license from HP required for possession, use or copying. Consistent with FAR 12.211 and 12.212, Commercial Computer Software, Computer Software Documentation, and Technical Data for Commercial Items are licensed to the U.S. Government under vendor's standard commercial license. The information contained herein is subject to change without notice.
Contents 1 Overview of the HP Matrix KVM Private Cloud...............................................6 Features..................................................................................................................................6 How it works............................................................................................................................7 About user authentication......................................................................................................
Restart the infrastructure orchestration service..............................................................................30 Configure a KVM cloud pool....................................................................................................30 Create a template...................................................................................................................30 Create a cloud service.................................................................................................
A Reset the administrator password................................................................49 Reset the administrator password..............................................................................................49 administrator/resetPassword API ..............................................................................................49 Index.........................................................................................................
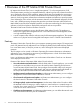
1 Overview of the HP Matrix KVM Private Cloud HP Matrix KVM Private Cloud, new in Insight Management 7.2, is the next generation of HP CloudSystem Matrix providing an integrated hardware, software and services solution that allows you to realize the value of cloud computing.
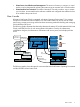
• Virtual server size definition and management. The amount of memory to assign to a virtual machine can be designated by selecting the instance type to associate with a virtual machine. • Virtual machine host activation. The Matrix KVM Admin Console provides a way to activate your VM hosts. An activated host has software installed and configured that enables the host to be added to the private cloud. How it works HP Matrix KVM Private Cloud is integrated with Matrix Operating Environment 7.
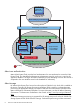
Matrix OE (CMS Server) CLoudSystem Matrix Private Cloud Matrix OE Deployment Network Matrix OE Access Network Host Management Subnet (non-routable private network) KVM Instance nova services SAN Fabric Compute Nodes nova-compute nova-network Controller Node (HA) Heartbeat Cloud Connectivity Subnet (public-facing network) Bonding Matrix KVM Private Cloud Network About user authentication Matrix KVM Private Cloud provides local authentication for users authorized to access the KVM Private Cloud.
SAN zoning within Brocade SAN environments if at least one zone is already configured in the SAN fabric by the SAN administrator. For more information about SPM, see the HP Storage Provisioning Manager (SPM) User Guide at http://www.hp.com/go/matrixoe/docs. If on-demand storage provisioning through SPM cannot be used in the environment, make available Storage Pool Entries (SPEs) and LUNs for which appropriate zoning and storage presentation have already been done.
2 Verify appliance and cloud configuration The information in this chapter assumes that initial installation and setup of the Matrix KVM Private Cloud has been completed by an HP Services Technical Consultant as part of an HP Matrix Operating Environment installation. You should now be able to access the KVM Admin Console through a supported web browser and verify the state of your appliance and the Matrix KVM Private Cloud.
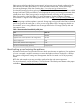
Figure 1 Screen components 1 2 3 4 5 Main menu Search Activity control Session control Help control 6 7 8 9 Banner Actions menu Details pane Master or filter pane Learn what the icons represent Icons represent the current status of resources, alerts, user actions, and general navigation. Table 2 Icon definitions Large icon Small icon Resource Activity Notification Explanation Critical Critical The component is in a critical state.
Table 2 Icon definitions (continued) Large icon Small icon Resource Activity Notification Explanation Unknown Informational The component is not known to the cloud and is not in an active state within the cloud. Determine if intervention is needed. In progress overlay indicates applying a change or a task is running.
Acquire and install the HP public key The HP public key verifies that HP created its RPMs and updates and that the code was not modified since it was signed. Prerequisites • Minimum required privileges: Infrastructure Administrator • Internet connection Procedure 2 Acquiring and installing the HP public key 1. 2. 3. 4. Click the Edit icon in the Security portion of the Settings screen. Select the hp.com link.
Table 4 Data displayed on Cloud Networking screen (continued) NOTE: The Matrix KVM Admin Console allocates addresses on this network to provisioned virtual machines. Ensure that external DHCP or other services are not attempting to allocate addresses within this range. Netmask, Usable IP range, and IPs available are calculated based on the IP address. IPs assigned shows the IP addresses assigned to instances on the IP Addresses screen.
2 3 4 Alternatively, click the icon to reveal (or conceal) the filter banner, which contains the same selection choices in a vertical presentation. Expand the view of a notification to reveal notes and other details. Click the link to view a log of the events that are included in this notification. Start typing in the note box to begin adding instructions or other information to a notification.
Restoring the default settings: You can restore the filters to the original setting – all active notifications – by selecting Filters→Reset to defaults. You can restore the original date setting – all dates – by selecting All Time on the date selector. About VM host management To navigate to this screen from other locations in the user interface, click the black menu bar at the top of the screen and select Hosts.
See “Deploy a virtual machine to the cloud” (page 26) for information about how to create and deploy a KVM cloud instance. From the Instances screen, you can: • Create an image from a snapshot of an instance, which allows you to capture the attributes of the running environment of an instance and duplicate it for future use. • Start an instance, if the virtual machine is not running.
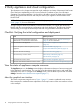
Table 7 Instances overview screen details (continued) vCPU Number of processor units (cores) allocated to each virtual machine, based on the selected instance type. Memory (GB) Memory allocated to each virtual machine, based on the selected instance type. Boot disk (GB) Size of memory set aside for booting the virtual machine, based on the selected instance type. Table 8 Available actions Create image Create an image from a snapshot of an instance.
3 Plan an expansion of the cloud The Matrix KVM Private Cloud is a flexible solution that can expand to meet growing business demands. There are two ways to expand Matrix KVM Private Cloud capacity: 1. Expand an existing cloud: this type of expansion involves adding VM hosts to an existing cloud. 2. Create a new cloud: this type of expansion requires installing a new appliance in addition to new VM hosts. Contact HP Support for assistance in creating a new cloud.
Table 9 Resource considerations when expanding a KVM Private Cloud (continued) Cloud component Configuration options and requirements Network Three separate networks (IP subnets) are required to provide connectivity among the KVM Private Cloud elements. NOTE: Make sure there are sufficient IP addresses to allocate to the VM instances that you plan to deploy. If you do not allocate enough IP addresses when you configure cloud networking, you cannot add them later without resetting your environment.
Table 10 Resource oversubscription rates Physical resource Virtual resource Physical to virtual oversubscription rate 1 CPU core 8 CPU cores 1:8 1 GB RAM 1.5 GB RAM 1:1.5 1 GB disk 1.5 GB disk 1:1.5 A practical example of calculating cloud resources for VM replacement The purpose of this example is to apply the information provided in the previous section to a realistic expansion scenario.
issues so providing additional memory in your cloud can help performance. In this example, there is little reason to put more than 1200 GB in this cloud. Calculate the disk space required Assume the total disk space needed by the VMs is 36 TB. Dividing by our oversubscription ratio of 1:1.5, we need a minimum of 24 TB of physical disk space on the compute nodes.
4 Expand an existing cloud This chapter describes how to configure a new VM host to make it ready for activation. Checklist: Expanding the KVM Private Cloud The following procedures describe how to add hosts to the Matrix KVM Private Cloud. Task Procedure Install and configure prerequisite software on “Install RHEL 6.3 with KVM on the host before activation” the host. (page 23) “Bring up the host’s network on the Host management subnet” (page 24) Activate the host.
PEERDNS=’no’ PERSISTENT_DHCLIENT=1 See “About cloud networking” (page 13) for more information. Storage Configure storage as follows: 1. Ensure that you have the prerequisite storage configured for the RHEL operating system. 2. Create the following path where virtual machine instances will be provisioned. For HA configuration and flexible management, HP recommends that you create a separate file system on a logical volume with underlying multi-path storage.
Activating a VM host performs the configuration required on the host to bring the system into the cloud, including: • Creating local SSH keypairs • Creating and configuring users on the system, including isc-kvm-user, nova-user, and the local Matrix KVM Private Cloud user • Setting the date and time on the host • Installing isc-compute-node software using Red Hat Package Manager (RPM) • Installing for dependencies: isc-kvm-hosts kvmhost-openstack openstack-config openstack-nova-api openstack-nova-c
5 Deploy a virtual machine to the cloud The following procedures describe how to deploy a virtual machine instance to the Matrix KVM Private Cloud. Matrix Operating Environment interfaces with the VM host to provision servers and storage, deploy images, and connect the network.
Role category Associated permissions or privileges orchestration self service portal must be set separately within the Matrix Operating Environment. Cloud User Used when configuring a KVM cloud pool in Matrix OE. The permissions associated with the Cloud User role grant Matrix OE the capabilities to securely provision virtual machines to the KVM cloud and manage communication between the infrastructure service and the virtual machines.
Your identification has been saved in /c/Users/you/.ssh/id_rsa. # Your public key has been saved in /c/Users/you/.ssh/id_rsa.pub. # The key fingerprint is: # 01:0f:f4:3b:ca:85:d6:17:a1:7d:f0:68:9d:f0:a2:db your_email@youremail.com 4. Enter the following command to copy the key to your clipboard. The clip command does not add newlines or whitespace to the clipboard. clip < ~/.ssh/id_rsa.pub 5. Paste the contents of your clipboard into the Public key for keypair field.
The Matrix OE software is installed on a Central Management Server (CMS) running Systems Insight Manager, which provides a browser-based user interface. A single CMS can be used to manage different types of systems or instances. 1. Obtain system credentials and the IP address for the CMS running Matrix OE. 2. Log in to Matrix OE, specifying the IP address of the CMS in the following URL: https://cms-ip-address:50000 Edit the Matrix infrastructure orchestration properties file 1. 2.
2. Import the SSL root certificate into the Systems Insight Manager trust store. 1. From the Systems Insight Manager menu (the top blue menu bar), select Options→Security→Credentials→Trusted Systems. 2. Select the Trusted Certificates tab. Click Import, browse to the file, and click OK. Restart the infrastructure orchestration service 1. 2. On the Matrix OE CMS, select Start→Administrative Tools→Services. Restart the “HP Matrix infrastructure orchestration” Windows service. Configure a KVM cloud pool 1.
Create a cloud service 1. 2. 3. Launch infrastructure orchestration Console at https://cms-ip-address:50000 and select Tools→Infrastructure orchestration. Click the Servers tab, and create a pool containing cloud resources by clicking Create Pool. Create a new service using the template. 1. Click the Templates tab. Select the template previously created and click Create Service. 2. On the Create Service screen: 3. 4. • Click Options. • Enter a service name. • Enter a hostname completion string.
6 Manage the appliance The Matrix KVM Admin Console Settings screen’s Actions menu contains an Update link that allows you to download the latest firmware versions for the appliance. When you select this action, a connection is made to the HP Support center and the most recent firmware version can be downloaded. Make sure that all active operations have completed before updating the firmware. A direct link to HP Support can be enabled or disabled on your appliance.
Create a support dump file Some error messages recommend that you create a support dump of the appliance so it can be sent to HP Support for analysis. This support dump feature: • Deletes any previous support dump file • Gathers logs and other information required for debugging • Creates an encrypted, compressed file. The support dump file consists of: • Operating system logs • Product logs • The results of certain operating system and product-related commands.
2. The appliance generates a compressed file of the audit logs and downloads it to your local computer. The compressed file is named audit-logs-yyyy_mm_dd-hh_mm_ss, where yyyy_mm_dd indicates the date and hh_mm_ss indicates the time the file was created. The name of the audit log file is displayed on the screen. If you designated a Download folder in your browser options, the audit log file is downloaded into that folder. Otherwise, you are prompted where it should be stored.
Prerequisites • Minimum required privileges: Infrastructure Administrator Procedure 9 Enabling or disabling HP Support Access 1. 2. 3. 4. Select Actions→Edit support access in the Settings screen. Read and understand the WARNING statement on this screen. Select the appropriate option: • Select Enabled if you want to allow HP Support to access your appliance. • Select Disabled if you want to deny HP Support access to your appliance. Click OK. A screen displays the setting you chose.
7 Troubleshooting When an operation does not process as expected, the troubleshooting tasks in this section can be used to help pinpoint the problem. If these troubleshooting tasks do not resolve the problem, see “HP Support services” (page 46). IMPORTANT: Should the appliance fail such that it must be reinstalled to work properly, contact HP technical support services for assistance.
Reboot appliance after serious error Symptom Possible cause and recommendation You see The CIC Rebooting the appliance may solve the problem appliance has encountered a serious 1. Log in to the management VM host on which the appliance is running and enter the command: error virsh reboot ISC-VM 2. Open the Matrix KVM Admin Console in your browser and wait for a login screen, then log in. 3.
Support dump file creation action fails A subsequent support dump file creation might fail if there is insufficient time between them. Symptom Possible cause and recommendation Support dump file not created Insufficient time 1. Minimum required privileges: Infrastructure Administrator 2. Wait. Creating a support dump file can take several minutes. If the log files are large or if the system is extensive, creating a support dump file can take even longer. 3. Retry the create support dump action.
Symptom Possible cause and recommendation The virtual machine instance is not running 1. Verify that the instance is running and accessible. 2. Retry. Removing an IP address owner operation is unsuccessful Apply the recommendations that pertain to your situation. Symptom Possible cause and recommendation Owner of the selected IP address is not removed IP address configuration 1. Verify the following: • An IP address is selected. • The IP address is not attached to a virtual machine.
Symptom Possible cause and recommendation 1. Manually delete the image using the Delete action, which deletes the image entry from the database. 2. Place the image on a file server. 3. Retry the Add Image action and Enter file URL. This option allows you to add a pointer to the image on the file server, which will be used to locate the image during provisioning. On the Images screen, you see an image with a size of 0.
Image server storage configuration is unsuccessful Apply the recommendations that pertain to your situation. Symptom Possible cause and recommendation You see Error occurred during image server storage configuration Dedicated glance storage volume is not available for mounting at startup 1. Ensure that there is a device named /dev/sdb and that it is accessible to the appliance VM that was configured during initial installation. 2. Download and check log files for additional information.
Deployed instance does not boot Apply the recommendations that pertain to your situation. Symptom Possible cause and recommendation You see Unable to create instance. No available host can provide the specified resources No VM hosts in active state 1. Navigate to the Hosts screen and ensure that at least one host is in the Active state. See “Activate a host” (page 24) Insufficient resources available on active VM hosts 1. Ensure that you have sufficient cloud resources on the host.
Troubleshooting virtual machine hosts These sections describe a behavior you might encounter and provide suggested actions you can take. Hosts do not appear on overview screen Apply the recommendations that pertain to your situation. Symptom Possible cause and recommendation No hosts are visible on the Hosts overview screen No VM hosts are configured for use 1. Make sure that all prerequisites have been met for each target VM host. See also “Install RHEL 6.
Activated hosts cannot be provisioned Apply the recommendations that pertain to your situation. Symptom Possible cause and recommendation All activated hosts show red “critical” icon The time or time zone has changed Changing the time or time zone in the appliance user interface can make all activated hosts unresponsive to provisioning and cloud instance life cycle requests.
Symptom Possible cause and recommendation 3. Check the size of the log files in the /var/log/nova directory. Delete the files if they are consuming too much space on the disk. 4. When sufficient log file space is available, try again to deactivate the VM host.
8 HP Support services IMPORTANT: This product contains a technical feature that will allow HP support personnel to access your system, through the system console, to assess problems that you have reported. This access will be controlled by a password generated by HP that will only be provided to authorized support personnel. You can disable access at any time while the system is running. HP technical support personnel are not granted remote access to the appliance.
Related information Use this section to find related documentation for Matrix KVM Private Cloud, Matrix Operating Environment, and OpenStack software. Related HP documentation The latest versions of Matrix KVM Private Cloud manuals and white papers can be downloaded from the HP Insight Management Information Library at http://www.hp.com/go/matrixoe/docs, including the following documents: • HP Matrix 7.
HP authorized resellers For the name of the nearest HP authorized reseller, see the following sources: • In the United States, see the HP U.S. service locator website: http://www.hp.com/service_locator • In other locations, see the Contact HP worldwide website: http://www.hp.com/go/assistance Documentation feedback HP is committed to providing documentation that meets your needs. To help us improve the documentation, send any errors, suggestions, or comments to Documentation Feedback (docsfeedback@hp.
A Reset the administrator password Reset the administrator password If the administrator password for an appliance is lost or forgotten, you can reset the password using the pwreset command. This action requires you to contact HP Support Center by telephone. Prerequisites • You have access to the physical appliance console. • The appliance software is running. Procedure 10 Resetting administrator password 1. 2. 3. 4. 5. 6.
412 PRECONDITION FAILED 415 UNSUPPORTED MEDIA TYPE 500 INTERNAL SERVICE ERROR 503 SERVICE UNAVAILABLE Example https://{appl}/rest/users/administrator/resetPassword X-API-Version • X-API-Version:[api-version] The API version that a specific CI Controller appliance supports. In this release, the only supported value is: X-API-Version:1 An unsupported API version will result in a response code of 412 (Precondition Failed).
Index Index A activities about, 14 date range selector, 15 filter explanation, 15 filtering list of, 15 Activity Overview Screen, 14 administrator password resetting, 49 alerts about, 14 filtering list of, 15 appliance adding virtual machines, 23 icon descriptions, 11 status, 10 updating, 34 verifying configuration, 10 appliance actions create support dump file, 33 download audit logs, 33 reboot, 32 update, 34 audit logs, 33 B backup and restore, 9 C certificate troubleshooting, 37 checklist verifying ap
troubleshoot boot deployed instance operation, 42 troubleshoot delete instance operation, 41 troubleshoot start instance operation, 42 troubleshooting errors, 41 Integrated Lights Out see iLO IP Addresses troubleshoot detachment of IP address, 38 troubleshoot IP address owner removal, 39 troubleshoot lost network connectivity, 38 registering for, 46 SSL certificate, 29 status icon, 11 storage, 8 support dump file, 33 troubleshooting creation of, 38 support matrix for related products, 47 L troubleshoot a