
HP CloudSystem Matrix How-To Guide: ESXi Cluster Provisioning


7
After the Auto Deploy server has been installed, confirm that it can be connected from the CMS.
a. Launch the PowerCLI interface by clicking Start -> All Programs -> VMware -> VMware vSphere
PowerCLI.
b. Connect to the vCenter server by using the following command:
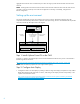
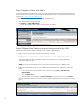
Connect-VIServer -Server <ip address> -User <user> -Password <password>
You can ignore the following certificate warnings.
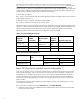
PowerCLI C:\Program Files (x86)\VMware\Infrastructure\vSphere PowerCLI>
Connect-
VIServer -Server localhost -User sp_admin -Password hpinvent
WARNING: There were one or more problems with the server certificate:
*
The X509 chain could not be built up to the root certificate.
*
The certificate's CN name does not match the passed value.
Name Port User
---- ---- ----
localhost 443 Administrator
PowerCLI C:\Program Files (x86)\VMware\Infrastructure\vSphere PowerCLI>
TIP: Test the Auto Deploy solution to provision a server blade outside of IO before continuing.
Step 3: Configure Operations Orchestration properties
The IO implementation for provisioning hypervisors utilizes special-purpose workflows that are packaged with the
Matrix software by HP. This section identifies the system properties and system accounts that must be set in the OO
instance configuration.
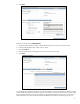
1. Launch OO Studio from the CMS by clicking Start -> All Programs -> Hewlett Packard -> Operations
Orchestration -> HP Operations Orchestration Studio.
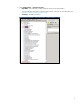
The parameters that the workflows use are located in paths under two branches of the Configuration tree:
System Accounts and System Properties. These locations contain numerous other parameters that IO uses
internally, but do not modify them. Matrix will look at only those settings specifically used by the hypervisor
provisioning workflows. The process for setting these values is as follows:
a. Select the system account or system property.
b. Right-click Repository -> Check out.
c. In the open variable window:
i. Set the value.
ii. Save (click the diskette icon near top tab).
iii. Close (click x).
d. Right-click Repository -> Check in.