
HP Matrix 7.2 KVM Private Cloud Getting Started Guide

2 Verify appliance and cloud configuration
The information in this chapter assumes that initial installation and setup of the Matrix KVM Private
Cloud has been completed by an HP Services Technical Consultant as part of an HP Matrix
Operating Environment installation. You should now be able to access the KVM Admin Console
through a supported web browser and verify the state of your appliance and the Matrix KVM
Private Cloud.
NOTE: To learn how to expand the initial cloud deployment, see “Plan an expansion of the
cloud” (page 19) for more information.
To begin using the Matrix KVM Admin Console for the first time, it is a good idea to become
familiar with the current appliance configuration and cloud deployment. The following checklist
will also help you to begin to familiarize yourself with using the Matrix KVM Admin Console.
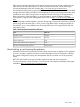
Checklist: Verifying the initial configuration and deployment
Related proceduresTask
If you are unable to log on, see “You cannot log in”
(page 36) for more information.
Log on to the Matrix KVM Admin Console as
Administrator or as Infrastructure Administrator.
View the status of appliance compute resources
(page 10)
View the status of the appliance.
View the HP Public key (page 12)
Acquire and install the HP public key (page 13)
Confirm the presence of the HP public key for the
appliance.
About cloud networking (page 13)View the cloud network settings
About Activity notifications (page 14)
Filter the Activity list (page 15)
View the Activity overview screen.
About VM host management (page 16)View the Hosts overview screen.
About virtual machine instance management (page 16)View the virtual machine Instances overview screen.
View the status of appliance compute resources
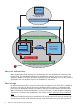
The Appliance pane on the Settings screen displays information and status of resources assigned
to the appliance virtual machine. You can also locate the software build version and install date
displayed in this area. To navigate to the Settings screen, click the black top menu bar and select
Settings. See also Learn what the icons represent (page 11)
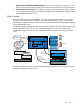
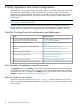
About the graphical user interface
The screen components image shown in Figure 1 (page 11) contains numbered screen sections
that correspond to numbered screen explanations. Each major section of the user interface is shown
in this example.
10 Verify appliance and cloud configuration