
HP Matrix 7.2 KVM Private Cloud Getting Started Guide
Create a cloud service
1. Launch infrastructure orchestration Console at https://cms-ip-address:50000 and
select Tools→Infrastructure orchestration.
2. Click the Servers tab, and create a pool containing cloud resources by clicking Create Pool.
3. Create a new service using the template.
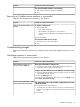
1. Click the Templates tab. Select the template previously created and click Create Service.
2. On the Create Service screen:
• Click Options.
• Enter a service name.
• Enter a hostname completion string.
• Select the cloud pool in the Available Server Pools table.
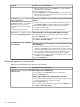
3. Click the right arrow to move the cloud pool to the Selected Server Pools table, and click
Submit.
4. Click the Requests tab to view the progress and status of the create service request.
Verify the cloud instance
The KVM cloud instance can be viewed in Matrix OE and in the Matrix KVM Admin Console.
Perform one or more of the following steps to verify that the KVM cloud instance was successfully
created and is available for use.
1. Verify that the selected image in the Matrix OE Software tab matches the image in the Matrix
KVM Admin Console Images screen.
2. Verify that the selected cloud capacity pool appears in the Matrix OE Servers tab.
3. Open the console VM and its details. Verify that the details are in accordance with the specified
instance type (for example, m1.small), and that the processor and memory values are the
same as those defined in the xml properties files as expected.
4. View the public IP address of the KVM cloud instance (owned by the Cloud User) on the
following:
• Matrix KVM Admin Console Instances screen.
• Matrix OE Services tab (in the NIC Details tab of the Details pane).
Create a cloud service 31