
HP Matrix 7.2 KVM Private Cloud Getting Started Guide
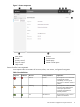


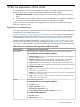

Alternatively, click the icon to reveal (or conceal) the filter banner, which contains the same
selection choices in a vertical presentation.
2
Expand the view of a notification to reveal notes and other details.
3
Click the link to view a log of the events that are included in this notification.
4
Start typing in the note box to begin adding instructions or other information to a notification.
TIP: You can click and drag the lower right corner of the note box to expand the box for
better viewing or easier editing.
5
Mousing over the State of a particular notification reveals additional options that you can
select by clicking the word in the column. An “Active” notice can be cleared; a “Cleared”
notice can be restored.
6
Immediately assign an alert or other notification to a registered user by choosing a name listed
in the selector in the Assignment column of each notification.
7
Use the Actions menu to assign, clear, restore, or delete selected notifications. By clicking
Select All and then selecting an action, the operation is performed on all notifications currently
listed on the screen.
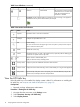
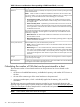
The Activity filters and date range selector
1
Select one or more health status levels to filter the list of all notifications.
2
Select Mine by itself or in combination with other filters to see those notices or alerts assigned
to you.
3
As illustrated here, the current selection is to show Active notices. Active is the default filter.
4
Select to see notices about changes in the system that do not impact a resource’s health status.
Lifecycle notices are filtered out of the Activity list by default to keep the list a reasonable size.
Active counts do not include lifecycle notices in the count.
5
Restore the filters to the original setting (Active).
6
The default date setting to see all notices stored in the database for selected filters.
7
Use this selection to bring up the date range selection fields and a calendar to define an
extended time period.
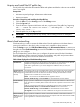
Filter the Activity list
Filter activities to limit the number or type of notifications displayed in the Activity panel.
Prerequisites
• Minimum required privileges: Infrastructure Administrator
Procedure 3 Filtering the Activity list
1. From the main menu, navigate to the Activity screen.
2. Use the Filters menu bar or the Filters banner to select one or more attributes to display in this
view. See also “About Activity notifications” (page 14).
3. Use the Date selector to limit the data display to the day or date range you specify.
About Activity notifications 15