
HP LP2065 20" and HP LP2465 24" LCD Monitors User Guide - Accessibility Enhanced
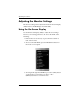
Table Of Contents
- Contents
- Product Features
- Safety and Maintenance Guidelines
- Setting Up the Monitor
- Operating the Monitor
- Troubleshooting
- Technical Specifications
- Agency Regulatory Notices
- Federal Communications Commission Notice
- Declaration of Conformity for Products Marked with the FCC Logo (United States Only)
- Materials Disposal
- Canadian Notice
- Avis Canadien
- European Union Regulatory Notice
- Disposal of Waste Equipment by Users in Private Household in the European Union
- Japanese Notice
- Korean Notice
- Power Cord Set Requirements
- LCD Monitor Quality and Pixel Policy

Operating the Monitor
To use the auto-adjustment feature:
1. Allow the monitor to warm up for 20 minutes before
adjusting.
2. Press the -/Auto button on the monitor front panel.
❏ You can also press the Menu/Select button, then select
Auto-Adjustment from the OSD Main Menu. Refer to
“Adjusting Monitor Settings” in this chapter.
❏ If the result is not satisfactory, continue with the
procedure.
3. Insert the CD in your disc drive. The CD menu launches.
4. Select Open Auto-Adjustment Software. The setup test
pattern displays.
5. Press the -/Auto button on the monitor front panel to produce
a stable, centered image.
6. Press the ESC key or any other key on your keyboard to exit
the test pattern.
4–4 User Guide