
HP LP2065 20" and HP LP2465 24" LCD Monitors User Guide - Accessibility Enhanced
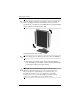
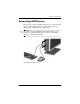
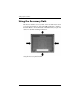
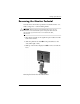
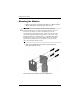
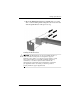
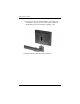

Table Of Contents
- Contents
- Product Features
- Safety and Maintenance Guidelines
- Setting Up the Monitor
- Operating the Monitor
- Troubleshooting
- Technical Specifications
- Agency Regulatory Notices
- Federal Communications Commission Notice
- Declaration of Conformity for Products Marked with the FCC Logo (United States Only)
- Materials Disposal
- Canadian Notice
- Avis Canadien
- European Union Regulatory Notice
- Disposal of Waste Equipment by Users in Private Household in the European Union
- Japanese Notice
- Korean Notice
- Power Cord Set Requirements
- LCD Monitor Quality and Pixel Policy

Setting Up the Monitor
Mounting the Monitor
1. Remove the monitor pedestal base. Refer to “Removing the
Monitor Pedestal” steps in the previous section.
Ä
CAUTION: This monitor supports the VESA industry standard
100mm mounting holes. To attach a third party mounting solution to
the monitor, four 4mm, 0.7 pitch, and 10mm long screws are
required (not provided with the monitor). Longer screws should not be
used because they may damage the monitor. It is important to verify
that the manufacturer’s mounting solution is compliant with the VESA
standard and is rated to support the weight of the monitor display
panel. For best performance, it is important to use the power and
video cable provided with the monitor.
2. Remove the Quick Release from the pedestal base by
removing the four screws.
Removing the Quick Release from the Pedestal Base
3–14 User Guide