
Installing SUSE LINUX Enterprise Server 9 on the Intel Itanium 2 Processor Family

• NIS — user accounts are managed centrally by a NIS server
• LDAP — user accounts are managed centrally by an LDAP server
• Locally (/etc/passwd) — for systems in which user accounts are managed using a local passwords
file.
For details about these options, see the SUSE LINUX documentation from Novell
Click on Next.
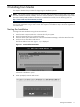
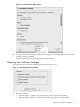
Setting Local Accounts
A dialog is displayed in which you can set up local user accounts. To create user accounts, fill in the fields
for full user name, login name, and passwords. You can also choose two other options for individual users:
• Receive System Messages via E-Mail
• Automatic Login
When finished adding user accounts, click Next. The system confirms that it is writing the system configuration
to disk.
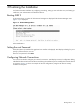
Checking Release Notes
YaST displays SUSE LINUX release notes. After reading the notes, click Next.
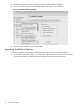
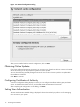
Configuring Hardware
YaST opens a Hardware Configuration dialog, in which all devices it has found, such as graphics cards,
printers, and sound cards, are identified.
If you want to change any of these device settings, click on the Change pulldown box and choose the device
to be modified. You do not have to configure all devices at this time; they can be configured later. However,
you should ensure that your graphics card is configured properly.
When satisfied with the hardware configuration, click on Next.
Completing the Installation
After YaST writes the configuration data to disk, a dialog is displayed asking you to verify that you want to
finish the installation. If so, click on Finish.
At this point, the SLES installation is complete. The graphical login screen will be displayed.
Setting Local Accounts 17